For example, say if I want to order some food to go alongside the TV show I’m about to binge for 8 hours? Ordering food is usually a quick and simple task, but being able to do this from our TV simplifies the process of doing so.
No fast-food delivery companies have decided to make the move onto TV yet, so to have a rough idea of what this would look like I decided to open up Sketch and use it for my sketchpad of thought. For a few hours I played around with some ideas and constructed a quick concept in order to see its potential.

Throughout this concept we’ll not only be looking at the screens themselves, but we’ll take a quick look at both design and development implications that may arise, alongside some best practices that we should follow when designing applications for the TV.
Android TV & Chill
Let’s set the scene a little. So I’m sitting there watching a bunch of episodes of my favourite TV show on Netflix (The Walking Dead, just incase you didn’t know). I open Netflix and continue watching the latest episode that my girlfriend and I are currently watching (we’re at season 4 now, things are really kicking off).

All is good and well until we start to get a little hungry for some pizza 🍕. If I have to get up and cook a pizza, that’s going to involve me moving away from what I’m watching. Not such a huge deal, but for me as a user being able to do this on the device I’m already using would make me a bit happier.
Luckily for me I have the Dominos App installed on my Android TV device – phew, that was a close one! And thanks to Android N, we can now support Picture-in-Picture mode – as shown by the little icon in the controls bar (known as the PlaybackOverlayFragment), so I can continue watching my TV show through the whole process of ordering my food 🙌

In the control bar I can click the Picture-in-Picture icon to enter Picture-in-Picture mode, let’s click that button and get some food.

So you’ll see here that what I’m currently watching has entered this Picture-In-Picture mode, this is where the system minimises your current activity into a small-sized window in the corner of the screen. This awesome new feature is available as of Android-N and is great because it means our users are not disrupted from consuming content when they wish to carry out other actions on the device.
Note: The system decides which corner of the screen the Picture-In-Picture window is displayed, so it’s important to take this into consideration when designing your screens layout. Be sure to make sure no important content or buttons could be obstructed by a Picture-In-Picture window being present. You can read more about supporting Picture-in-Picture here.
In my case, the home screen of my Android TV is displayed when I enter Picture-in-Picture mode. You’ll see in the screenshot above I’ve located the Dominos app on my home screen, so we can go ahead and open the app 😄

So now I’ve now opened the Dominos app, I’m greeted by a categorised menu. For this menu I’ve used icons as well as text, not only does this add little visual niceties to the menu, but it also allows me to quickly glance at the menu and reduce the need to read the text being displayed.
Notice that the Picture-In-Picture window is still being shown, so I can continue watching my episode of The Walking Dead whilst I browse for my food! From this screen I can easily access my basket or browse through the categories of the dominos menu.
Note: This screen is making use of the BrowseFragment provided by the leanback library. You can learn more about creating a catalogue browser here.
At this point whilst I navigate through the category titles, I’m simply shown images of the food in each of the rows – we want to keep the experience of our TV app as visual as possible and this means I can quickly glance at the items without the need to read a text-based menu like I would do on my mobile device.
Remember, the experience we’re designing for is very different than that of a mobile environment. We’re used to seeing imagery and video on our TV sets, so conveying our message to the user visually is extremely important in a TV environment.
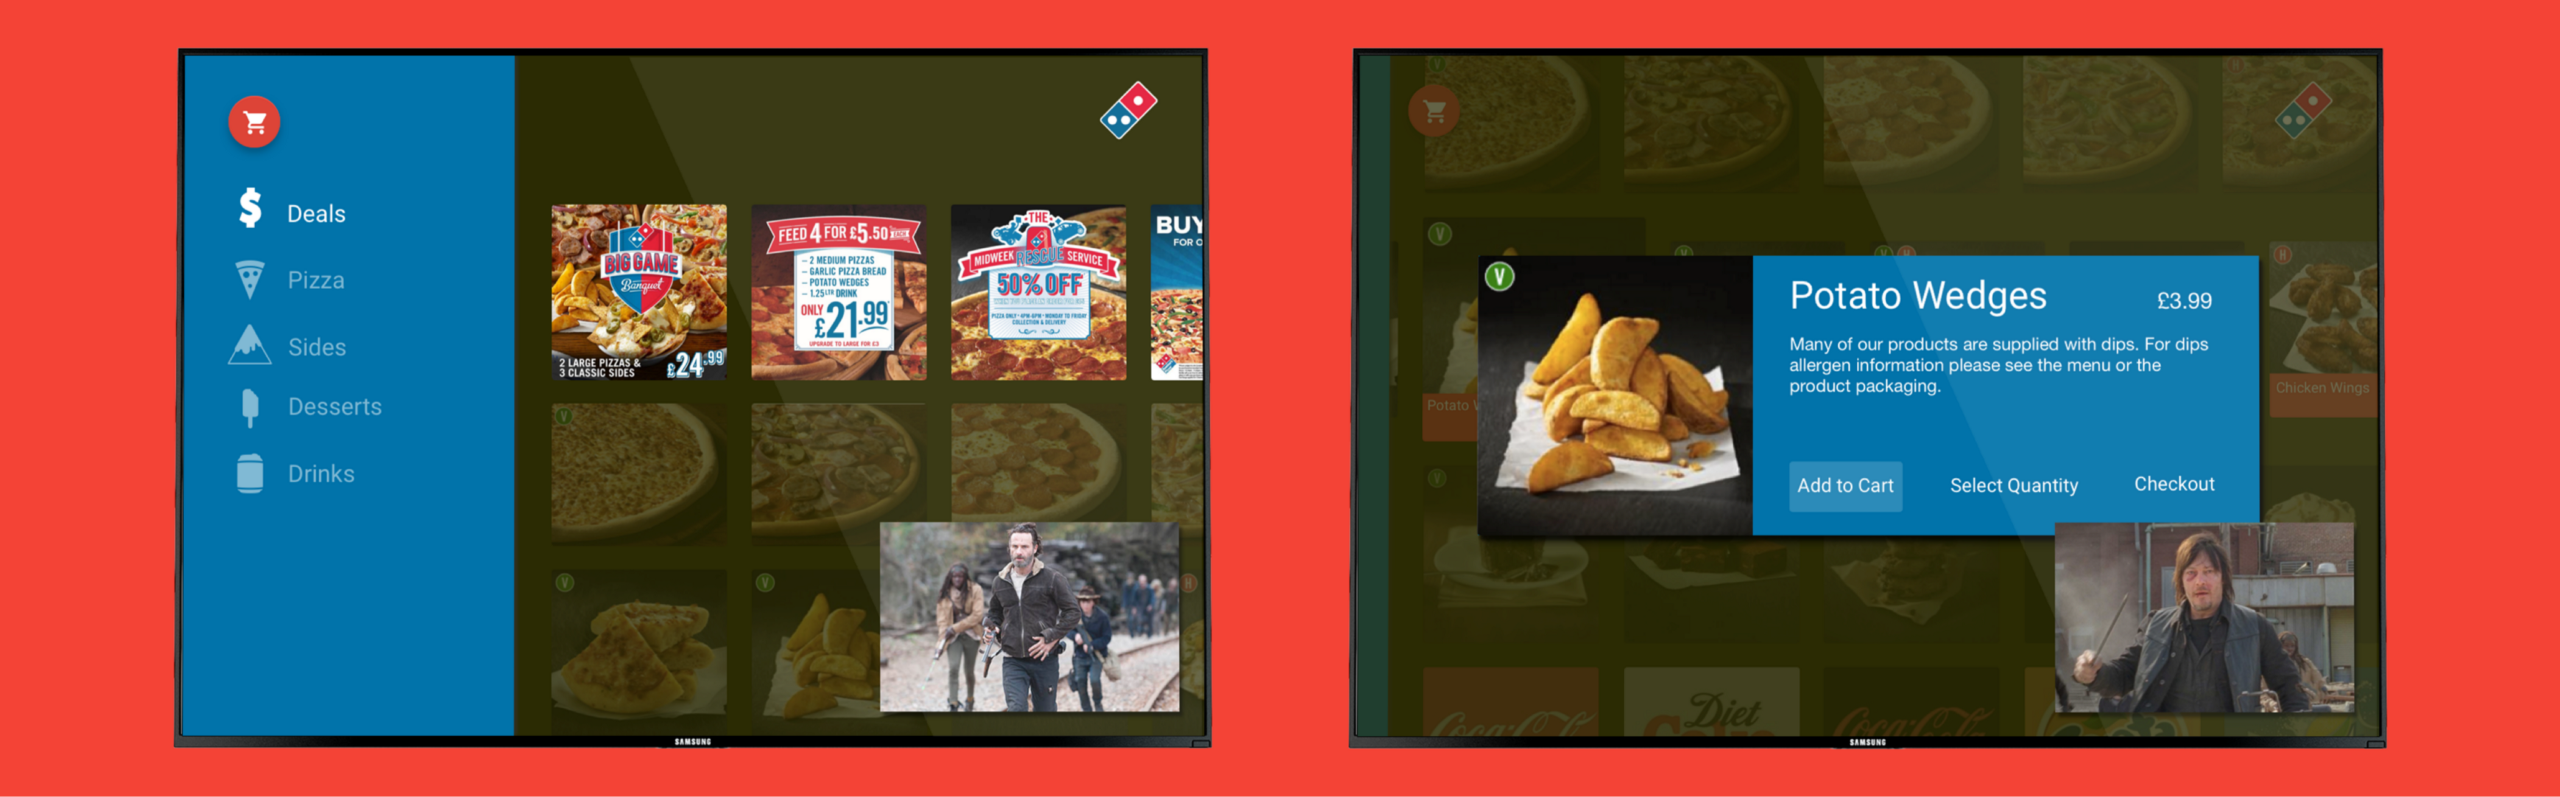
Now I’m going to navigate into a category so I can see a little bit more information for the food items. I want to check out the deals that are currently on, so I navigate into the ‘Deals’ category.

Here I’ve entered the ‘Deals’ category. You’ll see now that each of the items displayed in this row now show me a simply title, along with a price if one is available. We also have the option of showing a second row of text on each of the item cards, but again this should only be used if it is required. If our image conveys our message, we can reduce the amount of text that we’re showing to the user.
Again, the user can still easily access their basket from the icon at top of the screen. Even though the categories menu has collapsed, the basket icon is still in view – this is handled automatically by the BrowseFragment.
Ok so to begin with, we fancy some potato wedges 😍. At this point, we navigate to the ‘Sides’ category – as we’re using the BrowseFragment, we can easily move between category rows without the need to go back and select a category from the menu. We’ve reached the potato wedges, let’s hit the select button on our remote.

After selecting the potato wedges, I’m displayed a custom overlay view to display the item details and actions. Within this view, I’m shown a clear image of the item along with any information that should be displayed regarding the item itself.
Note: Here, you could use a DetailFragment. This allows us to easily show details regarding a selected item to the user, you can find more information about implementing this here.
Alongside the item information, there are several actions which I can carry out at this point. These are:
- Add to Cart — This action will add the item to my shopping basket.
- Select Quantity — This action will allow the user to select a quantity of the item to be set. The best way of allowing this would be to use a GuidedStepFragment.
- Checkout — This action allows the user to navigate to the Checkout, which they may wish to do so once they’ve added an item to their basket.
You’ll notice here that by default the ‘Add to Cart’ action is selected. This is for a couple of reasons:
- On Android TV there is no cursor, so you should ensure that there is always an item in focus. This allows the user to quickly and easily recognise where they currently are on screen.
- If a user has clicked on an item, it’s likely they’re going to add it to their basket. So rather than them have to navigate to this action, pre-selected it makes it easier for them. If they do not wish to add the item to their cart, then they can simply click the back button.
Note: As previously mentioned, the system decides which corner of the screen the Picture-in-Picture window is displayed. Because of this, it’s important to ensure that no important content or controls will be obstructed by the use of a Picture-in-Picture window.
Right, so we’ve found all our items we wish to order and have added them to our basket. We’re both getting pretty hungry now, so let’s navigate to the basket and double check that we’ve got everything we need!

Here we have a simple screen showing a grid of items that we’ve added to our basket. To implement something similar, you could use the VerticalGridFragment provided by the leanback library – this works in a similar way to the BrowseFragment, except our items are displayed as a single grid rather than rows. Again, all of our items are showing easily glanceable details in the form of a title, price and description if available.
Now that Android Pay has come to the UK, we’re able to pay for our order quickly and easily using the ‘Buy with Android Pay’ button. We won’t go into the details of Android Pay here, but if you wish to know more about ‘Buy with Android Pay’, check out my article here. Essentially, Android Pay allows us to carry out streamlined payments within our applications – if already set up, then this saves the user having to enter card and address details, which would be a pain to do so on a TV device.
Note: Ideally we’d support other payment methods, but for the case of this concept I’ve stuck to Android Pay just to keep things simple.
If the user selects an item then we could simply show them the detail overlay view that we previously looked at – this would allow them to check the details of the item and so on. I haven’t created a design for this, but it would be of a similar nature as found when selected an item on the Browse screen.
You’ll notice on the currently focused item I’ve placed an X, this simply allows the user to remove the item from their basket. We could listen for a long-press on an item or place an action inside the detail overlay when the item is selected from within the basket. This could be triggered from either event and allows the user to easily remove the item from their basket. Using a GuidedStepFragment, we can present a couple of options for the user when it comes to removing an item from their Basket.

At this point the user can select one of the two steps meaning they can:
- Clicking Yes to remove the item from their basket. The GuidedStepFragment will close and the basket will be updated to reflect the changes.
- Clicking No to return to the basket without making any changes, this is the same as pressing the back button on the Android TV remote. The basket will be displayed on the screen unchanged.
We’ve decided not to remove the potato wedges from our basket (that would be crazy!), so instead we’ve clicked the ‘Buy with Android Pay’ button in order to pay for our items. Clicking this then takes us to the ‘Confirm Order’ screen.

Because we’re using the Android Pay API and I’ve previously setup my Android Pay details, my default payment type and shipping address are automatically setup for me – how easy was that! Using the little pencil icons on each of the detail cards I have the ability to change my selected options if desired. You’ll notice the cart button is also displayed at the top of the screen at this point, allowing the user to open up the Basket activity to make any changes before finalising their order.
Note: On TV we still have access to location services. So to reduce the input required by the user, for address input be sure to make use of the TV location services to suggest a located if address input is required.
You’ll notice at this point the Picture-in-Picture window is still being displayed, this is great! I’ve done all my shopping and am ready to pay without having missed one bit of my show! Let’s go ahead and confirm that order 💪

It’s done! Here I’m returned to the home screen of the Dominos app and shown a short message to let me know that my order was successful.
At this point I can now return to watching my programme in full screen. The user can exit Picture-in-Picture mode by simply focusing on the Picture-in-Picture window and selecting it using the select button – this will cause the window to return to full screen mode.
Now I’m watching my programme back in full screen, it’d be great to be kept up-to-date with the progress of my order (without having to return to the app) – hooray for push notifications 🙇

Using push notifications, we can easily update the user about specific information. In the case of this app, Dominos are letting me know about each step of my order. Here in the screenshot above I’m being made aware that my order has left the kitchen and is ready for delivery, this is a great way of notifying the user without distracting them from their current activity too much.
And that’s it!
Whilst more thinking needs to go into both the UX and UI design of a food ordering application, I’ve thought about some basic design principles and technical approach when it comes to building such an application – I’ve found from this that it would be possible to do such a thing.
You can see from the entire process that I was able to go from watching my TV show in full screen, to ordering food whilst still watching my TV show, and returning to watching it in full screen without pausing my viewing experience.
I’m not sure if this would work for every single product type. For example, I myself would be happy buying train tickets quickly or even clothes whilst I’m watching TV but it’s probably fair to say that not every use-case would work well. However, there are definitely some sectors in the market that could benefit from TV based revenue.
I’m pretty hungry now from writing this, so I’m sorry if you are too…
What do you think? Would you order fast-food or products from your TV? Why not drop me a tweet or leave a response below!
Check out my other projects at hitherejoe.com