What is the Google Awareness API?
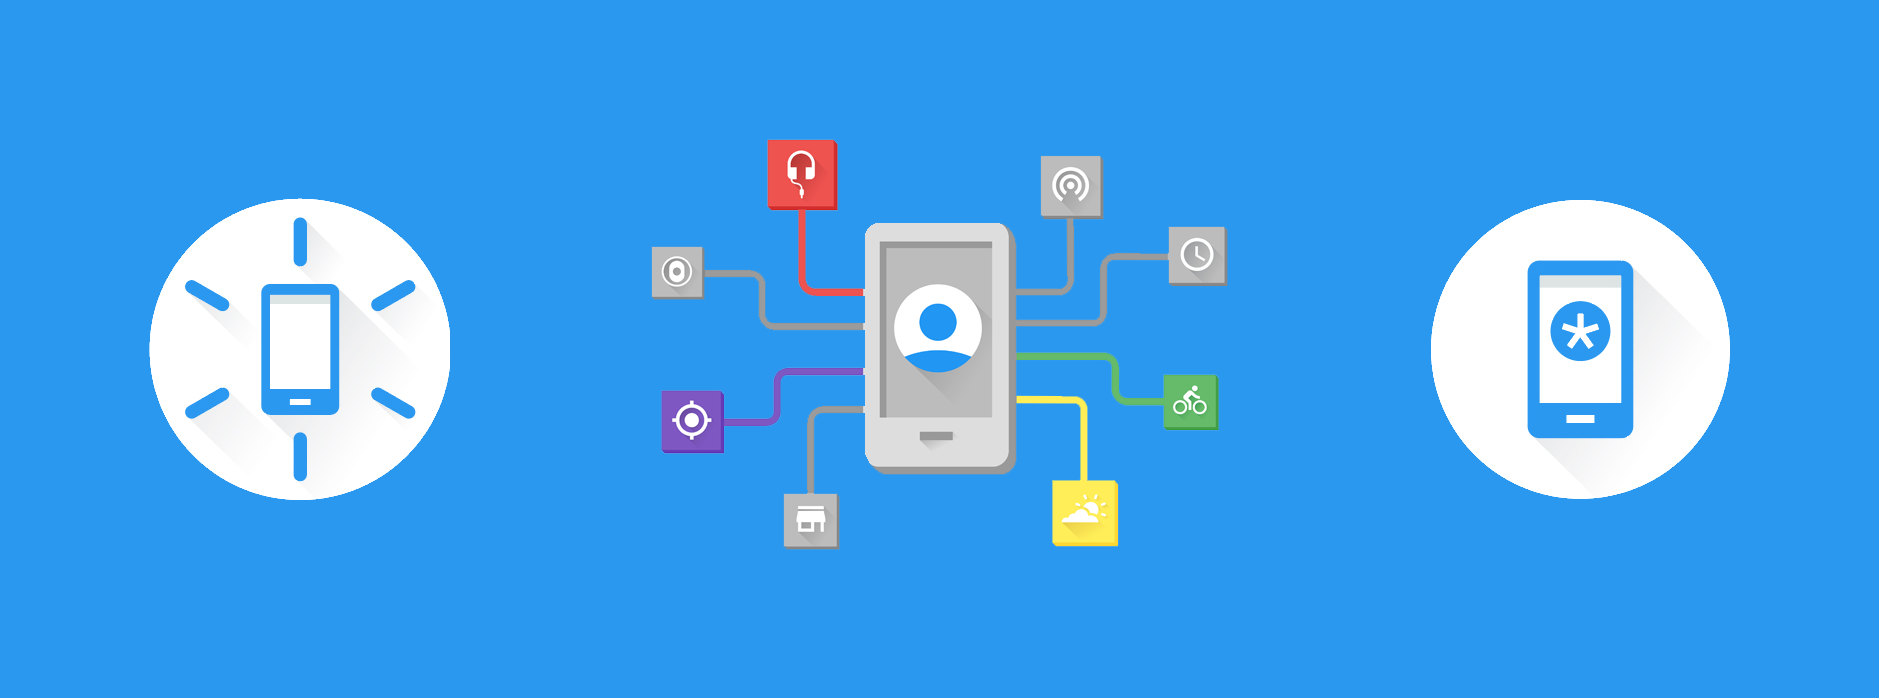
The Google Awareness API provides us with a collection of both contextual and location based signals, allowing us to create personalised, customised and dynamic experiences for our users. We can listen for state changes from sources such as:
- Location
- Time
- Beacons
- Weather
- User Activity
- Weather
And whilst doing so, the API collates data from multiple sources to ensure that the data provided is both accurate and of a high quality. It also takes into account both the power and memory consumption when accessing these signals – helping to ensure that the battery life and memory usage of our applications do not have a detrimental effect on the users device.
In order to access these signals we have two different parts of the API that we can use:
- Snapshot API – This allows us to retrieve information regarding the users current environment, we have access to 7 different signals to do so
- Fence API – This allows us to register for changes in the users current environment. We can combine contextual signals in order to listen for changes in multiple environment variables, receiving a callback from the API when change conditions occur
In order to understand the Awareness API better, I created a sample playground app which Iv’ve open-sourced on GitHub for anyone that wishes to play around with the API themselves 🙂

Setting up the Google API Client
You’ll need to do a little bit of setup before you can use the Awareness API, which I don’t want to spend too much time on in this article as it’s a little out of scope! You can follow this guide here from the official documentation on how to obtain an API key from the Google API console.
Once you have your key you can add it to your manifest like so:
<application>
  <meta-data
      android:name="com.google.android.awareness.API_KEY"
      android:value="YOUR_API_KEY"/>
</application>
And after adding any required permissions to your manifest, you can go ahead and start using the API in your application. You’ll need to use the GoogleApiClient wherever you wish to access the Awareness API, which you can do like so in your activities / fragments:
mGoogleApiClient = new GoogleApiClient.Builder(this)
        .addApi(Awareness.API)
        .build();
mGoogleApiClient.connect();
Snapshot API
We’re going to begin by taking a look at the Snapshot API. As previously mentioned, this allows us to retrieve information regarding the users current environment. And what’s great about the Snapshot API is that the system will cache any results for us, meaning they can be returned both quickly and efficiently. Using this API we can retrieve data such as:
- The current activity that the user is engaging in, such as walking, running or driving
- Any nearby beacons that we have registered to
- Whether the user currently has their headphones plugged in or unplugged
- The Place which the user is currently located in
- The weather conditions based on where the user is currently located
- The users current location
Let’s take a little look at these different kinds of data that we can retrieve from the Snapshot API.
Headphones
Using the Snapshot API we can detect whether the user currently has their headphones connected or unplugged. Some simple use cases could be found in:
- A music app that wishes to show a notification to allow quick access to their app when the user connects their headphones 🎧
- A fitness app that may wish to change the audio output of the application (such as distance / pace when running when the headphones are plugged in) 🏃


To get the headphone state from the Snapshot API we simply need to call the getHeadphoneState() method — this will return us and instance of the HeadphoneStateResult class that if successful, will contain information about the devices current headphone state.
Again, we must use the getStatus() method to check if our request was successful. If so, then we can continue on to call the getHeadphoneState() method to retrieve the HeadphoneStateResult instance we’re after. This HeadphoneState object contains the current state of the devices headphone connection. In my sample app, I retrieve this state like so:
https://gist.github.com/hitherejoe/db8b807da531c943fdc8d0078557b85e
Once completed, we can then retrieve the current state by calling:
headphoneState.getState();
This will return us a headphone state that we can use to determine whether the headphones are connected or not. The HeadphoneState class that we have retrieved has two states for the users headphone state, this will be one of either:
int PLUGGED_IN = 1;
int UNPLUGGED = 2;
Note: If the retrieval of the state is not successful, then be sure to handle this state correctly in your application. If your UI is currently showing, then give the user the chance to check again.
Weather
We can also use the Snapshot API to detect the weather conditions of where the user is currently located. Some simple use cases could be found in:
- A music app where we use the current weather to suggest a summer playlist if it’s nice and sunny outside ☀️
- A fitness app where we prompt the user that the weather outside is great for running in 🏃
To get the weather from the Snapshot API we simply need to call the getWeather() method – this will return us and instance of the WeatherResult class that if successful, will contain information about the users current locations weather.
Again, we must use the getStatus() method to check if our request was successful. If so, then we can continue on to call the getWeather() method to retrieve the WeatherResult instance we’re after.
Note: The getWeather() method requires the android.permission.ACCESS_FINE_LOCATION permission, don’t forget to add it to your manifest file.
Calling getWeather() on the WeatherResult class will return us a Weather object. This Weather object contains various pieces of useful data regarding the weather conditions at the users current location. In my sample app, this looks like below:
https://gist.github.com/hitherejoe/1e45bb5c1411e2f1196e5050621aa7a9
Now we have this weatherResult instance, we can begin using our user’s weather data. To begin with, we can retrieve an array of weather conditions based on the users current locations by calling:
weather.getConditions();
The results contained in this array can be any of:
int CONDITION_UNKNOWN = 0;
int CONDITION_CLEAR = 1;
int CONDITION_CLOUDY = 2;
int CONDITION_FOGGY = 3;
int CONDITION_HAZY = 4;
int CONDITION_ICY = 5;
int CONDITION_RAINY = 6;
int CONDITION_SNOWY = 7;
int CONDITION_STORMY = 8;
int CONDITION_WINDY = 9;
For example, if it’s currently snowing and icy where I currently am, then my getConditions() would return an array containing CONDITION_SNOWY and CONDITION_ICY.
We can also retrieve the current humidity at the users location by calling the getHumidity() method. This simply returns an integer value representing the current percentage of the humidity at the location (between 0% and 100%).
There are several other methods in the Weather class that allow us to get the temperate, feels like temperature and dew point of the users current location. However, all of these require us to pass in the unit in which we wish to retrieve the result back us. We can reference these variables statically from the Weather class and the unit can be either:
int FAHRENHEIT = 1;
int CELSIUS = 2;
So if we wish to retrieve the temperature of the users current location as a float value, then we can do this like so:
getTemperature(Weather.CELSIUS)
Or if we wish to retrieve the ‘feels like’ temperature of the users current location as a float value, then we can do this like so:
getFeelsLikeTemperature(Weather.FAHRENHEIT)
And finally, retrieving the dew point of the users current location can be done like this:
getDewPoint(Weather.CELSIUS)
Location
We can also use the Snapshot API to detect the location of where the user currently is. Some simple use cases could be found in:
- A coffee shop app where we let the user know they’re nearby one of our stores ☕️
- A fitness app where we prompt the user that the weather outside is great for running in ☀️

To get the location from the Snapshot API we simply need to call the getLocation() method — this will return us and instance of the LocationResult class that if successful, will contain information about the users current location.
Again, we must use the getStatus() method to check if our request was successful. If so, then we can continue on to call the getLocation() method to retrieve the Location instance that we’re after.
Note: The getLocation() method requires the android.permission.ACCESS_FINE_LOCATION permission, so don’t forget to add it to your manifest file and check for it at runtime when required.
Calling getLocation() on the LocationResult class will return us a Location object. This Location object contains various pieces of useful data regarding the the users current location. In my sample app, retrieving this looks like below:
https://gist.github.com/hitherejoe/e06924e01374338f3127060b88b37f25
Now we have this LocationResult instance, we can begin using our user’s location data. First, we can retrieve an instance of the Location class from our LocationResult by calling:
locationResult.getLocation()
From this Location instance we can retrieve numerous pieces of information regarding the users location. For example:
- getLatitude() — Get the latitude of the users current location
- getLongitude() — Get the longitude of the users current location
- getAltitude() — Get the altitude of the users current location
- getAccuracy() — Get the accuracy of the retrieved location data
The Location object is a standard class from the android framework, so check out the documentation for all of the methods available.
User Activity
We can also use the Snapshot API to detect the current activity that the user is currently engaging in. Some simple use cases could be found in:
- A fitness app where we wish to detect when the user has stopped running so we can automatically pause their activity 🚶
- A news app where we wish to detect when the user is stationary and provide them with something to read during this time 📰

To get the current activity from the Snapshot API we simply need to call the getDetectedActivity() method — this will return us an instance of the DetectedActivityResult class that if successful, will contain information about the users current location.
Again, we must use the getStatus() method to check if our request was successful. If so, then we can continue on to call the getActivityRecognitionResult() method to retrieve the ActivityRecognitionResult instance that we’re after.
Calling getActivityRecognitionResult() on the DetectedActivityResult class will return us a ActivityRecognitionResult object. This ActivityRecognitionResult object contains various pieces of useful data regarding the the users current activity. In my sample app, retrieving this looks like below:
https://gist.github.com/hitherejoe/cf9b9010d4e6198b33ac9e3fa64ad2da
Now we have the ActivityRecognitionResult instance, we can go ahead and retrieve information regarding the users current activity. When we retrieve the DetectedActivity instance, it has two properties that we can fetch:
- Activity type — We can use the getType() method to retrieve the activity type, these can be one of:
public static final int IN_VEHICLE = 0;
public static final int ON_BICYCLE = 1;
public static final int ON_FOOT = 2;
public static final int STILL = 3;
public static final int UNKNOWN = 4;
public static final int TILTING = 5;
public static final int WALKING = 7;
public static final int RUNNING = 8;
- Activity confidence — Retrieved using the getConfidence() method, This is the likelihood that the user is currently engaged in this activity, with a value between 0 and 100.
To begin with, we can get the most probable activity that the user may be engaging in from the ActivityRecognitionResult instance by calling:
activityRecognitionResult.getMostProbableActivity();
The getMostProbableActivity() method will return us a single instance of a DetectedActivity, being the activity which the user is most likely to be currently doing.
We can also get a list of likely activities that the user may be engaged in, then we can call:
activityRecognitionResult.getProbableActivities()
The getProbableActivities() method returns a sorted (by most likely) list of DetectedActivity instances that the user is likely to be currently engaged in.
We can check the confidence that the user is currently engaging in one these activities by calling the getActivityConfidence() method, passing in the activity type as a parameter:
activityRecognitionResult(int activityType)
For example, I could call:
activityRecognitionResult(DetectedActivity.WALKING)
This would then return me an integer value (between 0 and 100) of the likeliness that the user is currently walking.
The timing of these activities can be pretty important to know too, which is why we have the following methods to call from the ActivityRecognitionResult class:
- getTime() — This returns the time in milliseconds in which the activity was detected
- getElapsedRealtimeMillis() — This returns the real time in which the user has been engaged in the current activity
Places
We can also use the Snapshot API to detect Place instances based on the users current location. Some simple use cases could be found in:
- A coffee shop app where we can let the user know they’re nearby one of our stores ☕️
- A fitness app where we can prompt the user that the weather outside is great for running in 🏃

To get the nearby places from the Snapshot API we simply need to call the getPlaces() method — this will return us and instance of the PlacesResult class that if successful, will contain information about nearby places based on the users current location.
Again, we must use the getStatus() method to check if our request was successful. If so, then we can continue on to call the getPlaces() method to retrieve the list of PlaceLikelihood instances that we’re after.
Note: The getPlaces() method requires the android.permission.ACCESS_FINE_LOCATION permission, so don’t forget to add it to your manifest file and check for it at runtime when required.
Calling getPlaces() on the PlacesResult class will return us a list of PlaceLikelihood objects. Each of these Place objects contains various pieces of useful data regarding a Place that is near to the user. In my sample app, retrieving this list looks like below:
https://gist.github.com/hitherejoe/33606d2013c491ec241dd7d05d6c6ab1
Now we have this PlacesResult instance, we can begin using these nearby places within our application. First, we can retrieve this list of likely places from the PlacesResult instance like so:
placesResult.getPlaceLikelihoods();
From this, we’ll receive a list of PlaceLikelihood instances. This object contains two methods:
- getLikelihood() — Retrieve the float value representing the likelihood that the device is at the current Place
- getPlace() — Retrieve the Place associated with the PlaceLikelihood value
The Place instance contains various information regarding the place. It was available before the Awareness API and allows us to retrieve information such as the name of the place, the location of the place and much more. Check out the full documentation for more information.
Beacons
We can also use the Snapshot API to detect registered beacons that our user has come into range with. Why would we want to do this? Well, we may want to detect that our user has entered our store or is nearby a place of interest. Knowing this information will allow us to notify them of such an event, some simple use cases could be found in:
- Checking the user into our store once they have entered the beacons range, this way the employees will be aware of their presence 🏦
- Detecting a nearby point-of-interest, notifying the user or it’s presence 🍔

To get any nearby registered beacons from the Snapshot API we simply need to call the getBeaconState() method — this will return us and instance of the BeaconStateResult class that if successful, will contain information about nearby registered beacons that the user is in range with.
Again, we must use the getStatus() method to check if our request was successful. If so, then we can continue on to call the getBeaconState() method to retrieve the list of BeaconInfo instances that we’re after.
Note: The getBeaconState() method requires the android.permission.ACCESS_FINE_LOCATION permission, so don’t forget to add it to your manifest file and check for it at runtime when required.
Calling getBeaconState() on our BeaconStateResult instance will return us a list of nearby registered beacons, this will return us a list of BeaconInfo instances which contains:
- The type of the beacon attachment, retrieved by calling the getType() method
- The namespace of the bacon attachment, retrieved by calling the getNamespace() method
- The Content of the beacon attachment, retrieved by calling the getContent() method – this can be null if no content exists
In my sample app, I retrieve these BeaconInfo instances like so:
https://gist.github.com/hitherejoe/6c84a7d6d2fac77f2e5b0a51ac3b379c
Now we have the BeaconStateResult instance, we can now check if there’s any registered beacons near to our user. We do this by calling:
beaconStateResult.getBeaconState()
This will return us an instance of the BeaconState class. This class contains a list of BeaconInfo instances which can be fetched by calling:
beaconState.getBeaconInfo()
This method will then return us a list of BeaconInfo instances matching the TypeFilter that was previously used. We can then use these results to react accordingly with the nearby beacons and their content.
Fence API
Similar to Geofencing, the awareness API allows us to creates fences to listen for when users enter or leave a current region of activities and / or events. One of the great things about the fence API is the ability to listen for contextual changes, for example a fence for user activity could detect when the user begins running and then when they transition to walking. So in terms of contextual signals we could create a fence for:
- The users current location, such as their latitude and longitude coordinates
- The users current activity, such as walking / running / driving etc
- Headphone state, such as when the user connects and disconnects their headphones
- Proximity to any nearby beacons, such as the user entering and exiting a beacon zone
- Time of day events, such as it being 5 o’clock on Friday 🍻
We can also listen for multiple contextual signals with the use of AND, OR and NOT operators. For example we could listen for when:
- The user is running and plugs their headphones in
- The user enters a zone of beacons at 4 p.m on a Friday
- The user is driving and approaching a specific location
- The user plugs their headphones in the evening at bed time
As you can see, the possibilities are endless, the fence API really allows us to listen for contextual changes in the users activities and surroundings. So with that in mind, let’s look at how we can utilise this API 💪
Listening for Fence changes
There’s several parts which are the same for registering any type of fence. To begin with, for each fence we must use a BroadcastReceiver to listen for fence events, in my sample app I create a listener like so:
https://gist.github.com/hitherejoe/aab83c0d5695de1528b0b9288b0826c0
This listener will receive any callbacks related to our fences that we have registered. So for example, if I register a headphone fence:
- The receiver checks the FENCE_KEY matches the FENCE_KEY declared when I register my fence (we’ll look at that in a minute)
- Then we check the state of the fence. If the state is TRUE then this means the fence has been entered. So in the case of headphones, this would mean that the headphones are plugged in.
- If the fence state is FALSE, then the headphones are not currently plugged in. an UNKNOWN state means that something has gone wrong and we’re unaware of the state.
Now we have our receiver, we must create a new instance of it and use that to create a new PendingIntent – this is the intent that will be launched when our fence triggers a callback.
https://gist.github.com/hitherejoe/8c2fdda90a2d71a3877df4457d3d042f
Now it’s time to register our fence using this intent that we’ve created. There’s a few things that we need to declare, as seen in the code below:
https://gist.github.com/hitherejoe/eb090a7a8c444da40a17317524e255b0
We use the addFence() method to register a fence, we can chain multiple calls to the addFence() method here if we wish to register multiple fences. When calling this method we must pass in:
- FENCE_KEY – This is a string key value that is used in our receiver so that we can react accordingly to the correct fence. If using multiple fences, then this is where you can use different keys to handle events individually
- yourFence – This is the fence that you have created and wish to register to, for example if a headphone fence would look like this:
AwarenessFence yourFence = HeadphoneFence.during(HeadphoneState.PLUGGED_IN);
- mPendingIntent – This is the intent which we wish to be triggered when fence events occur, in this case our BroadcastReceiver will receive any triggered events
We must also remember to remove any fence when we’re done with them. We can do this by calling the removeFence() method and using the registered fences FENCE_KEY’s to do so:
https://gist.github.com/hitherejoe/eb090a7a8c444da40a17317524e255b0
As well as unregistering fences, don’t forget to unregister your receiver when it is no longer needed!
https://gist.github.com/hitherejoe/18af48ce568d23a8ad9759f84d838bdb
Now we now how to register and unregister for fences, as well as receive events on them, let’s take a look at the different fences that we can create:
Headphone Fence
We can create a headphone fence to listen for changes in the headphone connectivity in the users device, allowing us to detect when the user plugs in or unplugs their headphones. This can be created like so:
AwarenessFence headphonesPluggedInFence = HeadphoneFence.during(HeadphoneState.PLUGGED_IN);
AwarenessFence headphonesUnpluggedFence = HeadphoneFence.during(HeadphoneState.UNPLUGGED);

Location Fence
We can create a location fence in order to detect when the user is entering, exiting or is in a specified location. All this requires is the latitude, longitude and radius of the location that you wish to monitor, we can create these fences like so:
AwarenessFence inLocationFence = LocationFence.in(
50.830951, -0.146978, 200, 1);
AwarenessFence exitingLocationFence = LocationFence.exiting(
50.830951, -0.146978, 200);
AwarenessFence enteringLocationFence = LocationFence.entering(
50.830951, -0.146978, 200);

Detected Activity Fence
We can create a fence to listen for when the user is engaged in an activity, as well as when they’re starting and stopping it. We can use any of the DetectedActivity types and create fences for them like so:
AwarenessFence headphoneFence = DetectedActivityFence.during(DetectedActivity.WALKING);
AwarenessFence startWalking = DetectedActivityFence.starting(DetectedActivity.WALKING);
AwarenessFence stopWalkingFence = DetectedActivityFence.stopping(DetectedActivity.WALKING);

Time Fence
We can create a fence to listen for specific time periods to occur. Whether we wish to listen for daily intervals or an interval on a specific day, we can create fences like so:
AwarenessFence fence = TimeFence.inInterval(startTime, endTime);
AwarenessFence dailyFence = TimeFence.inDailyInterval(
                                      timeZone, startTime, endTime);
AwarenessFence mondayFence = TimeFence.inMondayInterval(
                                      timeZone, startTime, endTime);
AwarenessFence tuesdayFence = TimeFence.inTuesdayInterval(
                                      timeZone, startTime, endTime);
AwarenessFence wednesdayFence = TimeFence.inWednesdayInterval(
                                      timeZone, startTime, endTime);
AwarenessFence thursdayFence = TimeFence.inThursdayInterval(
                                      timeZone, startTime, endTime);
AwarenessFence fridayFence = TimeFence.inFridayInterval(
                                      timeZone, startTime, endTime);
AwarenessFence saturdayFence = TimeFence.inSaturdayInterval(
                                      timeZone, startTime, endTime);
AwarenessFence sundayFence = TimeFence.inSundayInterval(
                                      timeZone, startTime, endTime);

Beacon Fence
We can create a fence to listen for when we both find and lose beacons that we have registered to. We can use this to detect when a user leaves and exits a designated area of beacons, creating the fences like so:
List<BeaconState.TypeFilter> BEACON_TYPE_FILTERS = Arrays.asList( BeaconState.TypeFilter.with( “my.beacon.namespace”, “my-attachment-type”),
BeaconState.TypeFilter.with( “my.other.namespace”, “my-attachment-type”));
AwarenessFence foundFence = BeaconFence.found(BEACON_TYPE_FILTERS);
AwarenessFence lostFence = BeaconFence.lost(BEACON_TYPE_FILTERS);

And that’s it!
In this article we’ve taken a look at the new Google Awareness API and how we can use both the Snapshot and Fence components to listen for contextual changes to the user and their surroundings. Having this functionality available to us opens the doors for many possibilities in our mobile applications, knowing this information allows us to create more personalised and dynamic experiences for our users.
What will you use the Awareness API for? I’d love to hear any ideas or questions you may have 😄