Here at ribot we have a huge interest in payment and loyalty schemes in the retail sector and in the last Android Pay article, we took a look at the ‘Buy with Android Pay’ side of things. This time around we’ll be taking a deep dive into the ‘Save to Android Pay’ functionality to discover exactly what we could do with it.
Save to Android Pay
This part of the Android Pay API focuses on the ability to provide a central location for customer loyalty, coupons and gift cards within the Android Pay app.
This helps to remove a lot of friction around loyalty because it removes the need to send an offer or gift card via the post, email or any other form of advertising. This also helps if a customer has forgotten to bring a loyalty or membership card into the store. How many times have you gone to your local coffee shop to find out you’ve left your loyalty card at home? That’s where Android Pay comes in to help digitize the loyalty experience, making it easier for your users to save and more likely to shop with you because of a simpler, more pleasurable experience.
Adding the Save to Android Pay Button
So before we get started on how all the different Save to Android Pay functions work, let’s start by looking at how we can add a button for our users to interact with.

We have two options when it comes to display of the Save to Android Pay button, there are a number of different ways we may wish to distribute it to our users.
Deep Linking
We can embed the deep link into an email, as shown on the left. But that’s not all, we can also distribute this link to our users anywhere where links can be used by the user, for example this could be through:
- SMS
- Your Website
- Your Android App
- Social Media
And it’s as simple as that! The link looks something like this:
https://goo.gl/app/pay?link=https://www.android.com/payapp/savetoandroidpay/:jwt&
apn=com.google.android.apps.walletnfcrel&
amv=930006084&
pcampaignid=s2ap_:class_id
We haven’t yet got to how to define the information stated here, we’ll get onto that in the next sections! In this link we are simply passing:
- The generated JWT object for our loyalty class
- The JSON web token
- The ClassId for our loyalty class
Now this has been created, we simply just have to link our desired button using this link. When the user clicks this button they’ll be navigated to a page in their browser to confirm the save. Once confirmed the loyalty instance will be added to their Android Pay account.
Native Buttons
We can also use native button solutions for our apps or webpages. To begin with we can add a Save to Android Pay button to our webpage with two simple bits of code. To begin with we need to include the script on the page where we wish to use the button:
https://apis.google.com/js/plusone.js
Followed by adding the actual button itself to the place where we wish for it to be displayed:
<g:savetowallet jwt="{generated JWT}" onsuccess="successHandler" onfailure="failureHandler"
size="small" theme="light" ></g:savetowallet>
Again here we pass the generated JWT object when defining the button on our webpage.
However, if we want to add a native button to our android application then we must define the code in our activity. Using the assets provided in the Android Pay Toolkit, we can add a button to our layout using the Save to Android Pay image resource like so:
https://gist.github.com/hitherejoe/78980b9cfc16081b5ad301dfeb9d25bc
Followed by initialisation of the GoogleApiClient:
https://gist.github.com/hitherejoe/b0c26ac06a0189fe178840a6b1c3687b
And then saving the desired object to the Android Pay API like so:
https://gist.github.com/hitherejoe/76accd824694f3b831a24d654695b6cd
We’ll look at how to define these objects in the next section, but once the request is carried out we can handle the result in our activity onActivityResult() method.
When the user presses a native button, one of two things will occur (unless there’s an error!):
- If the user is logged into their Google account, then a rollover image will appear to confirm that the offer /gift card / loyalty card has been saved
- If the user is not logged in, then an authentication window will appear asking the user to authenticate their google account before saving to Android Pay
Now we know how to add the button for our users, we need to look a little more into each of the Loyalty, Offer and Gift Card objects. The next three sections take a deeper look at each of these, there will be some repetition in each of these sections to ensure every detail is covered (just in case you only wish to read up on a specific object section!).
Card Structure
Before we get started, let’s take a quick look at how each of these cards is structured. We’re going to be taking a look at the Loyalty, Gift and Offer cards in the next few sections. However, when looking at these you’ll notice they’re all pretty much the same in the way that they’re structured.
Whether it’s the LoyaltyClass, GiftcardClass or OfferClass – each card has it’s own ‘CardClass’ (or BaseClass). This class is essentially a base class which is used to hold global properties for a card, these are properties that are used for each instance of the card and not specific to a user. So all users will share these global properties for their instance of the card.
Next we have a CardObject – this could be either a LoyaltyObject, GiftcardObject or OfferObject. This CardObject essentially holds the data that is specific to an instance of a Card, such as user specific information (e.g a user ID, barcode number or personalised card message).

You’ll see exactly how this structure is used over the next sections where we’ll look at each of the different cards that can be saved using Android Pay.
Loyalty
Using the Save to Android Pay API makes it easy for us to both save and manage loyalty cards in Android Pay. Implementing the Save to Android Pay button on your website, in your app or emails makes it easy for users to save loyalty cards to their Android Pay profile. After the user has saved these cards, they can be dynamically updated to further engage the user or be configured for redemption in-store.

So how does a user save these loyalty cards to Android Pay? Well, all they need to do is simply click the Save to Android Pay button that you have provided. When this button is clicked, a loyalty card (represented by a JSON Web Token) is sent to the Android Pay API Server. Once received, a LoyaltyObject is created by the server using the received JWT and the card is connected to the users account.
So to integrate a Save to Android Pay button there’s a couple of steps to be carried out:
- We must begin by defining a LoyaltyClass that our defined LoyaltyObject extends. This class contains all of the data regarding our loyalty card.
- Next, we need to generate a JWT that represents our defined LoyaltyObject.
- Finally, we can put our Save to Android Pay button in its place of use.
Loyalty Card Structure
In order to implement Loyalty Cards with Save to Android pay we need to begin by defining the LoyaltyClass object for the given loyalty card. Once defined this object can be saved by making a POST request to:
https://www.googleapis.com/walletobjects/v1/loyaltyClass
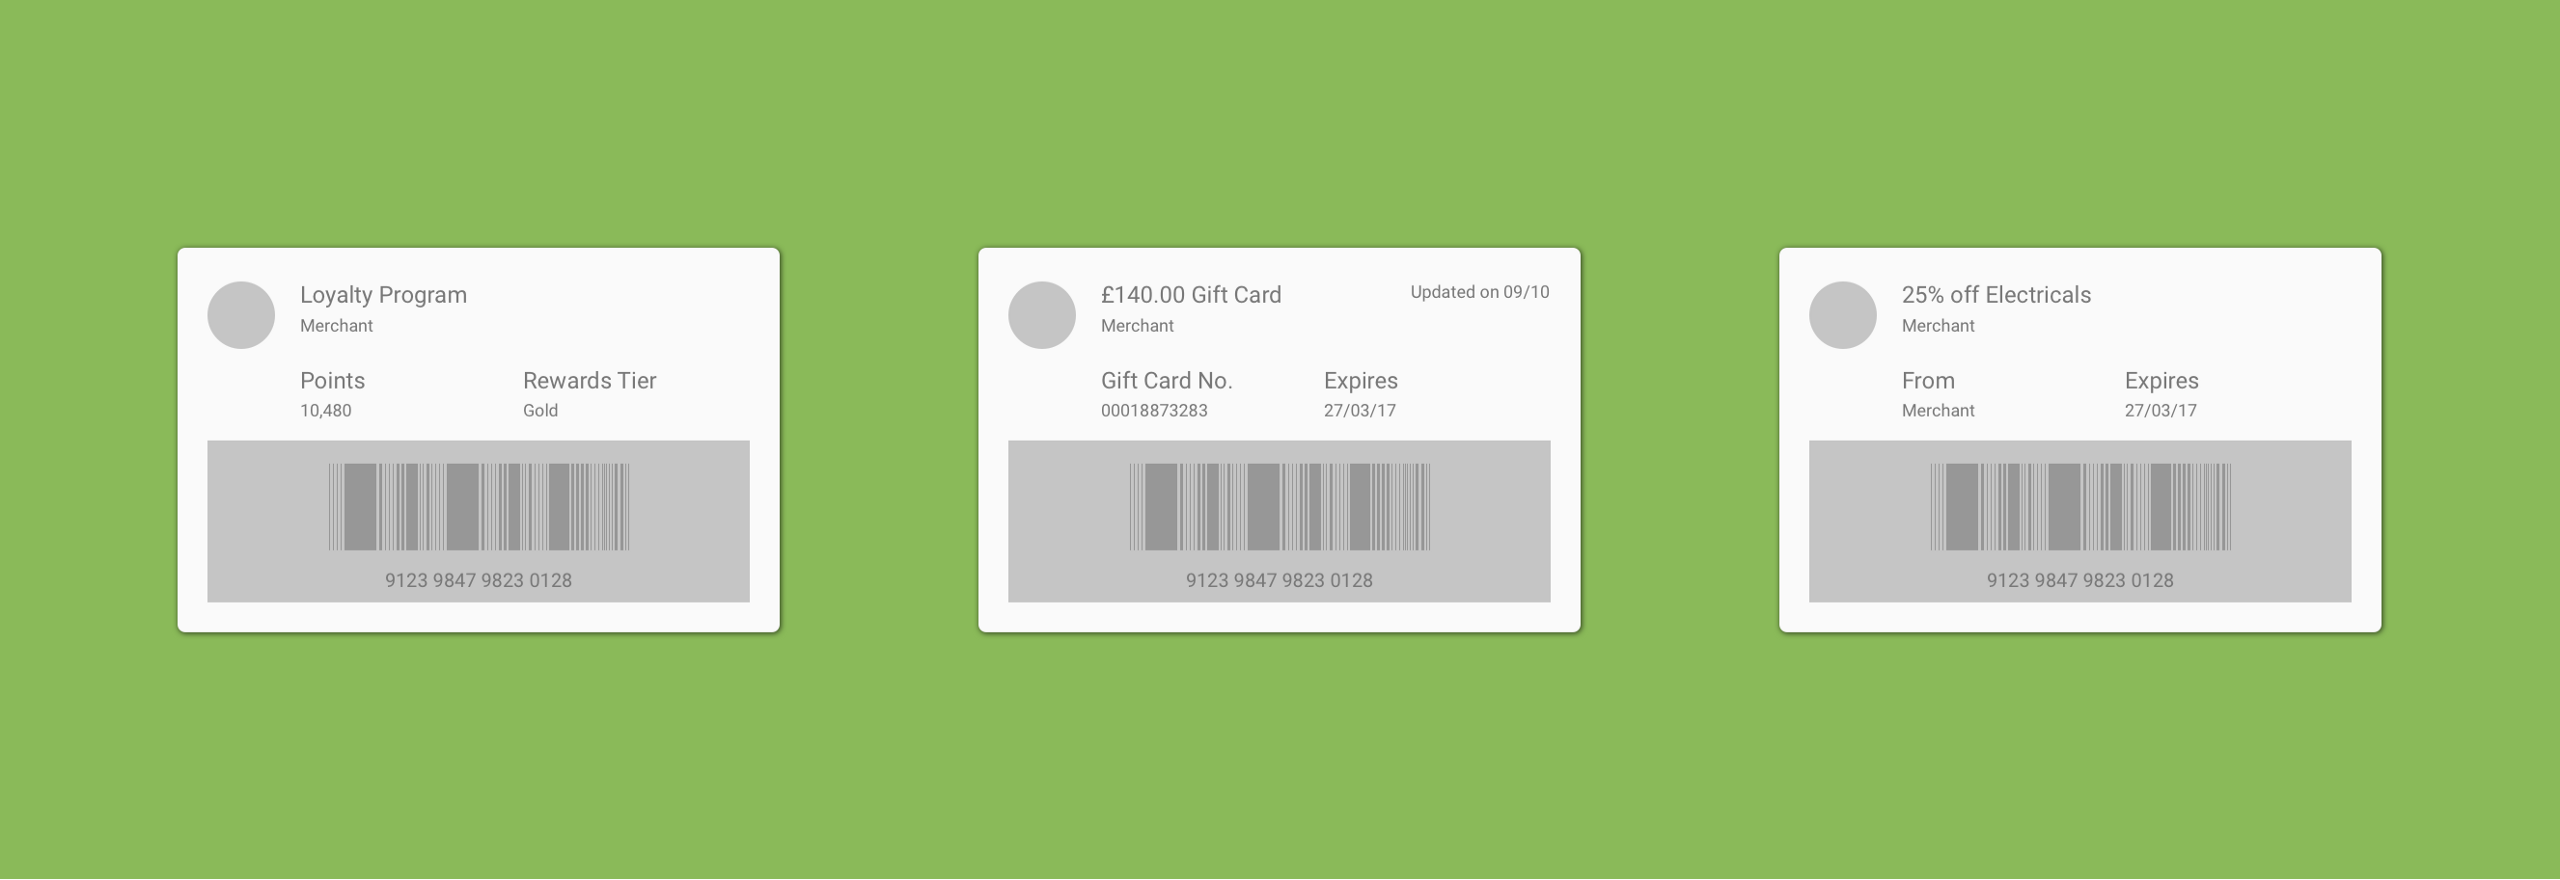
So that we can make a POST request to the API, let’s take a look at the data that is defined in this LoyaltyClass object and how it is represented on the Loyalty Card. As a template, our Loyalty Card will look a little like this:

- class.programLogo – The logo to be displayed on the loyalty card
- class.programName – The name of the loyalty program
- class.issuerName – The name of the merchant issuing the loyalty program
- object.loyaltyPoints.pointsLabel – The label to be used for the loyalty points
- class.rewardsTierLabel – The label to be used for the rewards tier
- class.rewardsTier – The rewards tier assigned to the loyalty card
- object.loyaltyPoints.balance – The balance for the points on the loyalty card
- object.barcode.type, object.barcode.value, object.cardNumber – These values define the barcode information for the loyalty card, allowing it to be successfully scanned and used in-store
- class.accountNameLabel – The label used for the account name
- object.accountName – The name on the loyalty card account
- class.accountIdLabel – The label used for the account id
- object.accountId – The account id for the loyalty card account
- *.imageModulesData.mainImage – The (main) full-width image to be displayed in the details section of the loyalty card
- *.messages[0].header – A header to be shown for a message from the array of message headers
- *.messages[0].body – A body to be shown for a message from the array of message bodies
- *.textModulesData.header – The header used for the text module section of the loyalty card
- *.textModulesData.body – The body used for the text module section of the loyalty card
- *.infoModuleData.labelValueRows[0].columns[0].label – A label to be shown for a information module from the array of information module headers
- *.infoModuleData.labelValueRows[0].columns[0].value – A value to be shown for a information module from the array of information module values
- *.linksModuleData.uris[0] — The first element of the links array, here a URI for a phone number
- *.linksModuleData.uris[1] — The second element of the links array, here a URI for a website
- *.linksModuleData.uris[2] — The third element of the links array, here a URI for nearby locations
As you can see, the LoyaltyClass resource that defines all of this data is made up of many different parts of data. We can take a look at all of the different properties within the LoyaltyClass here.
How a Loyalty Card works
A loyalty card is represented by a LoyaltyObject, each loyalty card represented within a user’s Android Pay app is represented by a single LoyaltyObject. As previously mentioned, the user can save these to their account by using the provided Save to Android Pay button. But what actually happens when this button is pressed?
To begin with, when the Save to Android Pay button is pressed, the Android Pay API inserts a LoyaltyObject and links it to the user who pressed the button — if the user attempts to click the same Save button again, then the loyalty card will not be recreated for them as they are already linked to an instance of that offer.
If the user decides to later remove that loyalty card, then the linked LoyaltyObject is not removed it is simply un-linked from that user — this means that if they then decide to click the Save to Android Pay button to again add that loyalty card, then the previous link is simply re-linked.
Note: A new id must be used for each save of a loyalty card to the API. This is because objects will not be re-inserted with an id that matches that of an existing objects id.
Loyalty Class Structure
Each LoyaltyObject that we define references a LoyaltyClass. This way, if we need to make a global change to an offer, then we can simply alter the LoyaltyClass and any changes will be automatically reflected in the LoyaltyObject — because of this dependancy, we must define a LoyaltyClass before defining a LoyaltyObject.
This LoyaltyClass we define contains properties that are common for every single user of the offer. This is information such as the ID, merchant logo and any other generic information is not user specific. So for every loyalty card that we wish to offer our users, we will create a LoyaltyClass to act as a ‘base class’ for the loyalty card that we’re providing.
On the other hand, the LoyaltyObject extending our LoyaltyClass contains data regarding an offer specific to the linked user. This allows us to assign specific properties per user, such as a loyalty card number or pin.
Loyalty Card API Flow
Now we know a bit more about the how loyalty cards work in Android pay, let’s take a look at the API flow for when a loyalty card object is either saved or updated.

So what exactly is going on here?
- Before we can do anything else, the issuer of the offer must create a new instance of the LoyaltyClass. This is defined within the server and saved by making a POST request to the Android Pay API.
- Now we have a defined loyalty card, the Save to Android Pay button can be used to save our card. Before the Save to Android Pay button is rendered, the issuers server must define the LoyaltyObject’s JWT. Now when the Save to Android Pay button is clicked, the LoyaltyObject’s JWT is sent to the Android Pay API server. At this point, the LoyaltyObject is inserted into the users account and a link to the user is created. Once saved, the loyalty card is synced with the users Android Pay application.
- If the loyalty card issuer wishes to update the card at any point then the issuer’s server must begin by making a GET request to retrieve the specified LoyaltyObject. When the Android Pay API returns the LoyaltyObject the issuer’s server can make the desired amendments to the card. Once these changes are made, a PUT request can be made to the Android Pay API to save the updated LoyaltyObject. Once this object is updated, the loyalty card is synced with the users Android Pay application.
Defining the LoyaltyClass
Before we can create our LoyaltyObject, we must define the base LoyaltyClass on our server. This essentially holds the global properties (data that is specific to our loyalty card and not a single user) for our Loyalty Card that will apply to every LoyaltyObject that extends it. As a JSON object, an example of this would look like so:
https://gist.github.com/hitherejoe/ae8f7755e81ee65ec59da3f68e51490a
We can also define this in our Android Application using Java, see the documentation here for details on doing so.
Now that the LoyaltyClass has been defined, along with the necessary properties, we can go ahead and send it to the API server. Once saved, we’re able to reference this created class in order to create a corresponding LoyaltyObject for our user.
Defining the LoyaltyObject
As previously mentioned, we need to generate the JWT for a LoyaltyObject for when the Save to Android Pay button is clicked. Before we can do that, we must define our LoyaltyObject on the server — which consists of the following properties:
https://gist.github.com/hitherejoe/6901748130f4289337be6135eb764086
And if you wish to define this within your android application, then please follow the instructions found in the documentation here.
At this point the loyalty card is not linked to a user, so here we are defining data that is going to be specific to the user that it is being generated for. You can see in the above code we’re using the classId property to link the LoyaltyObject to it’s LoyaltyClass parent. You’ll also notice here that the LoyaltyObject contains both text and link modules — this is because unlike other data, this textual and link content is specific to the user and not global, so it lives inside the object rather than the class.
Using this data, we need to encode the LoyaltyObject as a JWT. For full details on how to do this, please see this guide.
Linking the Loyalty Card to the User
Once we’ve followed all of the above and the user has decided to save the loyalty card to their account, the Android Pay API will automatically link the Loyalty Card to our user. When this has successfully completed, the API will automatically sync our user’s Loyalty Card with their Android Pay application, so they will be able to see the loyalty card within their account.

Gift Cards
Next up, Gift Cards! Similar to Loyalty Cards, we can use the Save to Android Pay API to both save and manage gift cards for our customers within Android Pay. Again, the user just needs to use the Save to Android Pay button to save these cards and from there they can be updated to further engage the user or configured for redemption in-store.

So how does a user save these gift cards to Android Pay? Just as before, you can simply click the provided Save to Android Pay button which will then cause a gift card (represented by a JSON Web Token) to be sent to the Android Pay API Server. Once the server successfully receives this object, an GiftcardObject is created by the server using the received JWT and the gift card is connected to the user’s account. There are a couple of high-level steps we must take in order to implement the Save to Android Pay button for our offers:
- We must begin by defining a GiftcardClass that our defined GiftcardObject extends. This class contains all of the data regarding our loyalty card.
- Next, we need to generate a JWT that represents our defined GiftcardObject.
- Finally, we can place our Save to Android Pay button in its place of use for our users to interact with.
Gift Card Structure
In order to implement offers within Save to Android Pay, we need to begin by defining the GiftcardClass for the given gift card. Once we have defined this, the object can be saved by making a POST request to:
https://www.googleapis.com/walletobjects/v1/giftCardClass
So that we can make a POST request to the API, let’s take a look at the data that is defined in this GiftcardClass object and how it is represented on the Gift card. As a template, our Gift card will look a little like this:

- class.programLogo — The image icon to be displayed for the gift card
- class.balance — The balance of the gift card
- class.balanceUpdateTime — The date in which the gift card was last updated
- object.merchantName — The name of the merchant where the gift card can be used
- class.pinLabel — The label used for the pin
- object.validTimeInterval.end — The expiry date for the gift card
- class.pin — The pin number for the gift card
- object.barcode.type, object.barcode.value, object.cardNumber — These values define the barcode information for the gift card, allowing it to be successfully scanned and used in-store
- class.eventNumberLabel — The label used for the event number
- object.eventNumber — The event number for the gift card
- *.imageModulesData.mainImage — The main, full-width image to be displayed on the loyalty card
- *.messages[0].header — An array of message headers to be displayed
- *.messages[0].body — An array of message texts to be displayed
- *.textModulesData.header — The header used for the data module section
- *.textModulesData.body — The body of text displayed for the data module section
- *.infoModuleData.labelValueRows[0].columns[0].label — The label used for the information text module
- *.infoModuleData.labelValueRows[0].columns[0].value — The text value used for the information text module
- *.linkModuleData.uris[0] — The first element of the links array, here a URI for a phone number
- *.linkModuleData.uris[1] — The second element of the links array, here a URI for a website
- *.linkModuleData.uris[2] — The third element of the links array, here a URI for nearby locations
As you can see, the GiftcardClass resource that defines all of this data is made up of many different parts of data. We can take a look at all of the different properties within the GiftcardClass here.
How a Gift Card works
A Gift Card is represented by a GiftcardObject, each of these gift cards is represented within a user’s Android Pay app and extends a single GiftcardClass (we’ll get into that in a bit…). As previously mentioned, the user can save these gift cards to their account by using the provided Save to Android Pay button. But what actually happens when this button is pressed?
To begin with, the API inserts an GiftcardObject and links it to the user who pressed the button — if the user attempts to click the same Save button again, then the gift card will not be recreated for them as they are already linked to an instance of that gift card. However, if the user decides to later remove that gift card, then the linked GiftcardObject is not removed but is simply un-linked from that user — this means that if they then decide to click the Save to Android Pay button to again add that gift card, then the previous link is simply re-linked.
Note: A new id must be used for each save of a gift card to the API. This is because objects will not be re-inserted with an id that matches that of an existing object id.
Gift Card Class Structure
As previously mentioned, each of these GiftcardObjects that we define references a GiftcardClass. This way, if we need to make a global change to a gift card, then we can simply alter the GiftcardClass and any changes will be automatically reflected in the GiftcardObject, because of this dependancy, we must define a GiftcardClass, before we can define a GiftcardObject.
This GiftcardClass we define contains properties that are common for every single user of the offer. The information such as the ID, gift card image and any other generic information is not user specific. So for every gift card that we wish to give to our users, we will create a GiftcardClass to act as a ‘base class’ for the gift card that we’re providing.
On the other hand, the GiftcardObject extending this GiftcardClass contains data that is specific to the linked gift card user. This allows us to assign specific properties per user, such as an offer number or pin.
Gift Card API Flow
Now we know a bit more about the gift card objects and how they’re used within Android pay, let’s take a look at the API flow for when a gift card is either saved or updated. The flow is the same as that of the Loyalty cards and Offers, with the exception of us dealing with a Gift Card this time around:

So what exactly is going on here?
- To begin with, the issuer of the gift card must create a new instance of the GiftcardClass — this is defined within their server and saved by making a POST request to the Android Pay API.
- Now we have a defined gift card, the Save to Android Pay button can be used to save it. Before the Save to Android Pay button is rendered, the issuer’s server must define the GiftcardObject’s JWT. Now when the Save to Android Pay button is clicked, the GiftcardObject’s JWT is sent to the Android Pay API server. At this point, the GiftcardObject is inserted into the users account and a link to that user is created. Once saved, the gift card is synced with the user’s Android Pay application.
- If the gift card issuer wishes to update the card at any point then the issuer’s server must begin by making a GET request to retrieve the specified GiftcardObject. When the Android Pay API returns the GiftcardObject, the issuer’s server can make the desired amendments to the gift card. Once these changes are made, a PUT request can be made to the Android Pay API to save the updated GiftcardObject. Once this object is updated, the gift card is synced with the user’s Android Pay application.
Sounds pretty simple, eh? 💪 Let’s take a deeper look at some of these technicalities.
Defining the GiftcardClass
Before we can create our GiftcardObject, we must define the base GiftcardClass on our server. This essentially holds the global properties (data that is specific to our offers and not a single user) for our Gift Card that will apply to every GiftcardObject that extends it. As a JSON object, an example of this would look like so:
https://gist.github.com/hitherejoe/5e5912c85e23a60ab57e9072428ef96b
We can also define this in our Android Application using Java, see the documentation here for details on doing so.
Now that the GiftcardClass has been defined, along with the necessary properties, we can go ahead and send it to the API server. Once saved, we’re able to extend this created class in order to create a corresponding GiftcardObject for our user.
Defining the GiftcardObject
As previously mentioned, we need to generate the JWT for an GiftcardObject for when the Save to Android Pay button is clicked. Before we can do that we must define our GiftcardObject on the server — which consists of the following properties:
https://gist.github.com/hitherejoe/24056eef75d6d51798b536a36c538bc1
And if we wish to define this within our android application, details on how to do so can be found in the documentation here.
At this point the gift card is not linked to a user, so here we are defining data that is going to be specific to the user that it is being generated for. You can see in the above code we’re using the classId property to link the GiftcardObject to it’s GiftcardClass parent. You’ll also notice here that the GiftcardObject contains both text and link modules – this is because unlike the offer and loyalty cards, this textual and link content is specific to the user and not global, so it lives inside the object rather than the class.
Using this data, we need to encode the GiftcardObject as a JWT. For full details on how to do this, please see this guide.
Linking the Gift Card to the User
Once we’ve followed all of the above and the user has decided to save the gift card to their account, the Android Pay API will automatically link the Gift Card to our user. When this has successfully completed, the API will automatically sync our user’s Gift Card with their Android Pay application, so they will be able to see the gift card within their account.

Offers
Similar to the above, we can use the Save to Android Pay API to both save and manage offers for our customers within Android Pay. Again, the user just needs to use the Save to Android Pay button to save these cards and from there they can be updated to further engage the user or configured for redemption in-store.

So how does a user save these offers to Android Pay? Just as before, you can simply click the provided Save to Android Pay button which will then cause an offer (represented by a JSON Web Token) to be sent to the Android Pay API Server. Once the server successfully receives this object, an OfferObject is created by the server using the received JWT and the offer is connected to the user’s account. There are a couple of high-level steps we must take in order to implement Save to Android Pay button for our offers:
- We must begin by defining a OfferClass that our defined OfferObject extends. This class contains all of the data regarding our loyalty card.
- Next, we need to generate a JWT that represents our defined OfferObject.
- Finally, we can place our Save to Android Pay button in its place of use for our users to interact with.
Offer Structure
In order to implement offers within Save to Android Pay, we need to begin by defining the OfferClass object for the given offer. Once we have defined this, the object can be saved by making a POST request to:
https://www.googleapis.com/walletobjects/v1/offerClass
So that we can make a POST request to the API, let’s take a look at the data that is defined in this OfferClass object and how it is represented on the Offer card. As a template, our Offer card will look a little like this:

- class.titleImage – The image icon to be displayed for the offer
- class.title – The title of the offer
- class.issuerName – The name of the merchant issuing the offer
- object.validTimeInterval.end – The expiry date of the offer
- class.provider – The party that has provided the offer
- object.barcode.type, object.barcode.value, object.cardNumber – These values define the barcode information for the offer, allowing it to be successfully scanned and used in-store
- *.imageModulesData.mainImage – The full-width main image to be used for the details section
- class.details – The details describing the offer
- class.finePrint – The fine print (terms & conditions) for the offer
- *.messages[0].header – An array of message headers to be displayed
- *.messages[0].body – An array of message texts to be displayed
- *.textModulesData.header – The header used for the data module section
- *.textModulesData.body – The body of text displayed for the data module section
- *.infoModuleData.labelValueRows[0].columns[0].label – The label used for the information text module
- *.infoModuleData.labelValueRows[0].columns[0].value – The text value used for the information text module
- *.linkModuleData.uris[0] – The first element of the links array, here a URI for a phone number
- *.linkModuleData.uris[1] – The second element of the links array, here a URI for a website
- *.linkModuleData.uris[2] – The third element of the links array, here a URI for nearby locations
- object.helpUri – A URI that links to help content
As you can see, the OfferClass resource that defines all of this data is made up of many different parts of data. We can take a look at all of the different properties within the OfferClass here.
How an Offer works
An offer is represented by an OfferObject, each of these offers represented within a user’s Android Pay app extends a single OfferClass (we’ll get into that in a bit…). As previously mentioned, the user can save these offers to their account by using the provided Save to Android Pay button. But what actually happens when this button is pressed?
To begin with, the API inserts an OfferObject and links it to the user who pressed the button — if the user attempts to click the same Save button again, then the offer will not be recreated for them as they are already linked to an instance of that offer. However, if the user decides to later remove that offer, then the linked OfferObject is not removed but is simply un-linked from that user — this means that if they then decide to click the Save to Android Pay button to again add that offer, then the previous link is simply re-linked.
Note: A new id must be used for each save of an offer to the API. This is because objects will not be re-inserted with an id that matches that of an existing object id.
Offer Class Structure
As previously mentioned, each of these OfferObjects that we define references an OfferClass. This way, if we need to make a global change to an offer, then we can simply alter the OfferClass and any changes will be automatically reflected in the OfferObject – because of this dependancy, we must define an OfferClass before we can define an OfferObject.
This OfferClass we define contains properties that are common for every single user of the offer. The information such as the ID, offer logo and any other generic information is not user specific. So for every offer that we wish to offer our users, we will create an OfferClass to act as a ‘base class’ for the offer we’re providing.
On the other hand, the OfferObject extending this OfferClass contains data regarding an offer specific to the linked user. This allows us to assign specific properties per user, such as an offer number or pin.
Offer API Flow
Now we know a bit more about the offer objects and how they’re used within Android pay, let’s take a look at the API flow for when an object is either saved or updated. The flow is the same as that of the Loyalty and Gift cards, with the exception of us dealing with an Offer this time around:

So what exactly is going on here?
- To begin with, the issuer of the offer must create a new instance of the OfferClass – this is defined within their server and saved by making a POST request to the Android Pay API.
- Now we have a defined offer, the Save to Android Pay button can be used to save our offer. Before the Save to Android Pay button is rendered, the issuer’s server must define the OfferObject’s JWT. Now when the Save to Android Pay button is clicked, the OfferObject’s JWT is sent to the Android Pay API server. At this point, the OfferObject is inserted into the users account and a link to that user is created. Once saved, the offer is synced with the user’s Android Pay application.
- If the offer issuer wishes to update the card at any point then the issuer’s server must begin by making a GET request to retrieve the specified OfferObject. When the Android Pay API returns the OfferObject, the issuer’s server can make the desired amendments to the offer. Once these changes are made, a PUT request can be made to the Android Pay API to save the updated OfferObject. Once this object is updated, the offer is synced with the user’s Android Pay application.
Sounds pretty simple, eh? 💪 Let’s take a deeper look at some of these technicalities.
Defining the OfferClass
Before we can create our OfferObject, we must define the base OfferClass on our server. This essentially holds the global properties (data that is specific to our offers and not a single user) for our Offer that will apply to every OfferObject that extends it. As a JSON object, an example of this would look like so:
https://gist.github.com/hitherejoe/dfe13d98ddef6b08ab6b335f348ea398
We can also define this in our Android Application using Java, see the documentation here for details on doing so.
Now that the OfferClass has been defined, along with the necessary properties, we can go ahead and send it to the API server. Once saved, we’re able to extend this created class in order to create a corresponding OfferObject for our user.
Defining the OfferObject
As previously mentioned, we need to generate the JWT for an OfferObject for when the Save to Android Pay button is clicked. Before we can do that we must define our OfferObject on the server – we are able to create this in java, but for readability this consists of something like:
https://gist.github.com/hitherejoe/9d2932ff240c5ff869916f1a15e9d782
And if we wish to do this within our android application, we can do like so:
https://gist.github.com/hitherejoe/bc6687cbbeca8e08e7d12a6628446374
At this point the offer is not linked to a user, so here we are defining data that is going to be specific to the user that it is being generated for. You can see in the above code we’re using the classId property to link the OfferObject to it’s OfferClass parent.
Using this data, we need to encode the OfferObject as a JWT. For full details on how to do this, please see this guide.
Linking the Offer to the User
Once we’ve followed all of the above and the user has decided to save the offer to their account, the Android Pay API will automatically link the offer to our user. When this has successfully completed, the API will automatically sync our user’s offer with their Android Pay application, so they will be able to see the offer within their account.

Card Component Design Guidelines
Now we’ve looked at all of the different types of cards, you’ll have noticed that there were some components used across all cards. There are some guidelines that should be followed for these to ensure they are displayed correctly within the User Interface.
Card Logo
The card logo displayed in the top-left hand corner is a masked circular image which makes it easy for the user to identify the merchant in which the card is from.

When designing this logo it’s important to ensure that the image will be masked and displayed correctly – so if uploading a non-circular image, be sure that your logo accounts for this masking.
The minimum size for the uploaded image is 660px x 660px, there are also some margins which you should take into account to ensure that your image fit’s into the safe area of the logo container:

Note: To help ensure the image is displayed correctly it’s best not to pre-mask your image prior to uploading it. Keep your logo as the shape it is with it’s full background intact, the Android Pay API will take care of the rest.
Card Background Colour
Unfortunately, we have no control over the background colour that’s used for our cards. The Android Pay API uses an algorithm to calculate a dominant colour to be used as the background. This is used to ensure that the content of the card is easily readable by the user.
Full-Width Images

Each card contains a field (*.imageModulesData.mainImage) that can be used to display a full-width image within a card. There’s a couple of things to take into account when preparing these images:
- The minimum width for these is 1860px, there is no minimal height.
- These images should always use a coloured background to help separate them from other content displayed on the card.
Card Modules

As we saw, there are a number of modules within cards which can be used to display a variety of images / text and links. These modules are:
- imageModulesData – Used to display a full-width image in our card, there should really only be one of these used to avoid clutter.
- infoModuleData – This module data can be used to display account-specific data such as member names or membership numbers. This is data which can be customised such as the card expiration date, a secondary point balance or value balance for the card account.
- linksModuleData – These modules can be used to display URI links within the loyalty card, for example a website or phone number. The iconography displayed next to the URI is dependant on the prefix used, these can vary between:

Using the http: prefix within your URI defines a website or Google location map. Using either of these will display the relevant icon. A map link (http://maps.google.com/?q=google) will display a marker icon whilst a web link (http://developer.google.com/save-to-android-pay/) will display a web icon.

However, we can also use the tel: prefix for phone numbers, which will display a telephone icon alongside the dial link. Using the mailto: prefix allows us to display an email link alongside the email message icon.
- textModulesData – These modules can be used to define program details or user account-specific details.
Save to Android Pay Button
When displaying the Save to Android Pay button we can declare the theme which we wish to use for the display of the button. This can either be dark:

or light:

We should also take into account the positioning of the button that we’re displaying on-screen:
- When it comes to displaying the button for the saving of loyalty cards, this button should be visible on screen without the need to scroll or perform any other user action.
- It should be placed in a group with other similar buttons, such as actions for printing the offer or any other action.
And that’s it!
Phew, that was a lot to take in regarding Save to Android Pay 😄
We’ve covered several topics in this article – including how cards are structured, the data they’re made up of and how they’re involved in the Save to Android Pay API flow. Hopefully now we have a bit more understanding of how this part of the Android API works and how we can utilise it to digitize the payments experience within our applications.
However, if you’re looking for someone to give you a hand then we’d love to help you out with implementing Android Pay into your application, why not get in touch with us over at ribot?

I’d love to see any use cases where you’re using Android Pay, so drop me a tweet if you have something to share or any questions to ask 😺
Check out my other projects at hitherejoe.com