In the last post we took a look into Hilt and how, at a high level, it can be used for Dependency Injection in Android projects. Now that we have seen how the API can be used, I want to start taking deeper dives into how things are working under the hood. In this post we’re going to dive into the @HiltAndroidApp annotation – looking at what it does when it comes to generated code and how the internals work at an application level. Within this exploration we’ll dive into the whole flow – starting from when a member is declared as required for injection, straight through to how that member is then provided. The internals here will improve our understanding of the how / why around declaring bindings in our classes, as well as how they are made available through Hilt components.
Note: there will be some crossover with vanilla Dagger in this post. I will also be assuming that you have some knowledge of Dependency Injection and/or Dagger for Android projects.
If you have not read my last post on Hilt, I would recommend that you do so to provide enough knowledge of how Hilt is used, as well as the code references made throughout this post.
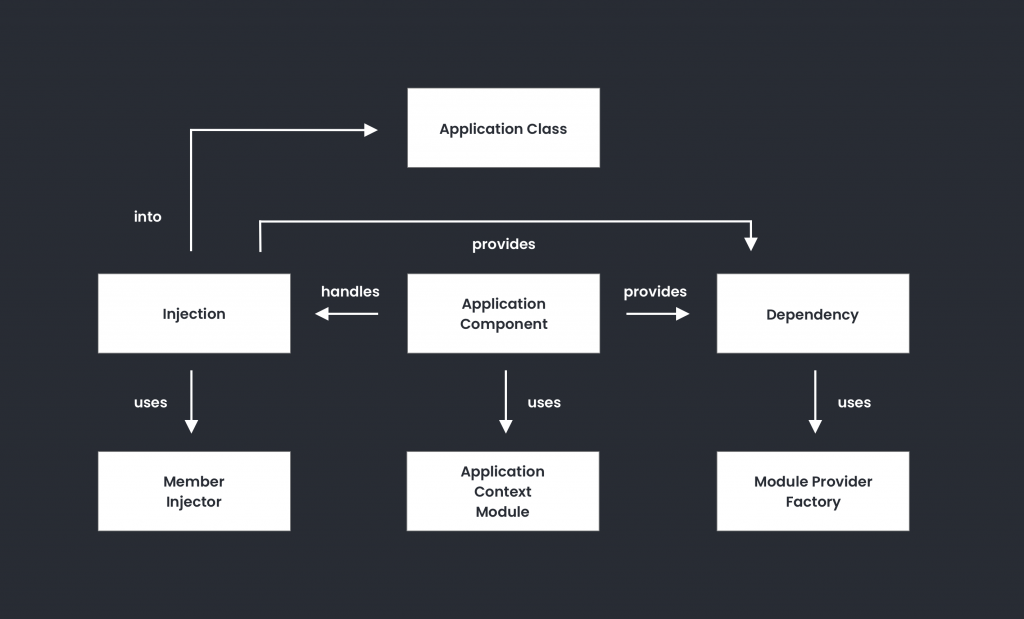
When it comes to types that the application knows how to provide, Hilt will generate a collection of classes that come together to provide the required injections for our application class. These components make up the Hilt component hierarchy, all of which are automatically integrated into various lifecycles of an android application. As seen in the hierarchy, the bindings declared in the application component flow down the tree – meaning that they are available from the rest of these components in the hierarchy. In the post we will be focusing on the top of that hierarchy tree, the Application Component.
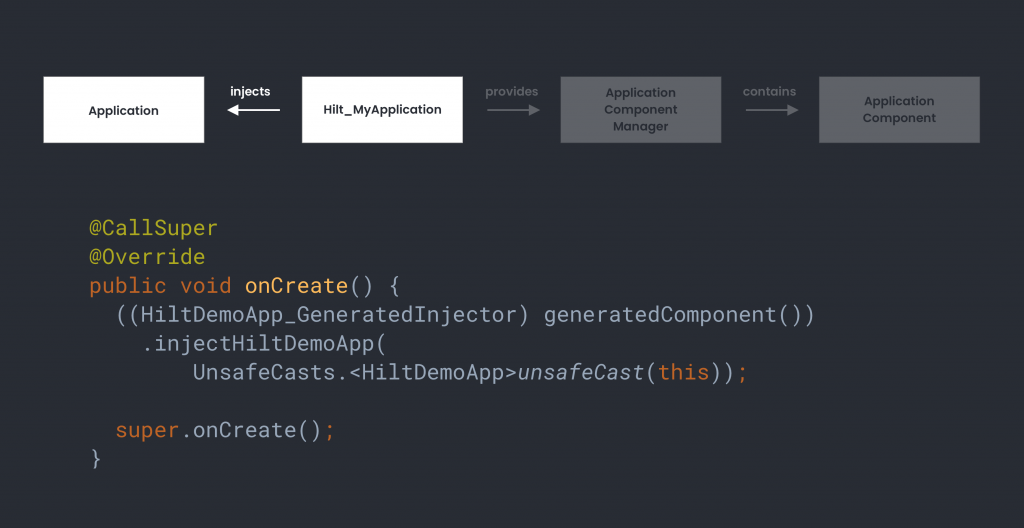
This generated Application Component becomes the access point between our application class and the required dependencies. In the diagram below, we can see the illustrated relationship between the application component and surrounding generated classes.
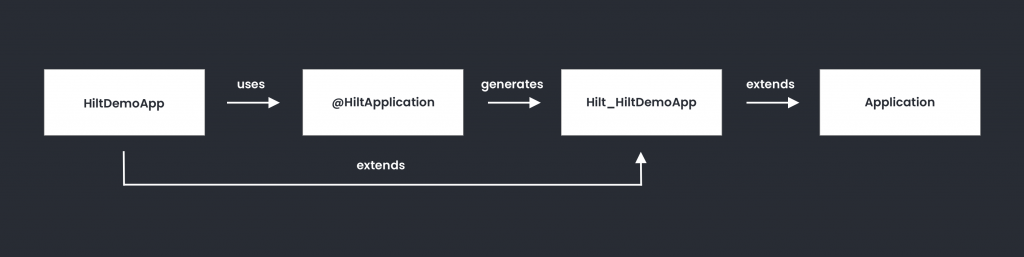
The @HiltAndroidApp annotation can only be applied to the Android Application class and is required if you are integrating Hilt into your app.
@HiltAndroidApp
class HiltDemoApp : Application()
When this is applied, building the project will trigger the code generation process – this generated code includes a Hilt_Application class, which extends from the android Application class. In my case this is Hilt_HiltDemoApp class, which will vary depending on the name used within your project. When it comes to this generated Hilt_Application class, we do not need to think about this when using Hilt as the Hilt gradle plugin handles that for us behind the scenes.
Hilt will generate an abstract class for every android class that we are performing injections inside of. Let’s focus here on the generated application class (code has been omitted here for brevity):
public abstract class Hilt_HiltDemoApp extends Application implements GeneratedComponentManager<Object> {
  private final ApplicationComponentManager componentManager...;

  @Override
  public final Object generatedComponent() {
    return componentManager().generatedComponent();
  }

  @CallSuper
  @Override
  public void onCreate() {
    ((HiltDemoApp_GeneratedInjector) generatedComponent()).injectHiltDemoApp(UnsafeCasts.<HiltDemoApp>unsafeCast(this));
    super.onCreate();
  }
}
Here we can see two core parts:
- A declaration for an ApplicationComponentManager class
- The injection of our Application class within the onCreate function
Starting at the ApplicationComponentManager, this class is used to manage the creation of components that reside within an application, as well as being used within the onCreate function to inject dependencies into our application class. We won’t look at the source of the ApplicationComponentManager class here, as it mainly acts as a holder for the built ComponentSupplier instance.
new ApplicationComponentManager(new ComponentSupplier() {
    @Override
    public Object get() {
        return DaggerHiltDemoApp_HiltComponents_ApplicationC.builder()
           .applicationContextModule(new ApplicationContextModule(Hilt_HiltDemoApp.this))
           .build();
    }
});
Inside of this ComponentSupplier implementation we can see a reference to an ApplicationC class (this is the Application component). The referenced DaggerHiltDemoApp_HiltComponents_ApplicationC is the generated application component which acts as a global container for everything used by Hilt across our application (this includes activities, fragments, views etc). Focusing only on the scope of the application class for now, the application component is built to essentially construct and provide the required dependencies for our application class, exposing these through an inject function.
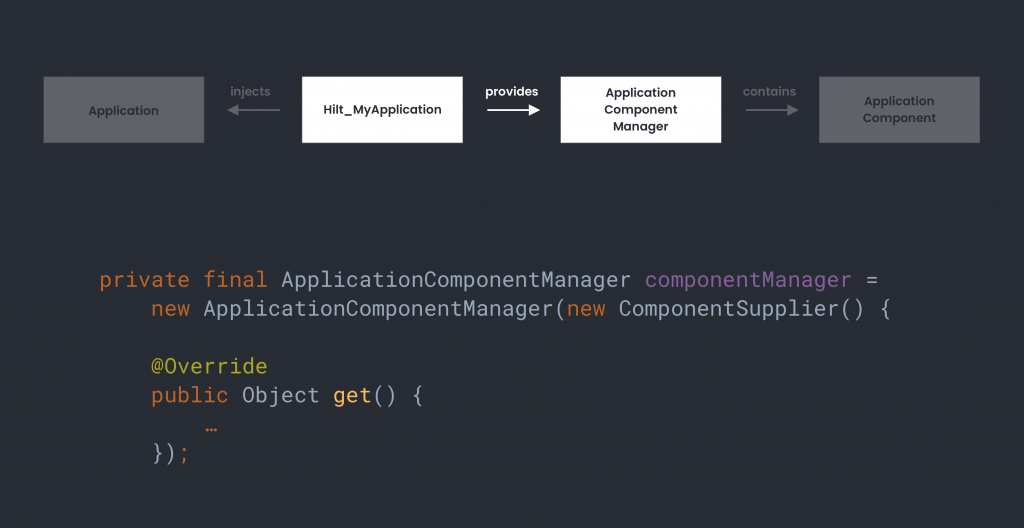
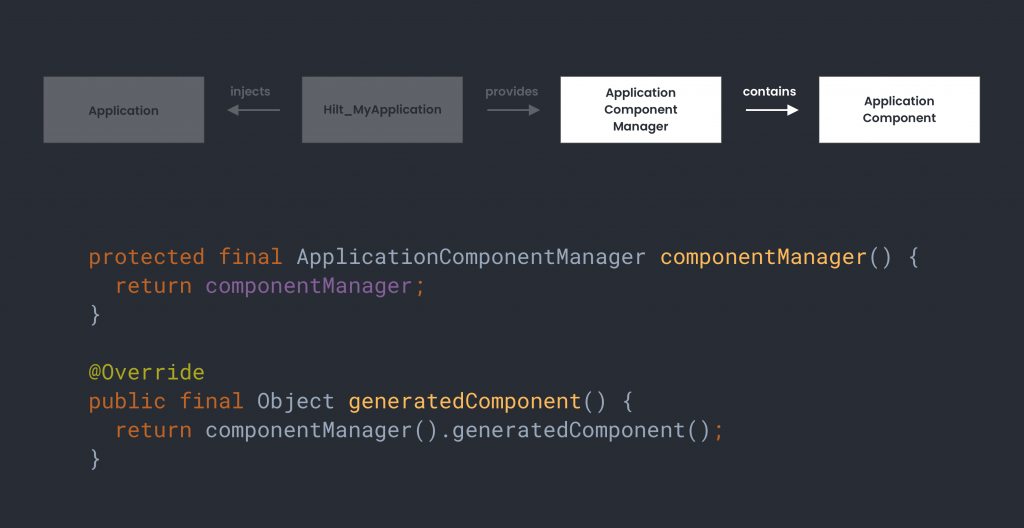
This instance of the ApplicationComponentManager is used at two points inside of this class. The first being the componentManager() function – this is protected, but acts as an internal access point for the class. Secondly, we have the generatedComponent() function where the ComponentManager reference is retrieved from the ApplicationComponentManager. This ComponentManager represents the application component, which can be used to trigger the injection of our application class.
During the onCreate function of the application class, the inject call is triggered to inject the required dependencies into our application class. This is the reason why the call to this parent onCreate must be called before interacting with injected components, as that is when all of the initialisation happens.
The generated application component implements an interface labelled as the GeneratedInjector. This provides an access point for external classes to trigger the injection of the application component members.
We’ll come onto the internals a little later in this post, but at a high level, this generated injectHiltDemoApp function executes the code to satisfy the required members for our Application class.
When it comes to providing these injected members for our application, a common requirement is a reference to a context – for an application level context, the predefined class in Hilt labelled as the ApplicationContextModule, is configured through the application component. So we’ll skip back to the Hilt_MyApplication generated class where the application component manager is instantiated.
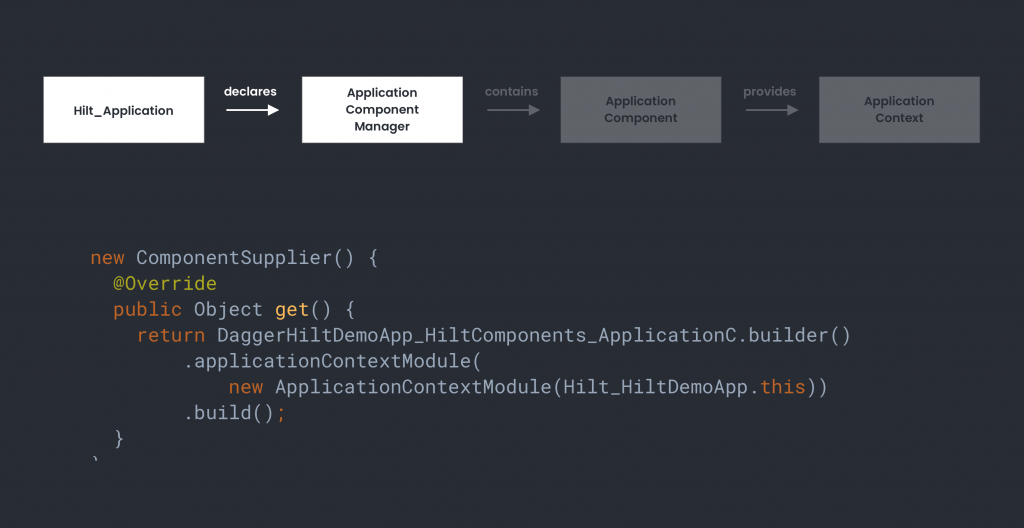
When this Application Component Manager is instantiated, an instance of a ComponentSupplier is provided. Overriding the required get() function, the builder from the Application Component is used to construct the required ComponentManager instance. This builder is used to bind a context to our application component using an internal ApplicationContextModule, followed by providing our application class with the required application component reference for use. At this point we can see the construction of the ApplicationContextModule – the construction of this requires a context, this is provided in the form of our generated Hilt_HiltDemoApp class.
The Application Context Module itself is a part of the Hilt library. This module is automatically installed within the application component using the @InstalIIn annotation, providing a context for wherever it may be requested.
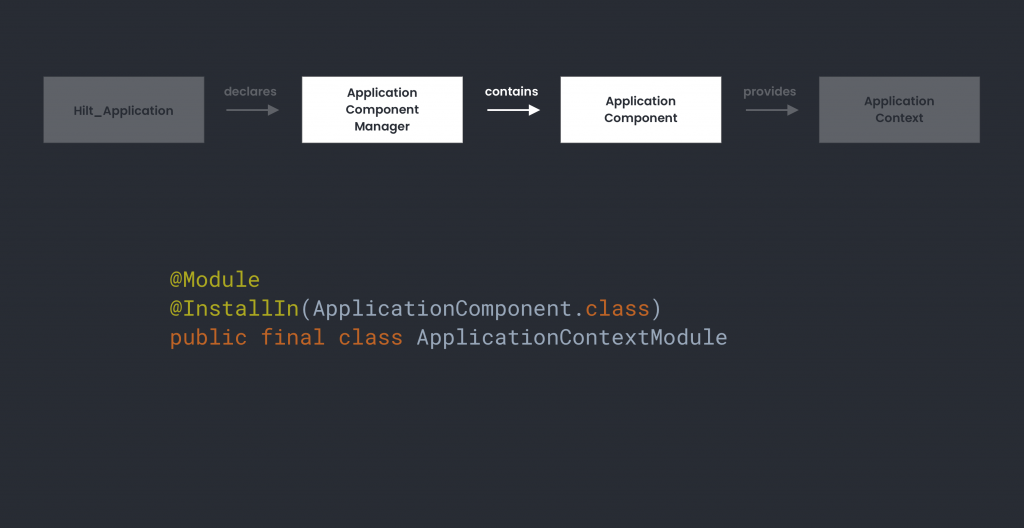
This declaration utilises the @ApplicationContext annotation (also known as a qualifier) – meaning that wherever you use this annotation when injecting a context into components, the context from the application context module will be provided.
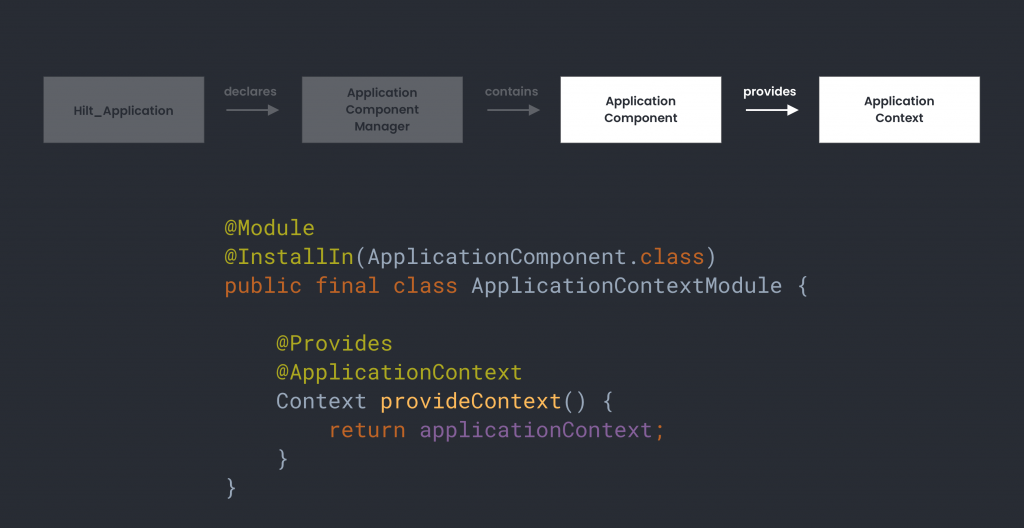
With the above, there is no need to manually configure the application context yourself inside of modules. Using the Hilt @ApplicationContext annotation alongside a context injection will provide you with the required context.
At this point, we’re ready to start providing some of our own dependencies to our application class. To recap from the last post, I have the following application class in my sample app:
@HiltAndroidApp
class HiltDemoApp : Application() {

    @Inject
    lateinit var someClass: SomeClass
    @Inject
    lateinit var anotherClass: AnotherClass

}
The SomeClass instance that I am injecting is a class with no arguments in its constructor. The @Inject annotation is used here to tell Hilt how an instance of this type is to be provided:
class SomeClass @Inject constructor()I also have another class which is being injected, except this one has no @Inject annotation and has a constructor argument that is required:
class AnotherClass(private val someClass: SomeClass)To declare how this should be constructed, I’m using a Dagger module which is installed into the Hilt application component using the @InstallIn annotation:
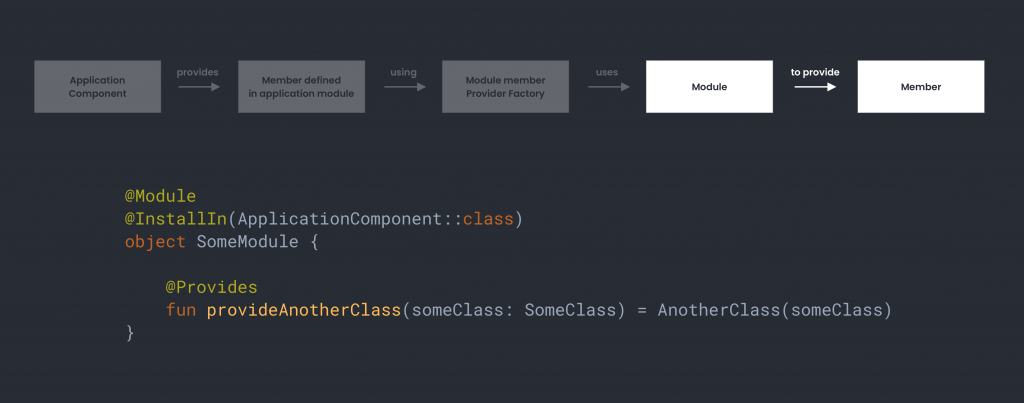
@Module
@InstallIn(ApplicationComponent::class)
object SomeModule {

    @Provides
    fun provideAnotherClass(someClass: SomeClass) =
        AnotherClass(someClass)
}
If we build our project, we should see something similar to the below source code for the application component. Note, a lot of code here has been omitted for brevity:
public final class DaggerHiltDemoApp_HiltComponents_ApplicationC extends HiltDemoApp_HiltComponents.ApplicationC {
...
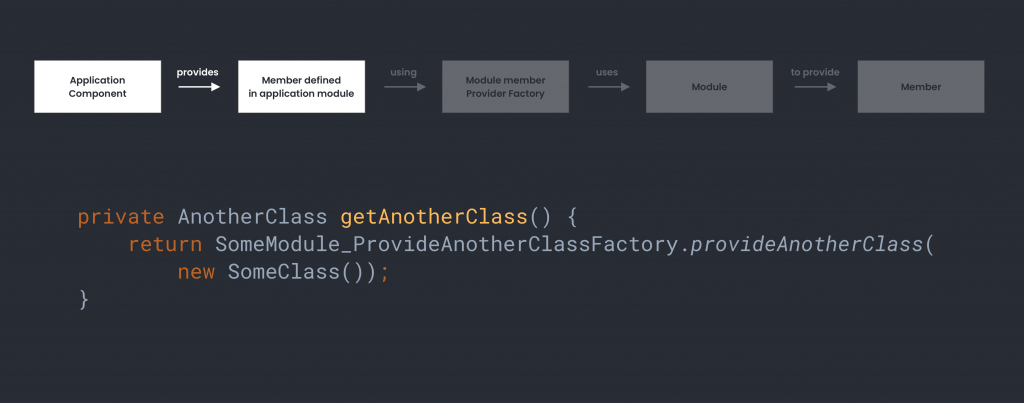
private AnotherClass getAnotherClass() {
return SomeModule_ProvideAnotherClassFactory.provideAnotherClass(new SomeClass());}
@Override
public void injectHiltDemoApp(HiltDemoApp hiltDemoApp) {
injectHiltDemoApp2(hiltDemoApp);}
private HiltDemoApp injectHiltDemoApp2(HiltDemoApp instance) {
HiltDemoApp_MembersInjector.injectSomeClass(instance, new
SomeClass());
HiltDemoApp_MembersInjector.injectAnotherClass(instance,
getAnotherClass());
return instance;
}
...
}
When it comes to providing dependencies for injection, we can see above that Hilt generates two core parts of code within our application component:
- provider factory – used to provide a type that is defined within a Dagger module
- member injector – used to perform the injection for the specified member in the HiltDemoApp class
Both of these generated classes are used by the application component for satisfying member dependency, we can see these defined within the generated application component code above. Let’s take a little walkthrough of these generated classes that are utilised by the component.
To begin with, in the example above, the application component defines an internal function which is used for providing the required AnotherClass type. This function provides the type by using a generated provider factory class specifically for that type.
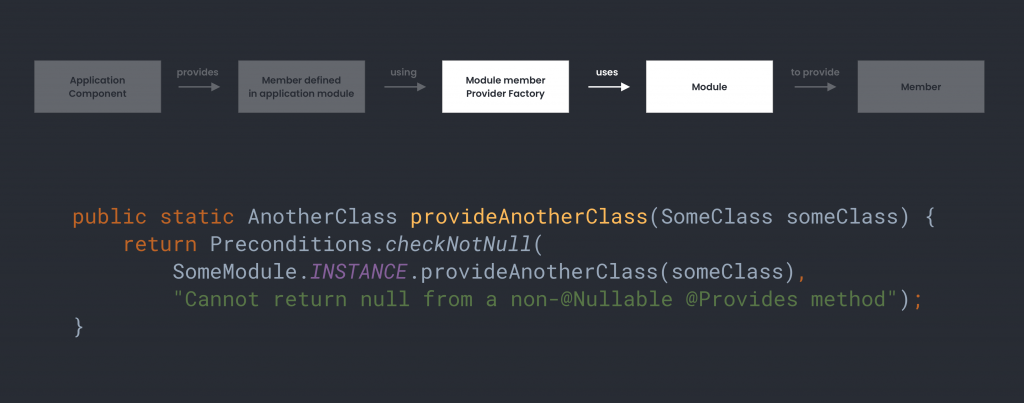
public final class SomeModule_ProvideAnotherClassFactory implements Factory<AnotherClass> {
  private final Provider<SomeClass> someClassProvider;

  public SomeModule_ProvideAnotherClassFactory(Provider<SomeClass> someClassProvider) {
    this.someClassProvider = someClassProvider;
  }

  @Override
  public AnotherClass get() {
    return provideAnotherClass(someClassProvider.get());
  }

  public static SomeModule_ProvideAnotherClassFactory create(
      Provider<SomeClass> someClassProvider) {
    return new SomeModule_ProvideAnotherClassFactory(someClassProvider);
  }

  public static AnotherClass provideAnotherClass(SomeClass someClass) {
    return Preconditions.checkNotNull(SomeModule.INSTANCE.provideAnotherClass(someClass), "Cannot return null from a non-@Nullable @Provides method");
  }
}
For dependencies that are defined within modules, Hilt will generate a Provider Factory that uses the construction definition from our module to provide the reference to the required class. For types that are not defined inside of the module (e.g ones that do not need their construction declared), these will be instantiated directly.
Inside of this generated provider factory, the overridden get() function provides external access to the required member instances. This is accessed using a Provider reference for the desired member, which is provided through the constructor of the Provider Factory.

The above get() function utilises a second function inside of the provider factory (which is also accessible externally) to retrieve the required member from the module where it is defined. As mentioned above, where required, a module defines how a member is to be constructed. Therefore the specified module is used during the code generation phase to satisfy the provider factory requirements.
And finally, if we jump into our module we will see the declaration for our dependency. This provideAnotherClass function is accessed above to obtain an instance of the required member, all within generated code. This declaration within our module is the only piece of code that we have needed to write ourselves, with the previous steps here being generated by Hilt, acting as the glue between our application class and member injection using the module.
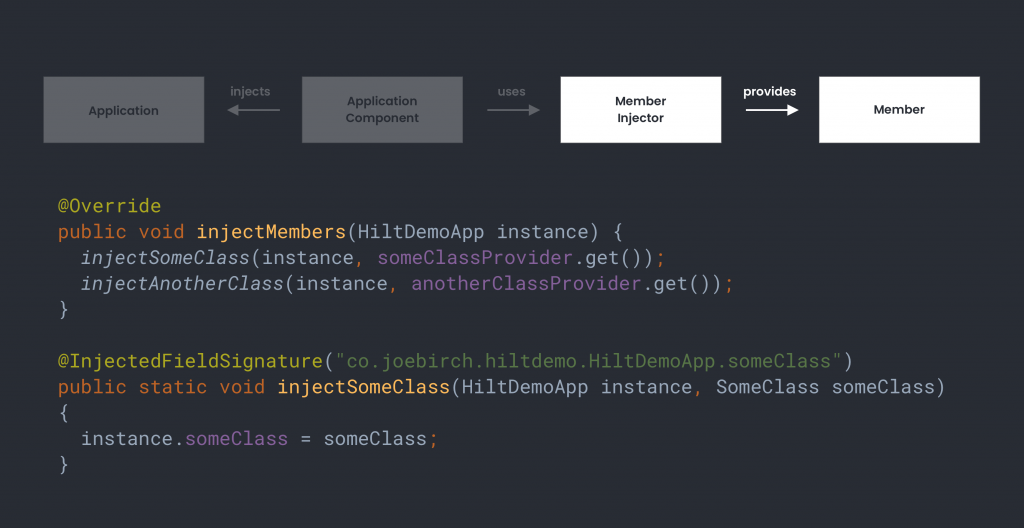
Now that our dependencies can be provided, they’re ready for injection into our application class. For this, Hilt utilises generated classes known as Member Injectors to provide the required members to their points of injection.
public final class HiltDemoApp_MembersInjector implements MembersInjector<HiltDemoApp> {
  private final Provider<SomeClass> someClassProvider;

  private final Provider<AnotherClass> anotherClassProvider;

  public HiltDemoApp_MembersInjector(
    Provider<SomeClass> someClassProvider,
    Provider<AnotherClass> anotherClassProvider) { … }

  @Override
  public void injectMembers(HiltDemoApp instance) {
    injectSomeClass(instance, someClassProvider.get());
    injectAnotherClass(instance, anotherClassProvider.get());
  }

  public static void injectSomeClass(HiltDemoApp instance, SomeClass someClass) {
    instance.someClass = someClass;
  }

  public static void injectAnotherClass(HiltDemoApp instance, AnotherClass anotherClass) {
    instance.anotherClass = anotherClass;
  }
}
We can see from the above source code that the member injector class acts as an access point for the required members. When initialised, Providers for each member are passed to the class which are then used when the corresponding members are required for injection. We can also see the public methods used for the injection of these members – before any calls reach these points, the injection starts at the generated application component. Here the component defines an inject function that can be used by an external class to trigger the injection of members. In this case, the application class will be the catalyst.
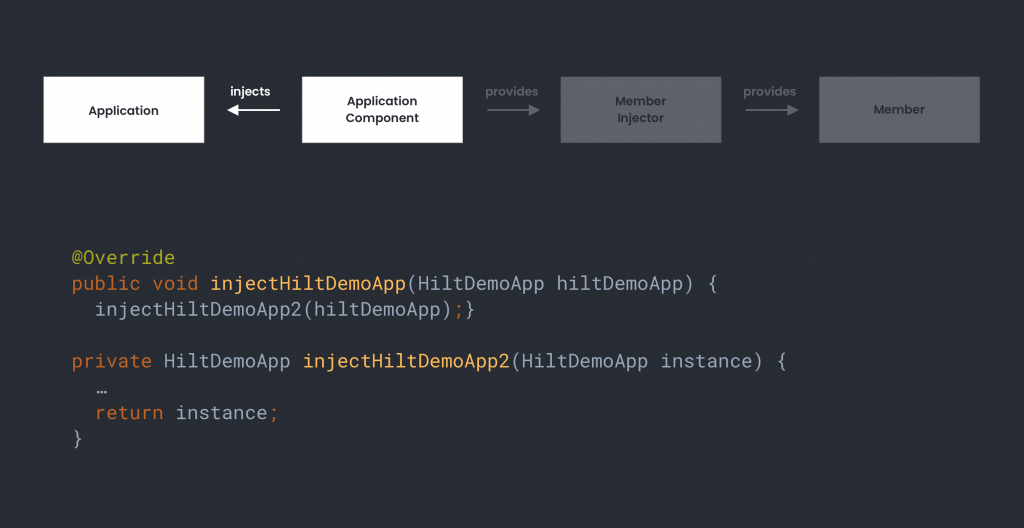
When these inject functions are called, the corresponding member injectors are used to handle the required injections. In the case of the injectHiltDemoApp2 function above, the following illustrated functions are used to trigger these injections.
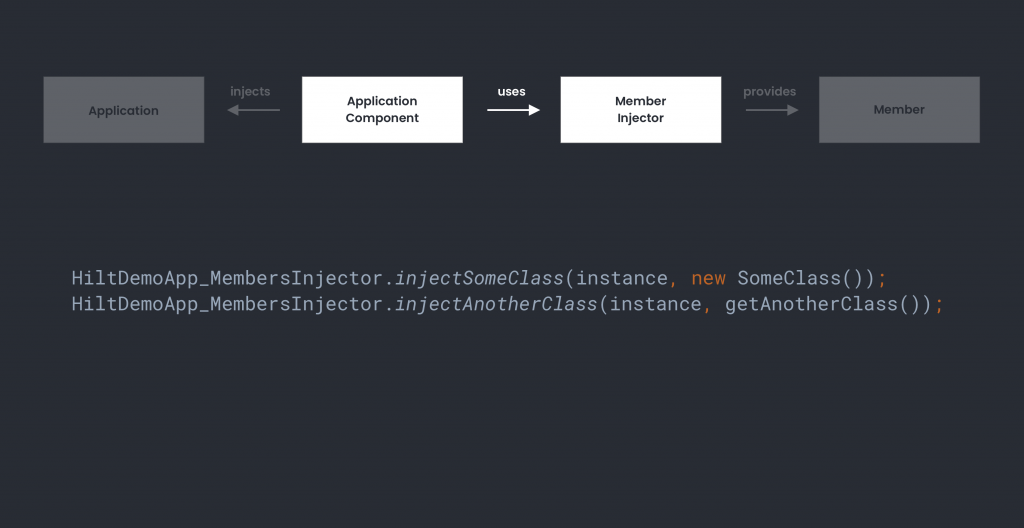
Within the corresponding member injector classes, these injections will assign the provided member references to the referenced application class. Once this has been done, the application class will be able to access these members. Because these member injectors need to directly assign their members, this is why they cannot be private – otherwise they would not be accessible here by Hilt.
To recap the findings throughout this post, we have seen that:
- When the @HiltAndroidApp annotation is applied to our application class, an application component is generated by Hilt – this is the central point of our global dependency injection setup
- The component also contains a reference to the activity, fragment, view and service components but we’ll cover those in the corresponding articles
- When constructing the Application Component class, an Application Context module is instantiated and bound to the component, giving global access to an application level context when using the @ApplicationContext annotation
- The component contains the required access points for dependencies.
- For dependencies that do not require construction declarations, these will be instantiated on-the-fly.
- For dependencies that are defined inside of modules, functions will be generated that provide the implementations of these. Each of these implementations will have a generated provider factory that is used to access the construction of the dependency through the module.
- The component will handle the injection of the application class. For this, a single generated member injector class is used for all of the required members of the application class. This is triggered when an external call to the inject function of the component is made.
With the above in mind, we can utilise the application component to provide dependencies at a global level, starting at our application class. Whilst here it looks like Hilt is doing a lot under the hood, this is all concealed from us as developers. Using the @HiltAndroidApp annotation is enough to inject members into our application class – but now whilst doing so, we have a better idea of what is happening behind the scenes.
Any questions on the above? Feel free to reach out. Otherwise, I’ll catch you in the next article where we’ll dive into the next part of Hilt!
Thanks to Manuel Vivo, Márton Braun, Wajahat Karim & Mike Nakhimovich for reading the initial draft and providing feedback!