When working with Navigation in modern Android apps, we’ve utilised navigation graphs through the navigation libraries. While the move to compose made things simpler, we still needed to work with navigation graphs and work with complex approaches that were carried over from the original navigation libraries. Navigation 3 aims to simplify the task of adding navigation to our apps, offering the following set of functionality to reduce friction around app navigation:
- Back stack management – Navigation 3 follows standard conventions for back-stack management, meaning each back-stack entry represents a piece of content the user has navigated to. We no longer need to utilise a navigation graph, instead we now utilise a back stack to represent a simple list of navigation destinations where we can add items to navigate forward and remove them to go back.
- Automatic UI updates – When the back stack changes, our UI will automatically update to reflect these changes, using out-of-the-box animations to transition between states
- Scoped state retention – while items are a part of the back stack, they’ll retain their state without requiring any additional configuration from developers
- Adaptive layouts – multiple destinations can be displayed simultaneously while also supporting switching between different layouts seamlessly, enabling support for adaptive layouts across different screen sizes
- Parent-child communication – content can pass metadata up to its parent layout, making it easier to coordinate between different parts of the navigation hierarchy
With this new approach to navigation, we now see a simpler approach for adding support for navigation to our apps. In this blog post we’re going to dive into Navigation 3 and learn how we can get using it in our own apps.
Setting Up
To get started using Navigation 3, we’re going to need to add some dependencies to our project. It’s important to note that Navigation 3 is still in Alpha, so we can expect some instability in the current releases and changes to come in future updates. For the examples that we’re running through in this blog post, you’ll need to add the following dependencies:
[versions]
navigation3 = "1.0.0-alpha01"
lifecycleViewmodelNav3 = "1.0.0-alpha01"
kotlinSerialization = "2.1.21"
kotlinxSerializationCore = "1.8.1"

[libraries]
androidx-navigation3-runtime = { module = "androidx.navigation3:navigation3-runtime", version.ref = "navigation3" }
androidx-navigation3-ui = { module = "androidx.navigation3:navigation3-ui", version.ref = "navigation3" }
androidx-lifecycle-viewmodel-navigation3 = { module = "androidx.lifecycle:lifecycle-viewmodel-navigation3", version.ref = "lifecycleViewmodelNav3" }
kotlinx-serialization-core = { module = "org.jetbrains.kotlinx:kotlinx-serialization-core", version.ref = "kotlinxSerializationCore" }

[plugins]
jetbrains-kotlin-serialization = { id = "org.jetbrains.kotlin.plugin.serialization", version.ref = "kotlinSerialization"}
This collection includes the core packages that we’ll need for plugging in Navigation 3 concepts into our app:
- Navigation 3 Runtime – Core Navigation 3 API. Provides access to classes used for declaring destinations.
- Navigation 3 UI – Provides access to the composables use to display destinations.
- ViewModel Navigation 3 – Allows ViewModels to be scoped to entries in the back stack. This can be excluded if you are not looking to utilise this functionality.
- KotlinX Serialization – Allows navigation keys to be serialized.
And if you need access to adaptive layouts for use with the NavDisplay composable, then you’ll need to add the adaptive package to your dependences. We won’t be using this in the examples within this post.
material3AdaptiveNav3 = "1.0.0-SNAPSHOT"
androidx-material3-adaptive-navigation3 = { group = "androidx.compose.material3.adaptive", name = "adaptive-navigation3", version.ref = "material3AdaptiveNav3" }
Managing the Backstack
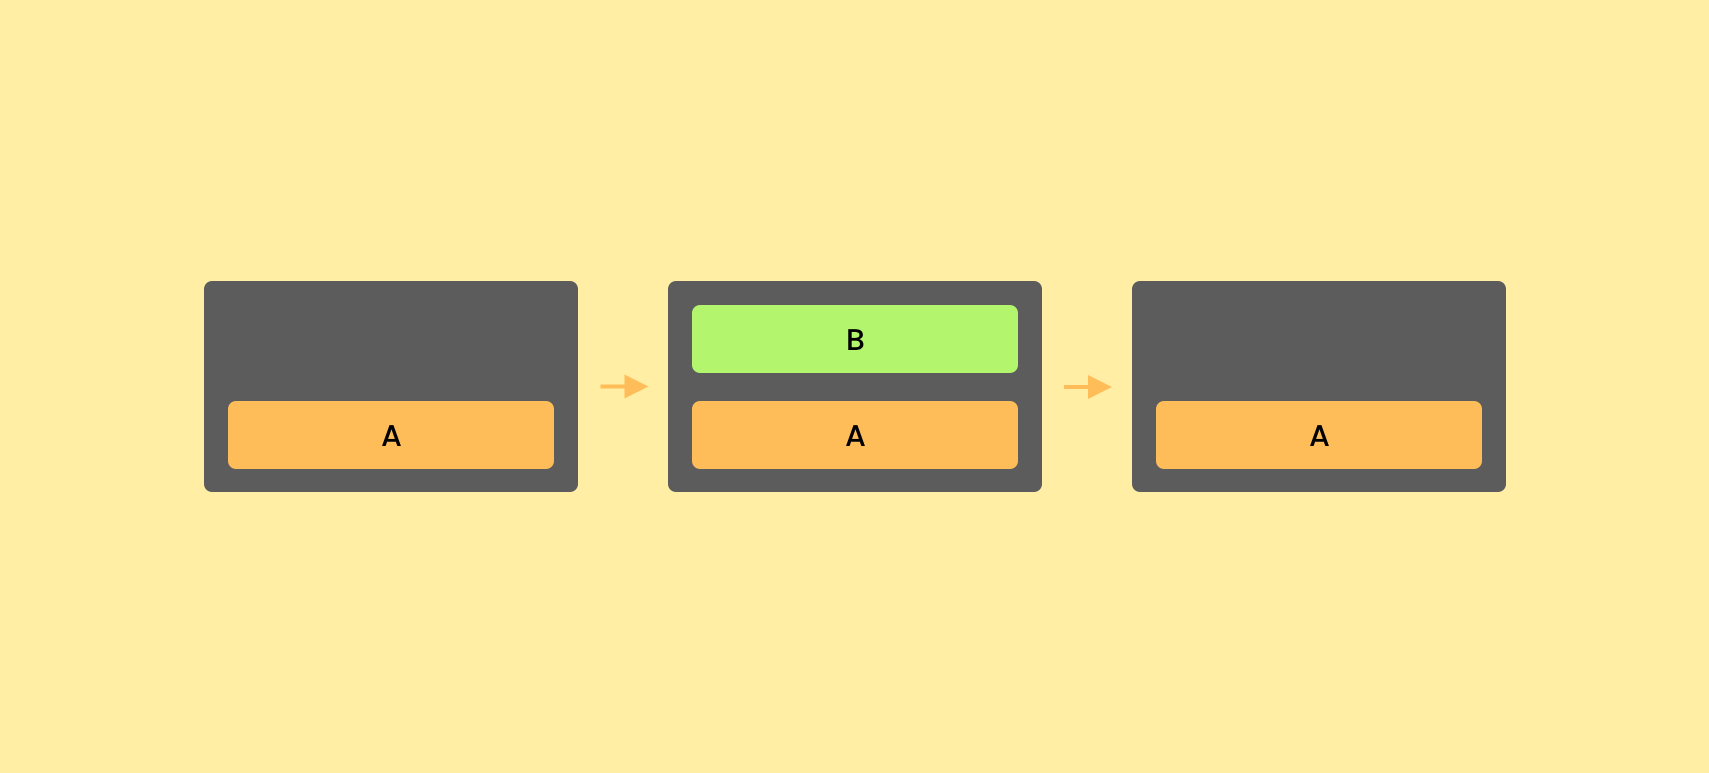
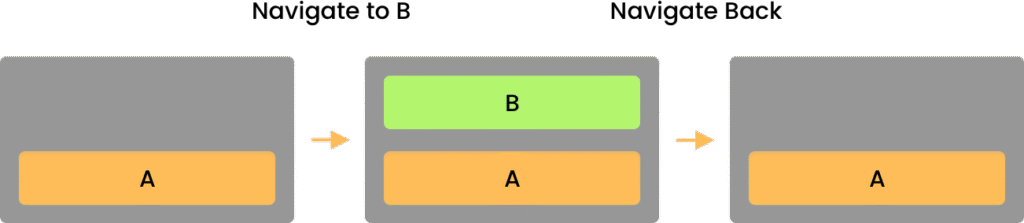
At the core of Navigation 3 is the back stack, this is what will model the state of our navigation. When the user moves forward to a new destination, this destination is added to the top of the stack. When they navigate back from that destination, that item is popped off the top of the navigation stack.
To represent items in this back stack, the Navigation 3 library stores references as keys. This not only simplifies how developers can navigate to destinations, but it also allows Navigation 3 to easily persist navigation state via serialisation.
A key difference with Navigation 3 is that our app now owns the back stack. It’s no longer a component that is hidden inside of the navigation package, we now declare the backstack ourselves and provide this to our navigation instance. Owning this backstack gives us far more control over it and removes the obscurity that is often felt when working with navigation libraries on Android.
To get started we’re going to begin by defining the destinations for our navigation – these will all be top-level destinations that can be navigated to in our app.
internal data object Home
internal data object Reminders
internal data object Pets
internal data object Medication
internal data object Weight
Now that we have these destinations, we’re going to go ahead and define the back stack – this will keep a track of the navigation stack for our application.
val backStack = remember { mutableStateListOf<Any>(Home) }Here we provide the default value of Home as this is the starting destination for our backstack. When we want to add an item to this backstack (and therefore navigate the user to this destination), we can use the add function to append an item to our backstack.
backStack.add(Reminders)And in cases where we want to navigate back (or remove an item from the backstack), we can simply call removeLastOrNull. This will remove the entry from the top of the backstack, navigating the user to the previous entry in the backstack.
backStack.removeLastOrNull()Declaring Navigation Routing
Now that we have our back stack in place, we need to write the code that will compose our destinations based on the current entries in the back stack. For this we’ll use the entryProvider DSL – this is a simpler way of defining navigation routing and allows us to avoid having to manually test each navigation destination to provide content. This entryProvider is used to define the different entries for our navigation stack, so here we will provide the entry for each destination along with a reference to the content that is to be composed for it.
entryProvider {

}
When it comes to the destinations that are contained inside of our entryProvider, these are represented by the NavEntry class. When using the entryProvider DSL our destinations are automatically wrapped in this class for us, meaning that we do not need to directly deal with it. However, it’s important to understand that it exists and what it is used for.
The NavEntry class is used to represent a single destination in our navigation graph, wrapping a composable function to provide it as an entry point. While the composable represents the content of our screen, the NavEntry represents the entire destination – not just the key used to access it, but also the content that is to be displayed for it.
To convert a navigation key into a NavEntry, we utilise the entryProvider that we previously touched on. This is a function that takes a key and returns the corresponding NavEntry for that destination. Using the top-level destinations that we previously defined, let’s construct the entryProvider for our app.
entryProvider {
    entry<Home> {
        Box(modifier = Modifier.fillMaxSize()) {
            Text(
                text = "Dashboard",
                modifier = Modifier.align(Alignment.Center)
            )
        }
    }
    entry<Reminders> {
        RemindersScreen()
    }
    entry<Pets> {
        PetsScreen()
    }
    entry<Medication> {
        MedicationScreen()
    }
    entry<Weight> {
        WeightScreen()
    }
}
If we decide not to use the DSL here, we need to manually define the NavEntry for each destination, which would look similar to the following:
entryProvider = { key ->
    when (key) {
        is Reminders -> NavEntry(key) { RemindersScreen }
        ...
    }
}
As we can see, the DSL provides an approach that is both simpler to read and implement.
Composing Navigation
Now that we have our entryProvider in place, we need to utilise this so that we can compose our navigation and the destinations that are contained within it. For this we utilise the NavDisplay composable – this takes a reference to our back stack and pairs this with our provided entryProvider to manage the composed destination. The NavDisplay acts as an observer, watching your back stack for changes and automatically updating the displayed content when navigation occurs.
@Composable
public fun <T : Any> NavDisplay(
    backStack: List<T>,
    modifier: Modifier = Modifier,
    contentAlignment: Alignment = Alignment.TopStart,
    onBack: (Int) -> Unit = ...,
    entryDecorators: List<NavEntryDecorator<*>> = ...,
    sceneStrategy: SceneStrategy<T> = SinglePaneSceneStrategy(),
    sizeTransform: SizeTransform? = null,
    transitionSpec: AnimatedContentTransitionScope<*>.() -> ContentTransform = ...,
    popTransitionSpec: AnimatedContentTransitionScope<*>.() -> ContentTransform = ...,
    predictivePopTransitionSpec: AnimatedContentTransitionScope<*>.() -> ContentTransform = ...,
    entryProvider: (key: T) -> NavEntry<T>,
)
For the first argument of our NavDisplay we need to provide the backstack – this is the back that we defined earlier in the form of a SnapshotStateList. This type represents an observable list, so whenever items are added or removed for the stack, recomposition will be triggered and our UI will be updated to match any destination changes.
Alongside this we’ll need to provide the entryProvider argument, this is the entryProvider that we defined in the previous section. We don’t need to do anything else here as our NavDisplay will simply use this to compose our destination based on the state of our back stack.
While an optional parameter, we can utilise the onBack lambda to customise the back behaviour for the back operation in our app. If we are simply removing the item from our back stack then we don’t need to provide this (as the NavDisplay will do this for us under the hood). However, you can provide this lambda to override the behaviour here if you need to do things differently (such as showing an alert on back press).
NavDisplay(
    modifier = Modifier.fillMaxSize(),
    backStack = backStack,
    entryProvider = entryProvider {
        entry<Home> {
            Box(modifier = Modifier.fillMaxSize()) {
                Text(
                    text = "Dashboard",
                    modifier = Modifier.align(Alignment.Center)
                )
            }
        }
        entry<Reminders> {
            RemindersScreen()
        }
        entry<Pets> {
            PetsScreen()
        }
        entry<Medication> {
            MedicationScreen()
        }
        entry<Weight> {
            WeightScreen()
        }
    }
)
Including Navigation Data
In cases where we need include navigation data alongside our destinations, we can do this by defining our destinations as a data class instead of an object. This will allow us to include a constructor for our definition, providing information alongside it to be used when navigating to our destination.
internal data class EditMedication(val id: String)We can then use the backStackEntry for our entry to access this information from our destination. You can notice in the example here that this information is automatically typed for us, meaning we do not need to perform any casting to access our data.
entry<EditVaccine> { backStackEntry ->
    AddVaccineScreen(
        vaccineId = backStackEntry.id,
        onComplete = {
            topLevelBackStack.removeLast()
        }
    )
}
It’s important to note that we should only use this to provide information that is needed to navigate to and compose our destination. In this example, I passed the ID of the item that the user is wanting to edit which will then be used to fetch the item in the cache – this helps me to avoid running into any memory issues for the size of the data that is being transferred.
Saving Navigation State in ViewModels
In our compose apps, we use ViewModels to retain state across configuration changes and by default, this our scoped to the nearest ViewModelStoreOwner (this will usually be an activity or fragment). However, we may want to scope our ViewModel to a specific NavEntry on our back stack – this will ensure that the state is only retained while that NavEntry is a part of our back stack, clearing its state when the NavEntry is popped from the stack.
To achieve this we can use the androidx.lifecycle:lifecycle-viewmodel-navigation3 package, which gives us access to a NavEntryDecorator for scoping ViewModels to their NavEntry. Once we have added this decorator to the entryDecorators for our NavDisplay, any ViewModel that is created inside of the content for a NavEntry will automatically be scoped to it.
NavDisplay(
    entryDecorators = listOf(
        // Add the default decorators for managing scenes and saving state
        rememberSceneSetupNavEntryDecorator(),
        rememberSavedStateNavEntryDecorator(),
        // Then add the view model store decorator
        rememberViewModelStoreNavEntryDecorator()
    ),
    backStack = backStack,
    entryProvider = entryProvider { },
)
Throughout this post we’ve explored the basics for Navigation 3 and getting a simple navigation stack configured in our apps. With the examples in this post we’ll be able to add a navigation stack to our app and move between destinations – but there’s more to learn for Navigation 3, so stay tuned for some future posts and check out the official documentation in the mean time!