Because of this, a few years ago (using an Arduino Uno) I created a refreshable braille display that essentially took a text file and displayed the contents in the form of braille. Now that Android Things is available and I had picked up a kit from pimoroni, I decided to revisit this project and take it up a notch to create BrailleBox. In this article we’ll be looking at what BrailleBox is, how it was constructed and the little amount of code that it took to create it 🚀
P.S: If you only came here for the code, you can check out the Github Repo here:
https://github.com/hitherejoe/BrailleBox
Wait, what is BrailleBox?
When I originally built the first edition of this with the Arduino Uno, it involved loading a text file into the program which was quite a manual process — this wasn’t very ‘smart’ (hey, it was only a prototype!). With the Internet of Things, you expect a device to be a bit ‘smarter’ than this — so it was obvious that the the approach this time around needed to be automated, or somewhat less-manual.
Rather than the loading of this text file, I thought it would be a nice idea to display some form of informative data to the user. One of my favourite ideas that came to mind was to allow users to read some latest news articles in braille — I came across News API and this felt like the perfect API for me to get something up and running fast. Using this API I could fetch a collection of news articles from a desired source and simply them to the user 🙂
Initially, I originally had a single key requirement when it came to creating BrailleBox:
- It needed to display a news article in the form of braille as requested by the device
But with a little bit of thinking, there were a few more things I had to think about in-order to improve the UX of the device:
- Should the device fetch the news automatically? This is automated, but I might not be at the device when it displays the article. This could also be quite alerting for the user if the device randomly starts clicking out of the blue.
- Instead of the above, the box could have a button which when pressed fetches and displays a news article in braille. Provided the box is placed in a location that the user is comfortable with, this will allow for
- The rate at which the news article is read could be either too fast or too slow for users. To solve this, it would be worth adding a potentiometer to allow changing of the rate at which the letters within each of the words in the news article text are displayed. (I didn’t actually end up putting that in this version, next time though 😉)
With that it mind, this is what I ended up with:

It’s only here to act as a prototype, so it’s not currently the most beautiful looking thing on this planet but it works, right! Here’s a little clip of it doing its job:
But wait, what’s Braille
Just to cover some foundations (I’m not a master in braille either, so I can’t give you a full lesson here I’m afraid), but braille is a system that allows the visually impaired to read sequences of patterns that represent letters, words and symbols. Each individual braille character consists of a combination of raised ‘points’, this is best represented in the graphic below:

You can see here that each letter and each number is represented by its own unique representation of braille ‘points’. With this in mind, it’s actually quite a simple system (probably not so simple to learn however) — from this system we can create complete word representations by piecing together combinations of letter representations. Once we have these ‘words’, we then need some way of displaying them in the physical world.
But how can we recreate this in the physical world? Current solutions have been pretty expensive — dynamic braille displays are nothing new, except they cost thousands of pounds to build and purchase. The whole point of this project originally was to be able to do it for a fraction of the price, making this kind of technology accessible to many (that’s one of the things I love about Android after all).

But how do these braille points get shown when it comes to BrailleBox? Well, in relation to the Android Things platform, we have access to what’s known as GPIO (General Purpose Input Output), we’ll come onto this more later in the article — but if you look at the image on the left, you’ll notice that we can arrange the output of these pins to look very similar to the braille sequences above.
Saying this, we can use GPIO and position 6 outputs to recreate the same representation of the braille characters that we previously looked at. For this, I used what are called Solenoids — a solenoid allows us to pass in a current, creating an electromagnet that can pull in our magnet, as well as pop it back out. You can read more about solenoids here, but the ones that I’m using look a little something like this:


I decided the little plastic hook wasn’t very user friendly for hands, so I pulled them off and fixed some little wooden balls to the end. But back to the point… this little metal rod will be pulled into the solenoid when a current is passed in, and pushed back up by the help of the spring when the current is released. This action allows us to ‘show and hide’ braille points, popping them out of the enclosure and making the only ‘touchable’ braille points the ones that make up the sequence of the letter that we’re currently displaying.
Looks cool! How did you make it?
The BrailleBox was actually pretty simply to build, all it consists of is:
- A raspberry pi 3
- A breadboard
- A project box (mine is sized 150 x 80 x 50 — make sure your breadboard fits in here if you want it to!)
- 5v Solenoid x 6
- Wooden balls x 6 (or something similar)
- 100Ω resistor x 7
- 1N4004 diode x 6
- Push switch
- A handful of male-to-male connector cables
- Male-to-female connector cable (for connecting the GPIO pins of the raspberry pi to the breadboard) x 7
The great thing is that this list isn’t too extensive and all of these components can be found for pretty cheap. The most expensive are the solenoids, but 5V ones can be picked up for around £2.50 each 🙂
And with the electronically components from this put together into a circuit, the schematics for the complete circuit isn’t too complex either:

I’m no expert in electronic engineering, but nothing has caught on fire yet so I think it’s doing good enough for a prototype so far 😅 It’s probably quite overwhelming to look at, so let’s break down each of the parts and what they’re doing.
Solenoids
The solenoids are the part of our circuit which allow us to display the braille sequences to the user. As previously mentioned, we can pass a current into them to enabled the magnet (bringing the rod in) and release the current to in turn release the rod. Without going too much into the technical details, let’s take a quick look at how the solenoids are hooked up to our raspberry pi:

- This connection shows the grounding of our solenoid to a grounding point on our breadboard.
- Here, this connection is coming directly from a GPIO pin on the raspberry pi. So whenever we send a signal using that GPIO pin, this is the entry point for the communication with the solenoid.
- Here I’ve placed a resistor to limit the current in the circuit, this is just for safety measures. It also conveniently prevents the solenoid from being pulled down so strongly, this reduces the ‘click’ sound which usually occurs without this resistance.
- Because solenoids hold the current they receive (acting as a capacitor in a way), a diode is placed here to ensure that the current can only flow in a single direction — meaning that the current will never be sent in the direction of the raspberry pi (safety first!)
- Now that our current has gone through the resistor and diode within our circuit, we can route it to the solenoid to give it power, pulling the solenoid ‘down’ into a retracted state.
Switch
We use a switch in the circuit to allow the user to request the display of a news article on the BrailleBox. The circuitry for this switch is also pretty straightforward:

- This connection shows the grounding of our switch to a grounding point on our breadboard.
- This is the connection that routes back to our GPIO — this is how we send the signal that the button was pressed.
- This connection is routed to a point of power on our breadboard.
- Here I’ve placed a resistor to limit the current in the circuit, this is just for safety measures in regards to the circuit.
- Finally, this is the connection for the positive connection point of the switch.
GPIO pins
If you’re not aware already, GPIO stands for General Purpose Input Output — it essentially acts as an interface to provide a way for us to communicate with the raspberry PI. You can read more about GPIO here. Here’s a quick look at what the pins on the raspberry pi 3 have to offer (this will differ depending on the device which you have):

You can see from this that we have access to pins such as:
- 5V power pins to provide power to our circuit
- Ground pins that can be used to provide a ground for our circuit
- Numbered GPIO pins for communication to and from the raspberry pi
In the case of BrailleBox, we use the GPIO pins for two different parts:
- To send a signal to each of the required Solenoids when we wish to display a letter using the Braille pins. In the diagram below we use GIPO pins 17, 27, 22, 23, 24 and 25 for this.
- To receive a signal when the push button is pressed so that we know when to fetch a new article from the api. In the diagram below we use GIPO pin 6 for this.

We can then organise the output from the GPIO pins to create the same layout and representation as the braille letters that we previously looked at. This allows us to display any given letter (or symbol) from the alphabet that makes up a word which we are currently showing:

And what about the box?!
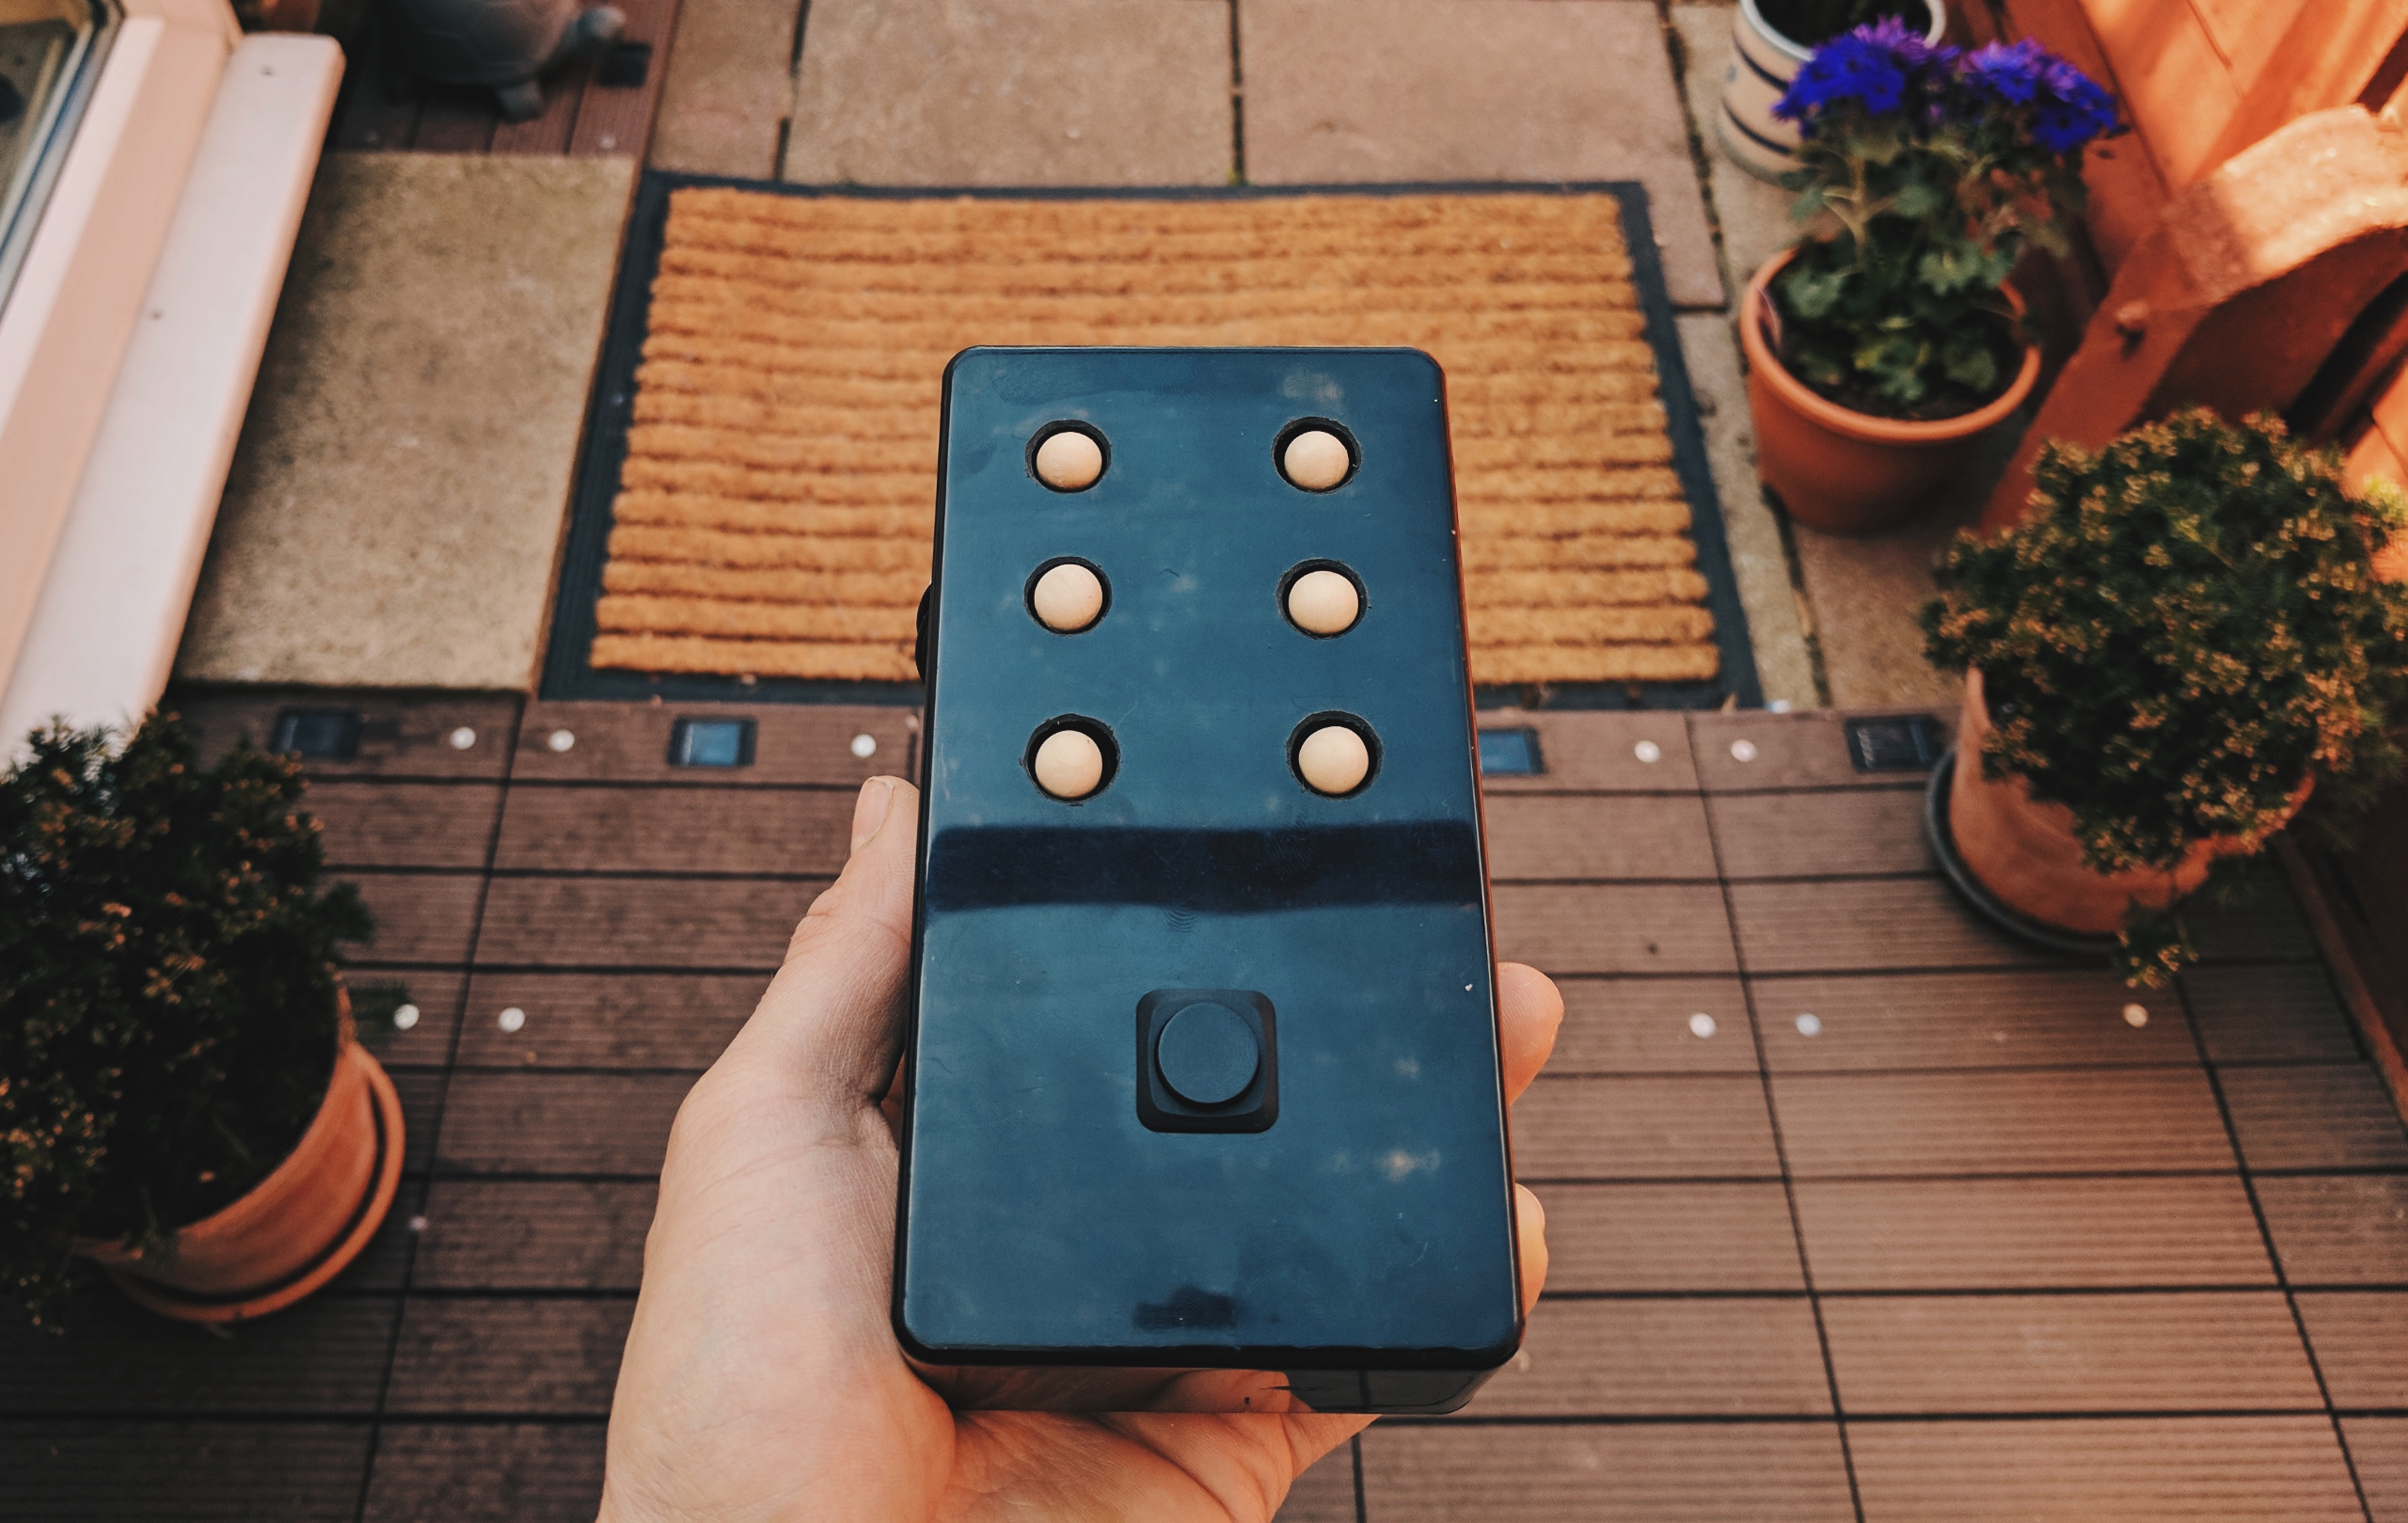
The box was actually pretty fun to put together, even if a bit difficult (getting the solenoids to sit at the right height…). I haven’t done any DIY in sometime, so I was a little rusty with the drill (I messed up the first box so I had to order a second). But the completed product looks a little like so:

I began by measuring a drilled 6 holes into the project box. Be sure to leave enough space on all 4 sides of the solenoids so that the other solenoids can fit in place comfortably. You can use a countersink drill head to smoothen our your holes, they look a lot cleaner and smoother if you do decide to do this 🙂 I also drilled a hole for the push button (this was a little bit bigger than the solenoid holes) and also one to feed out the wires for the solenoids.
Next, you need to align each of the solenoids up with their corresponding hole. When doing this, you also need to ensure that the solenoid heads (the wooden balls) both pop-out of the hole enough and also fall-back in deep enough when operating. To get the right height it was a bit fiddly — to do this I ended up using a flat 4×4 lego piece as the base (I had to sand off the lego circle heads 😅) but these worked a treat! Now they were at the right height, I used some ‘No More Nails’ that I found in the shed to stick these in place.
And voila! Other than screwing the base onto the project box, that was pretty much it! It wasn’t much work at all to put this little box together and it made the project feel a lot more complete than just being a bunch of components hanging off a breadboard.
Show me the code already!
The BrailleBox project can be found over on GitHub here:
https://github.com/hitherejoe/BrailleBox
The project itself is pretty straight forward, essentially all it does is:
- Fetch the top news article from a news API
- Convert the string representation into a series of braille sequences
- Display that sequences one at a time
I’m going to run through how BrailleBox was built, we’ll look at some basic setup points also for Android Things projects but won’t go too into depth as it’s a bit out of focus for this article 🙂
Add the Android Things Dependancy
To begin with, you’ll need to add the dependancy for the Android Things support library to your project. This gives you access to Android Things related APIs that aren’t a part of the standard Android SDK.
https://gist.github.com/hitherejoe/db24e0e261a34c7ea25e8c6f5e639a56
Set a Home activity
After creating the activity that will be used for the home activity, you’ll need to declare this as the launcher activity for the android things project. This means that when the device is booted, this activity will be launched by default.
https://gist.github.com/hitherejoe/3cfed354d963969ca2948f9d6b24d946
This is a great addition for Android Things as it allows us to build screen-less devices and easily launch our application upon boot 🙂
Configuring GPIO pins
We previously looked at the solenoid components and GPIO that I used to display braille characters. In order to use these GPIO ports, we need to configure them for use. In BrailleBox we do this when launching the application — we begin by open the GPIO pins using the pin numbers for the raspberry pi — we keep the numbers for these in the BoardDefaults class so that if we’re using another board it’s easy to switch these around.
Note: When it comes to GPIO pins, the reference for the pin you are wishing to communicate with depends on the hardware board that you’re using. It’s good practice to create a BoardDefaults class so that you’re able to easily support different board types. For BrailleBox I’ve only filled in the GPIO pin ids for the Raspberry pi 3 as that’s all I have access to, but it will be simple to extend on this in future.
If you look in the GpioHelper class, you’ll see that there’s a openSolenoidGpioPins() method that is used to configure the pins and store them in a List so that we can access them as and when we need.
https://gist.github.com/hitherejoe/b8421d91fa1a35fa7095e872a48d0b98
Within the configureGpioPin() method we’re doing what it says on the tin, configuring the pin ready for use. Here we do several things in the process:
- Use the PeripheralManagerService class to open the given GPIO pin
- Use the setDirection() method to set the pin as an output pin, also stating that it’s initial state to low
- Use the setActiveType() method to state that setting the pins value to true is equivalent to setting a high voltage
At this point out GPIO pins are all configured and ready to use when we wish to set values to them. But before we can do any of that we need to fetch an article from the api. When we receive a response back, we have an instance of a news article that we need to display in braille. When we have this instance, we take the title and description of the article and map it to it’s braille representation using a BrailleMapper class. This class essentially takes a given string and converts it to list of Braille representations that we can return and display on our solenoids.
https://gist.github.com/hitherejoe/4adf3f06904b9c6404f08443e3024a22
We begin by calling mapFromWords(), in this method we simply loop through each letter in our given string and create a Braille representation for each one. You can see here that we also add a space representation here on line 5, just to keep our sentences readable 🙂
Then once we have a complete set of Braille representations for our given strings, we pass each one (with a delay using Observable.interval()) back to our activity. When we receive back a Braille representation, we loop through the solenoids and set each corresponding GPIO pin to the corresponding GPIO value. This allows us to recreate the representation for letters in braille using the solenoids to do so.
https://gist.github.com/hitherejoe/753f472fa6ce19e2b78d18006000156d
You’ll notice that each Braille representation looks like this:
A(‘a’, “100000”), B(‘b’, “101000”)
So whilst we’re storing each representation as its true braille value (e.g. “100000″ for ‘a’), the solenoids that I’m using (because they’re cheaper 😄) are sticking up (low current) by default, you basically use a current to give them a HIGH value which then pops the solenoid down. Because of this, we need to flip the real braille representation so that the solenoids I’m using can display it correctly. So ‘a’ would go from “100000” to “011111” and ‘b’ would go from “101000” to “010111” and so on. You can get solenoids that have a default state of starting ‘down’ and using a current to pop them up, but for a prototype it didn’t make too much sense to spend the extra money.
And that’s pretty much it in terms of showing the braille representations of strings using the solenoid components. Other than that, a Button listener is used to detect when the push button is pressed (to fetch a news article) and I reset the solenoids every time a news article is requested.
Listening for the Button press
In order to use the push button that was shown in the circuit, we need to use a driver from the contrib-drivers repository. We can add this dependancy to our project as below:
https://gist.github.com/hitherejoe/5b29b43bc6f03740642439fe21f05249
Once added, we can simply configure the GPIO pin (similar to how we did with our solenoids) so that we are able to listen for button presses within our application.
https://gist.github.com/hitherejoe/057c3f7ad6e7be7f2fb35e43fb7a3f62
In line 3 above, you’ll note that we create a new Button instance by retrieving the Button GPIO pin from our BoardDefaults class, as well as passing in the state for which the Button is classed as pressed. Here we declare that the button is in a pressed state when
Conclusion
Whilst this is currently just a prototype it does what it needs to do, it’s not the prettiest looking thing but remember you shouldn’t judge a book by its cover ❤️ (that’s my excuse anyway).
It was pretty fun to build a screen-less project, there was quite little code involved and I haven’t toyed around with DIY for a while so this made a nice change — I encourage you to try and build some hardware 😃
I’d love to hear any questions or advice on Android Things, whether related to this project or not! Feel free to tweet me on the account below:
https://github.com/hitherejoe/BrailleBox
P.s Check out my other projects at joebirch.co