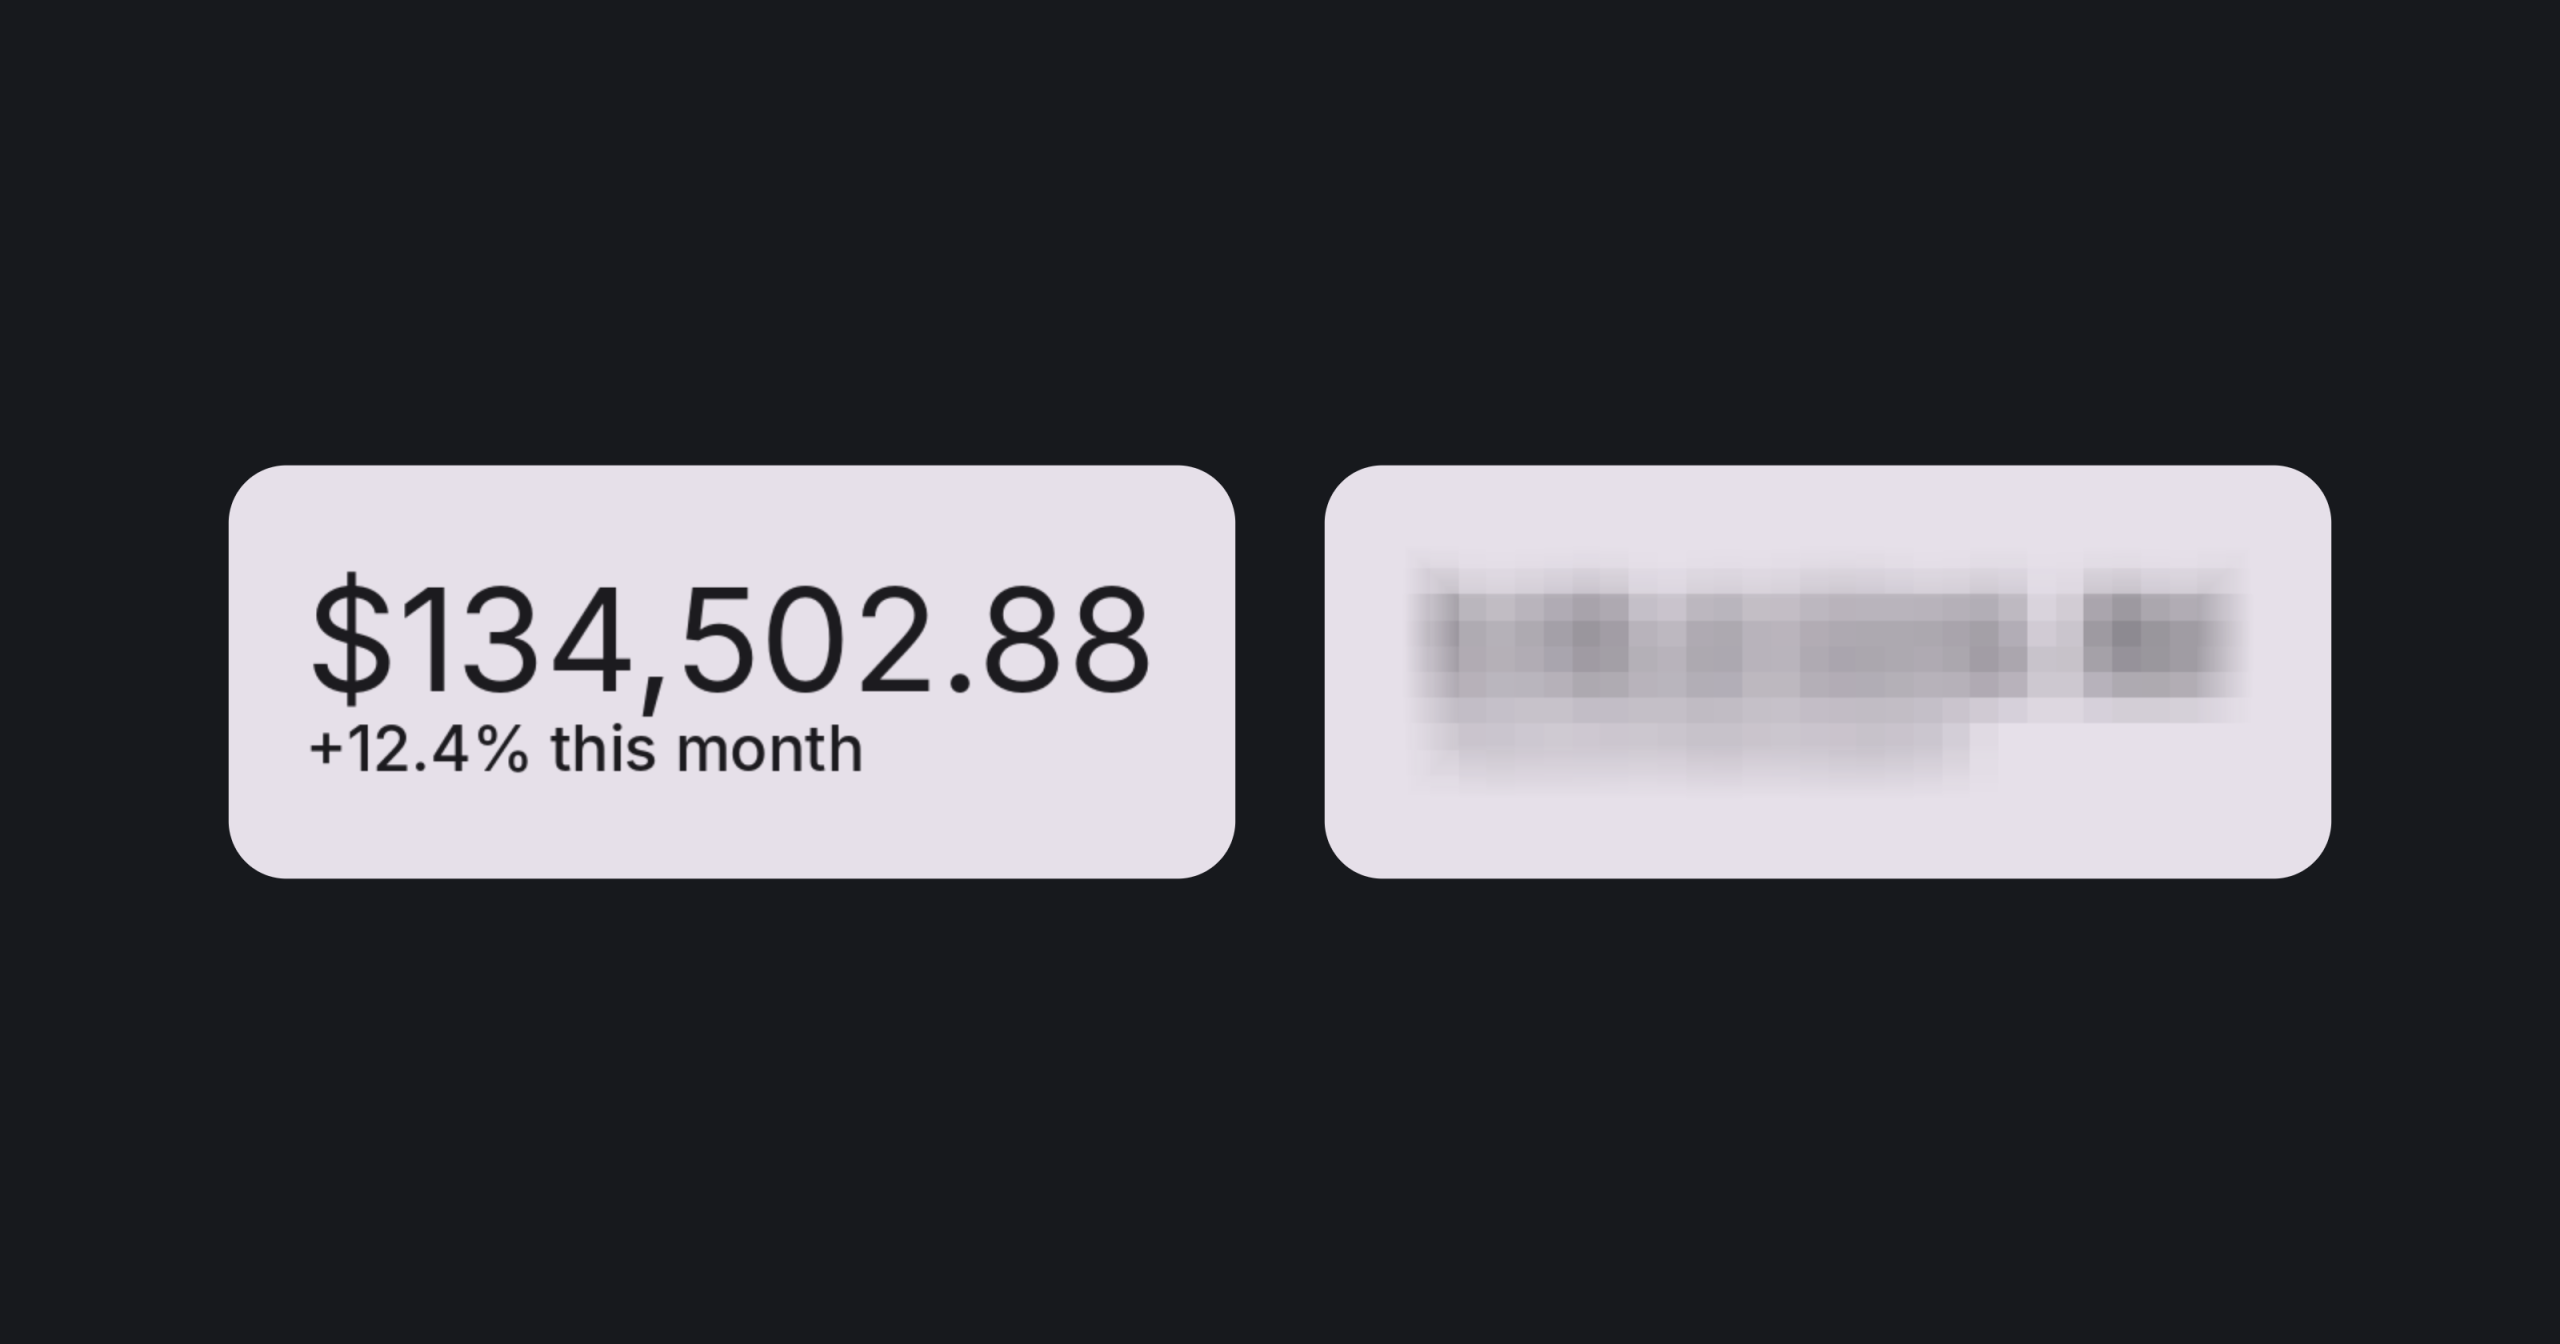
When it comes to displaying portfolio data inside of Sleevd, this is only available to users on the Ultimate plan. To hide this functionality from free users, a common approach here is to swap the value out for a placeholder or completely hide the component from view. While this works, I wanted to display the same UI for free and paid users as to give an insight into the information being displayed there which would then become revealed when the user upgrades.
To help with this I build Pixelate which is a small Compose Multiplatform library that pixelates whatever composable it is applied to.
Text(price, modifier = Modifier.pixelate())When it comes to applying pixelisation, we may want to apply it on a single Text composable:


Or we may want to apply the pixelisation to a parent composable and in turn, its children:


In this blog post, we’ll walk through how Pixelate is built and learning how we can build these kind of effects for our own apps.
How the pixelation works
Before we get into the code, let’s take a quick look at how we will approach this pixelation. Rather than covering the content up or swapping it out for something else, Pixelate takes over the drawing of the composable and draws a reduced version of it instead. This happens in four steps:
- Work out how big each block in the mosaic should be, based on the height of the content.
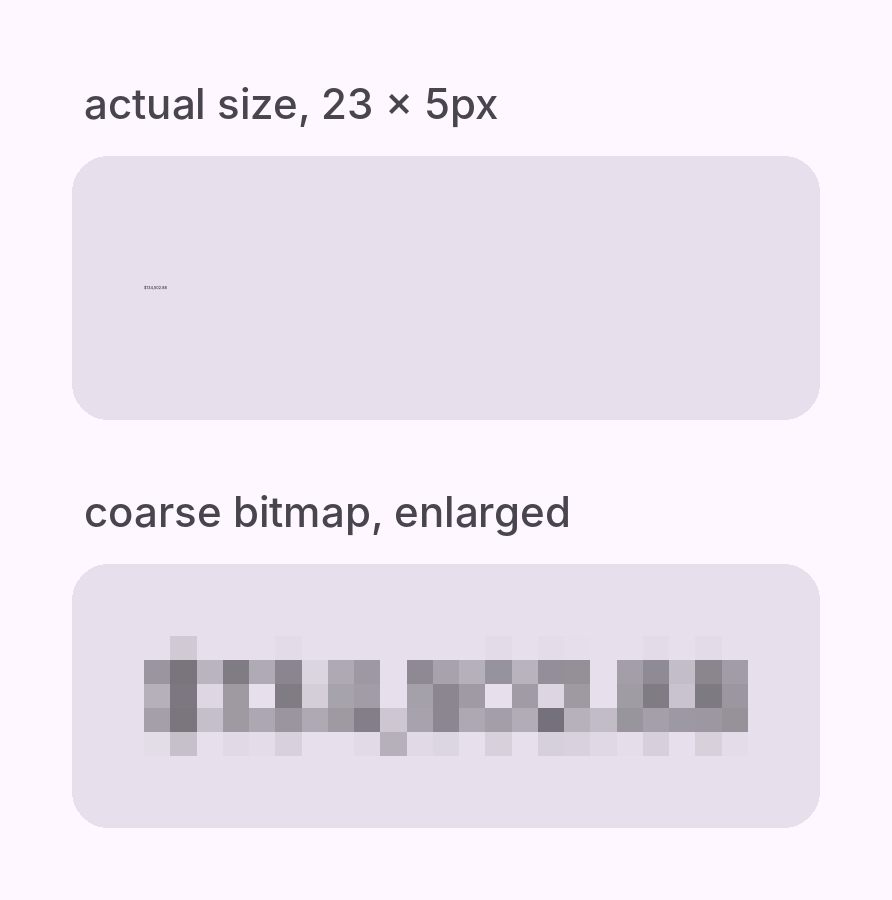
- Draw the content into a tiny bitmap that has one pixel for each block. This is the step where the detail of the content is thrown away.
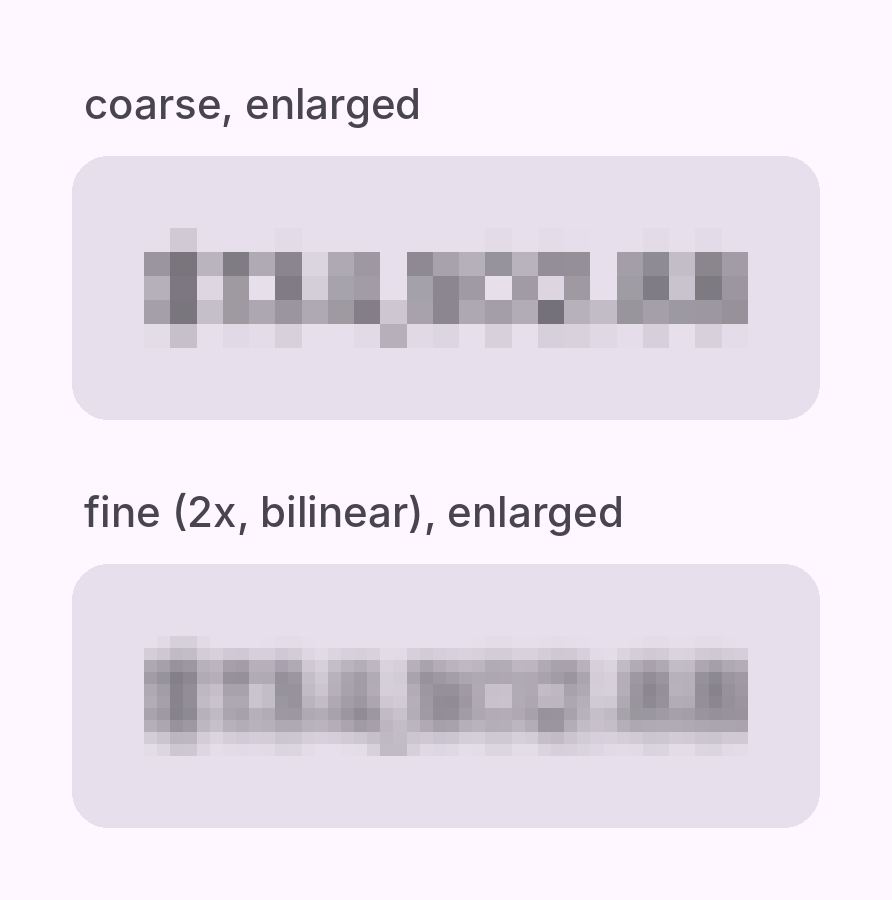
- Scale that bitmap up to twice its size with smoothing, softening the steps between neighbouring blocks.
- Draw the result back out at the full size of the content without any smoothing, so that each pixel becomes a solid block.
Because the original content is never drawn to the screen, there is nothing readable underneath the mosaic. And because all of this happens at draw time, the composable keeps its exact size and position in the layout.
Setting up the modifier
Everything in Pixelate happens at draw time, so we build out the pixelation functionality using the drawWithCache modifier. This gives us a CacheDrawScope where we can perform any of the initial setup work for the composable, along with onDrawWithContent where we perform the drawing for each frame. To begin with, the initial setup of our modifier looks like the following:
public const val DefaultBlockRatio = 0.22f

public fun Modifier.pixelate(
    blockRatio: Float = DefaultBlockRatio,
    minBlockSize: Dp = 4.dp,
    maxBlockSize: Dp = 14.dp,
    featherEdges: Boolean = true
): Modifier = drawWithCache {
    val srcWidth = size.width
    val srcHeight = size.height

    if (srcWidth < 1f || srcHeight < 1f) {
        return@drawWithCache onDrawWithContent { drawContent() }
    }

    onDrawWithContent {
        // the pixelation will happen here
    }
}
Here we start by taking the width and height of the content that the modifier is applied to. If either of these is less than a pixel, there’s nothing for us to pixelate, so we add a handler here as a safeguard and fall back to drawing the content as normal. When it comes to the drawWithCache block, this is only ever re-run when the size of the content, or any of the state reads, changes. This is perfect for handling the logic that involves the creation of the bitmaps for the pixelated content.
At this point nothing in our composable would have changed, as we are not utilising the modifier yet.

Calculating the block size
Before we can pixelate anything we need to know how big each block in the mosaic should be, so we start with calculating the height of the content.
val cell = (srcHeight * blockRatio).coerceIn(minBlockSize.toPx(), maxBlockSize.toPx())
val coarseWidth = (srcWidth / cell).roundToInt().coerceAtLeast(1)
val coarseHeight = (srcHeight / cell).roundToInt().coerceAtLeast(1)
Here we take the height of the content and multiply it by the blockRatio. The height is used here because when it comes to text, the height is only dependent on the font size, whereas the width depends on how many characters are being displayed. If we used the width then “$12” and “$134,502.88” at the same font size would end having very different sized blocks, creating inconsistency in cases where multiple pixelated values prices areshown next to each other would look inconsistent. With this approach of using the height, it means that every text component at the same font size will have the same size of block applied.
To ensure that we have consistency in other areas, we use coerceIn to keep the cell between minBlockSize (4dp) and maxBlockSize (14dp). Without this, content that has a larger height would result in having a few large squares instead of the mosaic effect that we are looking for, with the minimum check accounting for the other end of this.
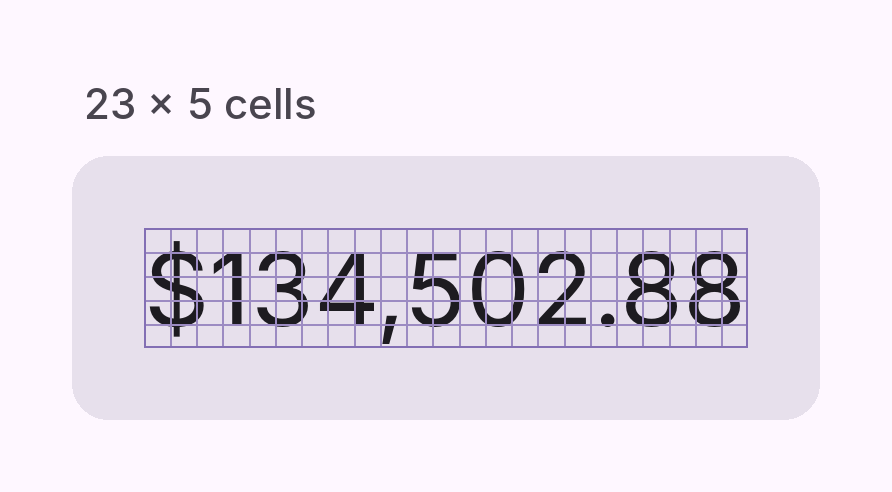
Once we have calculated the cell size, coarseWidth and coarseHeight are used to calculate how many cells fit both across and down the content. If we were to use 40dp tall and 200dp width Text as an example, this would give us:
- cell: 40 × 0.22 = 8.8
- coarseWidth: 200 / 8.8 = 22.7, rounded to 23
- coarseHeight: 40 / 8.8 = 4.5, rounded to 5
This gives us a grid of 23 × 5 cells, which will be used for the dimensions of a bitmap, using one pixel for each cell. If we draw this grid over our price, we can see how the content is going to be divided up:
Creating the bitmaps
Now that we have our grid of cells, we can start to think about the pixellation. We will implement this by drawing the content into a very small bitmap and then drawing that bitmap back out at full size. For this we create two ImageBitmap references, along with a Canvas for each so that we can draw into them.
val fineWidth = coarseWidth * 2
val fineHeight = coarseHeight * 2

val coarse = ImageBitmap(coarseWidth, coarseHeight)
val fine = ImageBitmap(fineWidth, fineHeight)
val coarseCanvas = Canvas(coarse)
val fineCanvas = Canvas(fine)
val coarseSize = Size(coarseWidth.toFloat(), coarseHeight.toFloat())
val fineSize = Size(fineWidth.toFloat(), fineHeight.toFloat())
The coarse bitmap has one pixel for every cell in the mosaic, while the fine bitmap is double that in each direction (we’ll come onto why both of these exist shortly). Because all of this sits inside of the drawWithCache block, the bitmaps are only allocated when the layout size changes, as opposed to every frame.
Drawing the content at a smaller size
Now that we have our bitmaps created, we can start filling in onDrawWithContent within our pixelate modifier. We’ll start here by drawing the content into the coarse bitmap.
onDrawWithContent {
    val contentScope = this

    draw(this, layoutDirection, coarseCanvas, coarseSize) {
        drawRect(color = Color.Transparent, blendMode = BlendMode.Src)
        scale(
            scaleX = coarseWidth / srcWidth,
            scaleY = coarseHeight / srcHeight,
            pivot = Offset.Zero,
        ) {
            contentScope.drawContent()
        }
    }
}
The draw function here allows us to redirect drawing operations into a different Canvas, which in this case is the one that wraps our coarse bitmap. Before drawing anything we start by clearing the bitmap by drawing a transparent rectangle with BlendMode.Src. Because the bitmap is reused across frames, without this we would see the previous value to bleed through the current one whenever the content changes. This is because Src replaces the existing pixels outright, as opposed to blending what has already been drawn.
Next we use scale with a pivot of Offset.Zero to shrink the content down to the size of the bitmap before we draw it. At this point, a price that was a few hundred pixels wide might be drawn into a bitmap that is very small.
Softening the steps between blocks
Following the above steps, we now draw the coarse bitmap into the fine bitmap.
draw(this, layoutDirection, fineCanvas, fineSize) {
    drawImage(
        image = coarse,
        srcSize = IntSize(coarseWidth, coarseHeight),
        dstSize = IntSize(fineWidth, fineHeight),
        filterQuality = FilterQuality.Low,
        blendMode = BlendMode.Src,
    )
}
Here we take our coarse bitmap and draw it into the fine bitmap, which is twice the size. When it comes to our price value example from before, this takes us from 23 × 5 pixels up to 46 × 10 meaning that each cell from the coarse bitmap now covers a 2 × 2 group of pixels.
For the coloring of these pixels, this depends on the FilterQuality that we apply. If we were to use FilterQuality.None then each pixel would reuse the colour of its cell and we’d end up with the same blocks as before but at a larger size. Instead, we use FilterQuality.Low, so that instead of copying a single colour, each new pixel is calculated using the colours of the nearest cells. Similar to the previous step, we use BlendMode.Src so that the contents of the last frame are replaced as opposed to being drawn over.
Comparing the two bitmaps, you’ll notice that the fine bitmap has a softer transition between neighbouring blocks:
Drawing the mosaic at full size
We now have everything we need to draw the result back out at the original size of the content.
if (!featherEdges) {
    drawImage(
        image = fine,
        srcSize = IntSize(fineWidth, fineHeight),
        dstSize = IntSize(srcWidth.roundToInt(), srcHeight.roundToInt()),
        filterQuality = FilterQuality.None,
    )
    return@onDrawWithContent
}
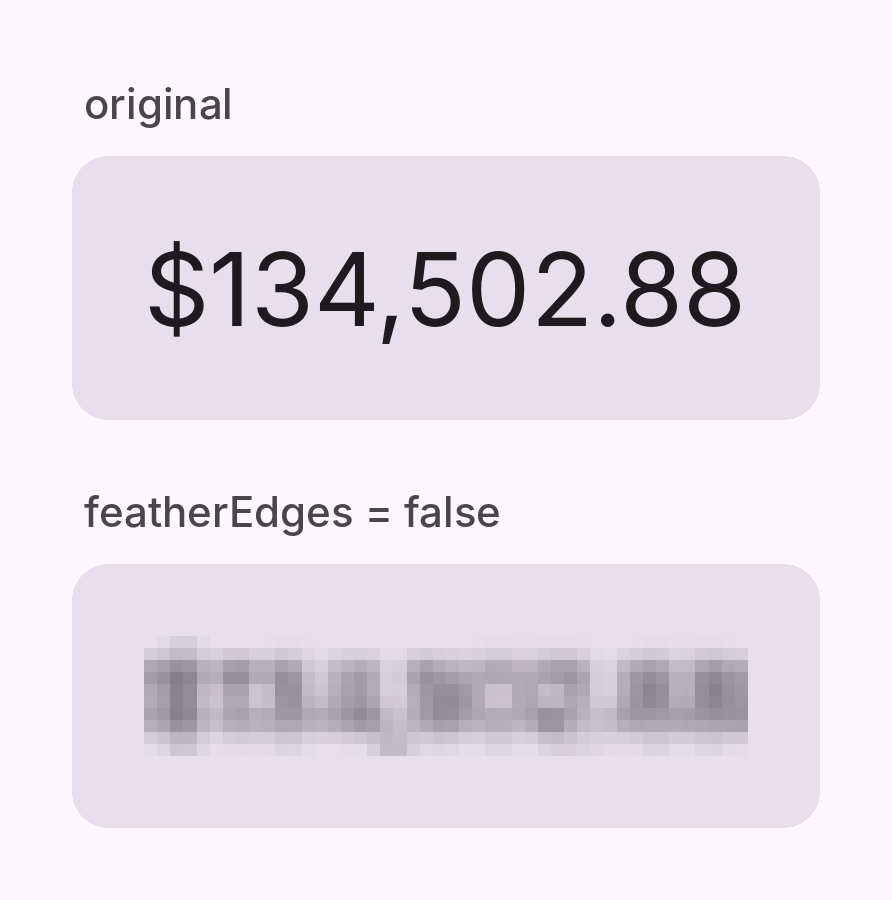
This time we use FilterQuality.None so that no smoothing is applied to the bitmap as it is scaled up. Each pixel of the fine bitmap is stretched into a solid square, which is what is used to create our mosaic effect. With this in place, our price is now drawn as a mosaic at its original size:
Feathering the edges
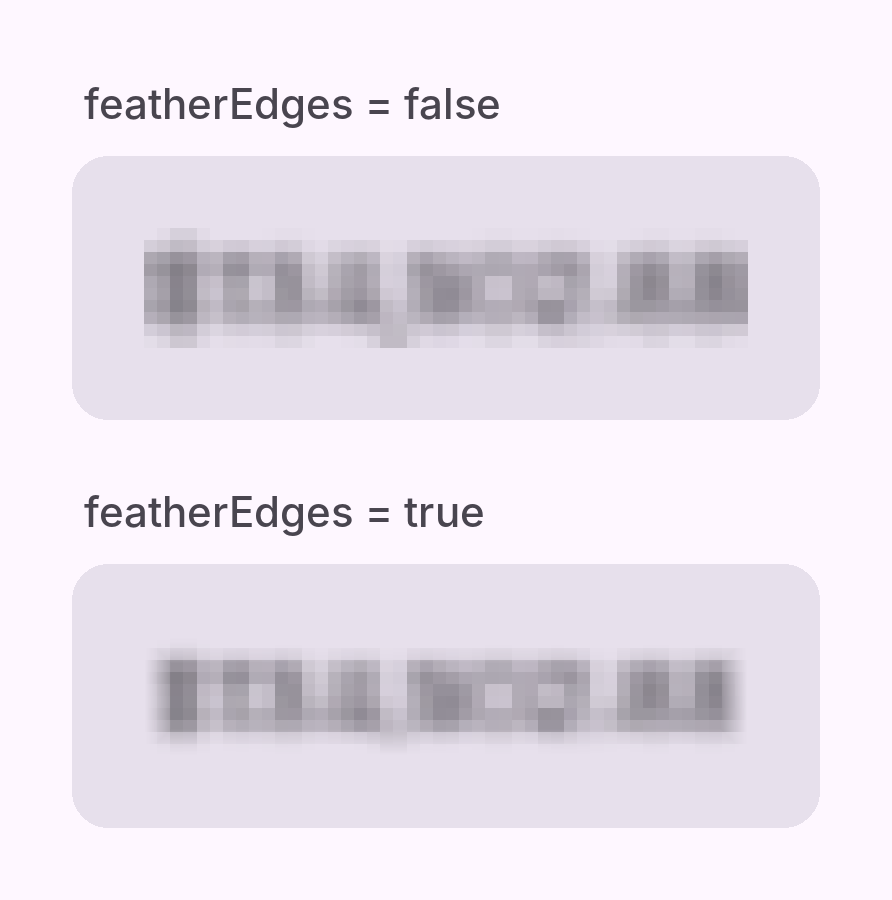
With featherEdges enabled the mosaic fades out towards its edges, this avoids having a hard edge on each of the cells. To do this, we draw the mosaic into a separate layer and then fade the alpha of that layer at each edge.
drawContext.canvas.saveLayer(Rect(0f, 0f, srcWidth, srcHeight), Paint())
drawImage(
    image = fine,
    srcSize = IntSize(fineWidth, fineHeight),
    dstSize = IntSize(srcWidth.roundToInt(), srcHeight.roundToInt()),
    filterQuality = FilterQuality.None,
)
val feather = cell
drawRect(
    brush = Brush.horizontalGradient(
        colors = listOf(Color.Transparent, Color.Black),
        startX = 0f,
        endX = feather,
    ),
    size = Size(feather, srcHeight),
    blendMode = BlendMode.DstIn,
)
// ...the same for the right, top and bottom edges
drawContext.canvas.restore()
Here we draw the mosaic using the same approach as before, but this time we draw it into a separate layer using saveLayer. Following this, we then draw a gradient over the left edge, using BlendMode.DstIn to go from transparent at the edge to solid. When using this blend mode, the colour of the gradient is ignored and the alpha of the mosaic is simply multiplied by the alpha of the gradient. This means the mosaic is removed at the very edge, drawn at full strength one cell in with a fade applied between the two.
Without the use of saveLayer, our gradients would also fade out whatever sits behind the composable which would create transparent areas in the background of the composable. Because this layer only contains the mosaic, this means that only the mosaic is faded and the use of restore draws the finished layer back onto the canvas.
With feathering enabled, the mosaic now fades out at its edges rather than stopping as a hard edge on each cell.
Pixelating a whole subtree
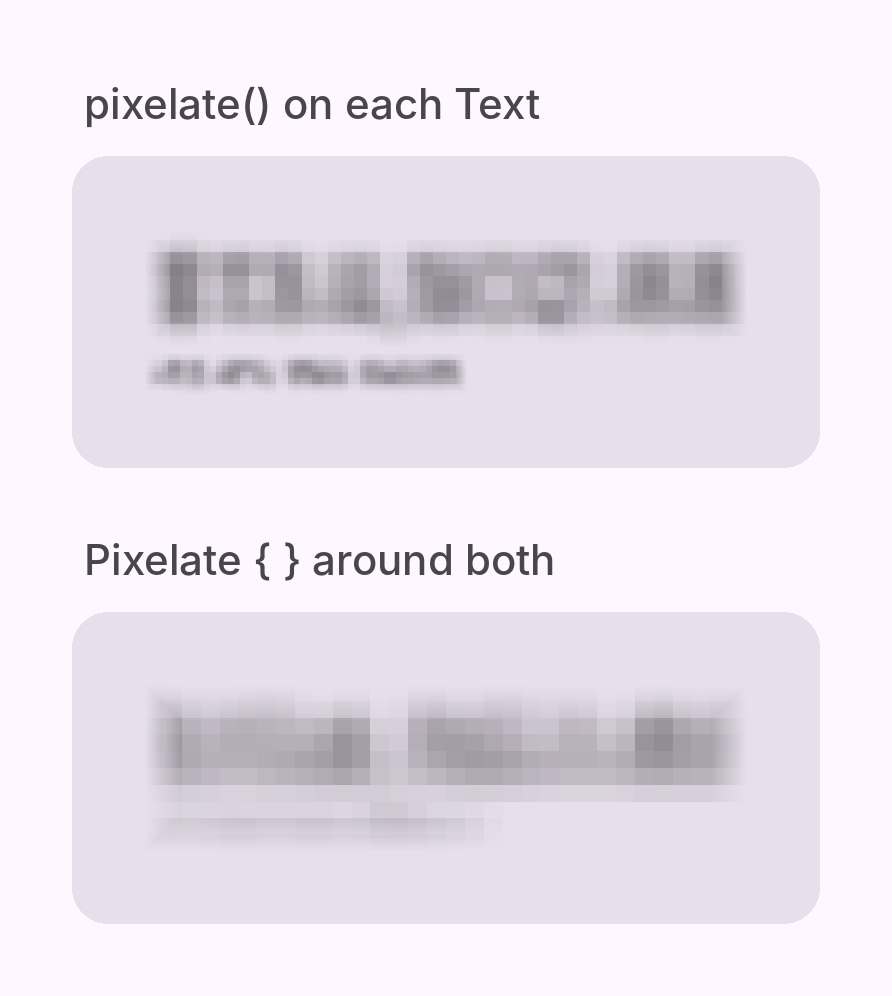
While the modifier works well for a single Text composable, there are cases in the app where I need to pixelate a group of composables. If we applied the modifier to each child separately, every child would get its own grid of cells, and the blocks wouldn’t line up with each other. For this, Pixelate also provides a Pixelate composable which is helpful for applying to a parent composable.
@Composable
public fun Pixelate(
    modifier: Modifier = Modifier,
    blockRatio: Float = DefaultBlockRatio,
    minBlockSize: Dp = 4.dp,
    maxBlockSize: Dp = 14.dp,
    featherEdges: Boolean = true,
    content: @Composable () -> Unit,
) {
    Box(
        modifier = modifier.pixelate(
            blockRatio = blockRatio,
            minBlockSize = minBlockSize,
            maxBlockSize = maxBlockSize,
            featherEdges = featherEdges,
        )
    ) {
        content()
    }
}
This is a thin wrapper around our pixelate modifier, simply applying it to a Box that holds the provided content. Because the mosaic covers the composed size of the whole Box, the grid of cells runs across all of the children as one element. Using it looks like the following:
Pixelate {
    Column {
        Text(total, style = MaterialTheme.typography.headlineMedium)
        Text(change, style = MaterialTheme.typography.labelSmall)
    }
}
When the modifier is applied to each Text separately, the smaller label gets its own grid of much smaller cells. Wrapping both in Pixelate gives them a single grid, allowing the blocks to line up across the whole group.
Choosing a block ratio
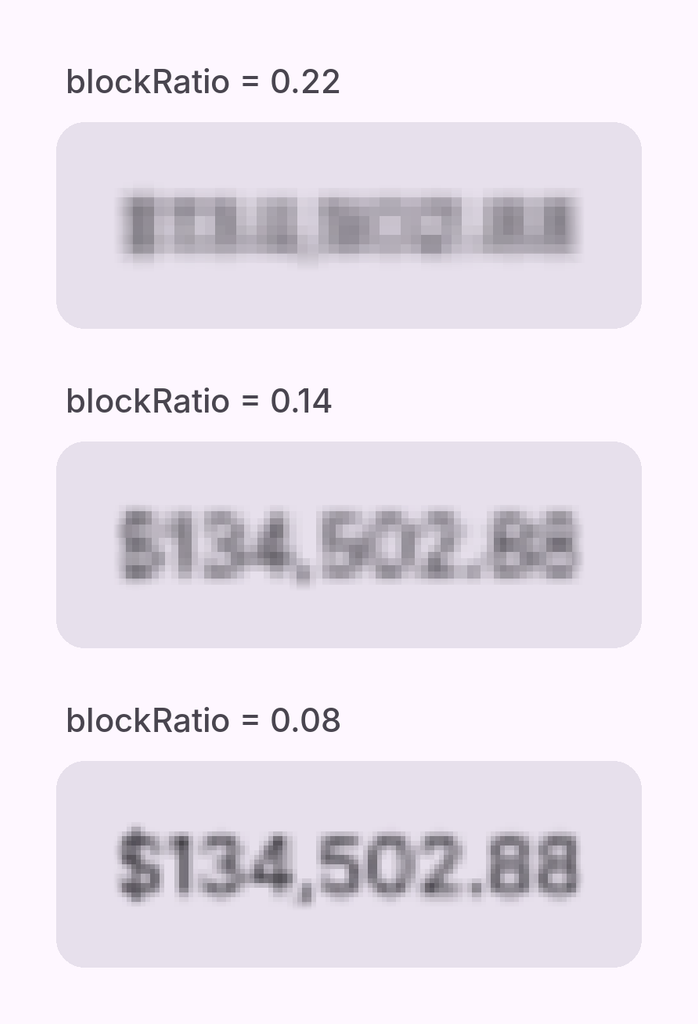
When pixelating content I’m using the same value throughout my app, but I thought that others may wish to have control over how ‘pixellated’ the content is. For this reason I added support for the blockRatio argument that allows developers to set the value used for the block ratio. However, using a too low value here will reveal content as smaller cells mean that more detail survives the downscale. To help protect against this, the library utilises a MinimumSafeBlockRatio constant of 0.18, which is used to assert against any provided blockRatio value.
public const val MinimumSafeBlockRatio = 0.18f

require(ratio >= MinimumSafeBlockRatio)
To illustrate what these low values look like in practice, we can see below how the content becomes more readable as we go into lower blockRatio values.
Things to be aware of
When it comes to using Pixelate, there are two immediate things that come to mind:
- The value that is obfuscated is still in the semantics tree, so it still remains available to any screen readers. When implementing mosaics, it’s important to ensure that the semantic value is also updated to reflect an obfuscated value message.
- While the bitmaps are only created when the size of the content changes, the drawing work happens every time the composable is drawn. During each cycle we see the content drawn into the coarse bitmap, that bitmap is drawn into the fine one, and then the result of this is drawn back out at full size, not to forget the additional work that feathering adds. For few obfuscated value this cost is small, but it adds up when it’s repeated across many composables at the same time. This is not optimised to be used in long lists of content that is not be recycled.
In this post we’ve seen how Pixelate draws a composable into a bitmap at one pixel per cell, and then scales it back up without any filtering to create a mosaic of solid blocks. Because all of this happens at draw time, the content keeps its real size and its real data, so nothing in the layout moves when a value is hidden or revealed. If you have any questions or ideas for improvements, feel free to reach out!