
This post is sponsored by Practical Jetpack Compose.
A large amount of mobile apps will need some form of Navigation, allowing users to move between different parts of an application. When implementing these requirements within Android Apps, applications have either rolled their own solutions, relied on traditional intents or the fragment manager, or explored the option of the Navigation Component over recent years. Throughout the alpha and developer preview releases of Jetpack Compose I was often asked, “What about navigation?”, “Is it possible to navigate between composables?”. With Jetpack Compose, the idea of working freely with Composables introduces the idea of a fragment free and (mostly) activity free app, allowing us to rely solely on composables when displaying our UI.
Thanks to the Navigation Compose support in the Navigation Component, this is now completely possible. Applications can launch a single activity in their app, relying on Composables to represent the UI components that make up the application. I’ve been using this component in a couple of projects and have been really enjoying what feels like a new way of building Android Apps. However, after initially using this in the project from existing guides and blog posts, I started to discover some things which felt they would add some friction and pain points in projects:
- Requiring a NavHostController reference in Composable functions — In many cases we’re going to need to have a Composable perform Navigation to another Composable. I’ve spotted that in many cases, the default approach is passing this NavHostController reference around through Composable functions. This means that to perform navigation, we must always have a reference to the current NavHostController. This isn’t very scalable and ties us to relying on this reference to perform navigation.
- Difficult to test navigation logic — When our Composables are directly using this NavHostController to trigger navigation, it makes it difficult to test our navigation logic. Composable functions are currently tested using instrumentation tests. Having another class handle our navigation logic (such as a view model) allows us to test navigation events within the unit tests of our project.
- Add friction to Compose Migration — A lot of projects using Compose are going to be existing projects which vary in size. In these cases, it’s very likely that projects are not going to be entirely re-written and will be migrated to Compose in a variety of ways — new features might be written in Compose, with existing components being slowly re-written. In these cases, it could prove difficult to provide this NavHostController to these composables. For example, maybe the existing components being re-written to Composables are isolated in a way that makes it difficult to get that NavHostController to those functions.
- Coupled to the Navigation Dependencies — Requiring the NavHostController reference to perform navigation means that every module using this will need a reference to the Compose Navigation dependency. Likewise, if you plan on using the Hilt Navigation Compose dependency to provide view models in different modules, the same will be true for that dependency also. While this feels like an expected requirement, the centralised dependency on these things is a nice side-effect when tackling the above concerns.
While these are just a few things I’ve been thinking about, it might be the case that Compose Navigation has got you thinking about how this might fit into your existing application, or be structured in your new project.
Inspired by an article I read a few years back on modular navigation, I want to share some explorations that I’ve been doing when adding Compose Navigation to a Modularised Android App. We’ll learn:
- How to Navigate to Composables across different features modules without depending on a NavHostController reference
- How to decouple these modules from Compose Navigation and handle navigation in a centralised location through View Models
- How to provide View Models to these Composables using Hilt Navigation Compose without having each feature module rely on that dependency
- How to simply our approach to testing by optimising our Navigation logic
We won’t be covering the foundations of the Compose Navigation Component during this article, so please use the following guide if you’re looking for an introduction to Compose Navigation.

Modularized Applications
To explore the above points, we’re going to be using my Minimise project as a reference, working with an application structure that looks something like the following:
Here, we have a couple of modules that are making up our application.
- App Module — this is the base module of our application. This contains our Compose Navigation Graph which provides navigation to the different Composables contained in the feature modules of our application.
- Navigation Module — the module which will orchestrate the navigation across our project. This provides a way for depending modules to trigger navigation, along with a way to observe these navigation events.
- Feature Module(s) — the module containing the Composable for a specified feature. Note: In the sample code we will be using more than one feature module, only one was included here to keep the diagram concise.
From this diagram we can start to see the relationships between these different modules and how they work together to achieve our desired goals for navigation.
- The App Module builds our Navigation Graph using the NavHostController, providing a way to Compose and navigate to the Composable within our feature module.
- The Navigation Module defines the possible destinations which can be navigated to in our Graph. These are structured as Commands, triggered from within our feature modules as required.
- The App Module uses the Navigation Module to observe these Navigation Commands when triggered through the Navigation Manager. When any events do occur, the NavHostController will be used to navigate across our composables.
- A Feature Module uses the Navigation Module to trigger these navigation events from its view model, relying on whatever is observing these events to handle the actual navigation.
- A View Model is provided to a Composable feature from within the App Module using the Hilt Navigation Compose, scoping the view model to the current backstack entry within the corresponding NavHostController.
So that we can see how this can be implemented, we’re going to start building out some code to represent the above requirements.
Composable Destinations
Before we can even start to think about navigating to Composables, we need to build some Composables. In my Minimise project I have two features; an Authentication screen and a Dashboard Screen. The user will start on the Authentication and then be taken to the Dashboard when they have successfully authenticated in the app.

We’ll start here by defining a new Composable function called Authentication, this will take a reference to a AuthenticationState kotlin class which holds the state of this screen. We won’t dive into the internal of these Composables as the code for that isn’t important for this article, we’ll just look at a high level what they are made up of.
@Composable
private fun Authentication(
    viewState: AuthenticationState
)
This state is going to come from a ViewModel which is annotated with the @HiltViewModel annotation, this is done using the Jetpack Hilt Integration.
@HiltViewModel
class AuthenticationViewModel @Inject constructor(
    private val savedStateHandle: SavedStateHandle,
    ...
) : ViewModel() {    val state: LiveData<AuthenticationState> ...}
You may have noticed that our previous composable function was marked as private. So that whatever accesses our feature module can compose the authentication UI, we’re going to add a publicly accessible Composable function. To this function we’re then going to add this ViewModel as an argument, allowing us to decouple how this ViewModel is to be provided as well as adding space for improving how we approach the testing of our composable.
@Composable
fun Authentication(
    viewModel: AuthenticationViewModel
) {
    val state by viewModel.uiState.observeAsState()
    Authentication(state)
}
With this in place we now have a Composable function in place for the Authentication feature of our application. So that we can navigate between two parts of our application we’re going to go ahead and create another composable function for a second feature, the Dashboard of our application. We’ll do the same as above here, we’ll create a composable function that will be used to compose our Dashboard UI, along with a ViewModel which will be used to orchestrate its state.
@Composable
fun Dashboard(
    viewModel: DashboardViewModel
) {
    val state by viewModel.uiState.observeAsState()
    DashboardContent(state)
}

@HiltViewModel
class DashboardViewModel @Inject constructor(
    private val savedStateHandle: SavedStateHandle,
    ...
) : ViewModel()
With these in place, we now have two features made up of Composable functions, each with their own ViewModel. However, these are not currently doing anything in our app – so next let’s take a dive into how we can configure moving between these two parts of our app.
Setting up the Navigation Routes
Because we’re going to have a centralised navigation module controlling the navigation around our application, we’re going to need to create some form of contract for the supported navigation in our app. We’re going to create this in the form of a NavigationCommand which allows us to define the different navigation events that can be triggered, observed by the class that holds the navigation controller.
If you don’t already have Compose Navigation within your project, you’ll need to add the following dependency.
androidx.navigation:navigation-compose:1.0.0-alpha07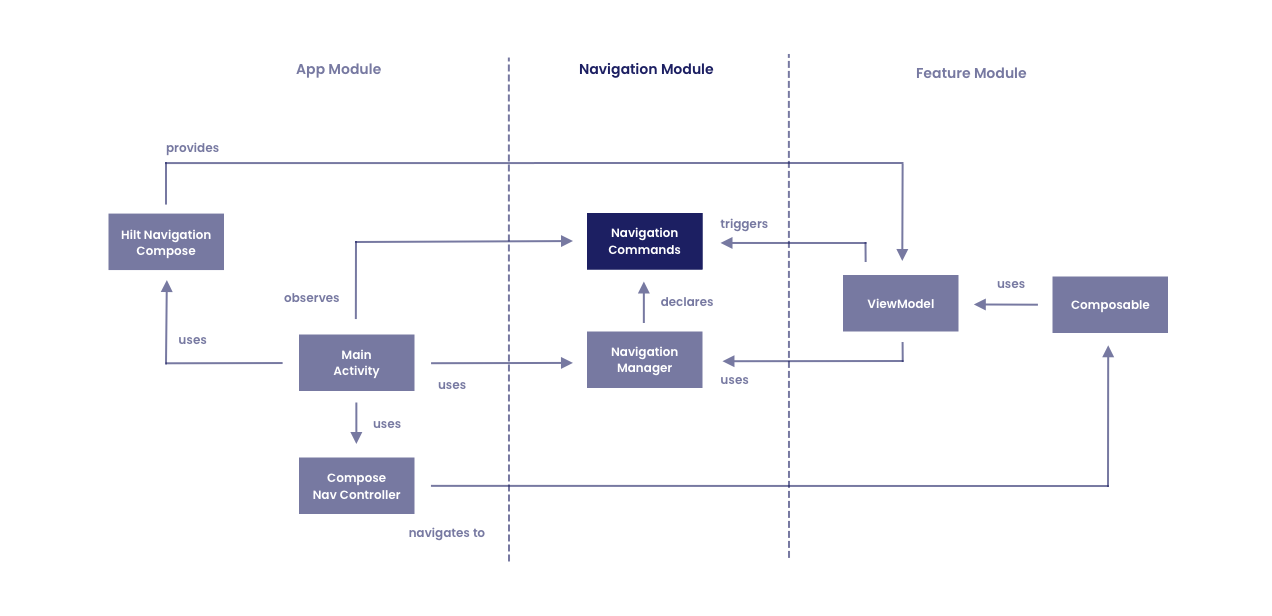
We’re going to start here by defining an interface, NavigationCommand. This is going to define the requirements for a navigation event — currently I only need this to support a destination and any arguments that are to be provided. There is space for this class to evolve should it need to match the needs of other requirements.
interface NavigationCommand {

    val arguments: List<NamedNavArgument>

    val destination: String
}
With this contract in place, we can now define some navigation commands that can be used to navigate between specific features of our application — which we’ll do for both our Authentication and Dashboard features. Here we’ll define a new function for each that implements our NavigationCommand interface from above. For now we’ll simply be hardcoding the navigation destination to satisfy the destination property of our command. This destination will then be used by our Navigation Controller when calculating what composable is to be navigated to.
object NavigationDirections {

    val authentication  = object : NavigationCommand {

        override val arguments = emptyList<NamedNavArgument>()

        override val destination = "authentication"

    }

    val dashboard = object : NavigationCommand {

        override val arguments = emptyList<NamedNavArgument>()

        override val destination = "dashboard"
    }
}
These destinations don’t currently use navigation arguments when navigation is being performed, but I wanted to provide the flexibility to do so as other parts of my app will need it. When required, we can still centralise the arguments used for Compose navigation within our navigation module. Using a function for the dashboard destination to provide the desired arguments, these can then be used to build the argument list. This keeps our approach to a navigation contract in place, while still giving us flexibility with modularised navigation.
object DashboardNavigation {

  private val KEY_USER_ID = "userId"
  val route = "dashboard/{$KEY_USER_ID}"
  val arguments = listOf(
    navArgument(KEY_USER_ID) { type = NavType.StringType }
  )

  fun dashboard(
    userId: String? = null
  ) = object : NavigationCommand {

    override val arguments = arguments

    override val destination = "dashboard/$userId"
  }
}
With the above in place, you can use the route and arguments of the object to configure the navigation, followed by performing the actual navigation by triggering the event using the dashboard() function. Using navigation arguments are out of scope for my requirements right now, but hopefully the above gives a rough example of what could be done here!
Setting up the Navigation Graph

Now that we have our navigation commands defined, we can go ahead and configure the navigation graph for our app — this is used to define the destinations and the composables that they point to. We’ll start here by defining a new NavHostController reference using the rememberNavController composable function — this will be used to handle the navigation for our graph.
val navController = rememberNavController()With this in place we can now go ahead and define our NavHost — this will be used to contain the composables that make up our navigation graph, which will be provided using its builder argument. For now we’ll provide our previously defined NavHostController reference, along with the destination which our graph should start at — for this we’ll use the Authentication screen, accessing its destination string from our previously defined NavigationDirections reference.
NavHost(
    navController,
    startDestination = NavigationDirections.Authentication.destination
) {

}
With this startDestination defined, this means that our NavHost will use this to configure the initial state of our navigation graph — starting our user at the composable that matches the Authentication destination string.
Setting up the Navigation Destinations

While we have defined this initial destination for our navigation graph, we haven’t yet defined any of the composable destinations that make up our graph — so things won’t quite work as they currently are! So here we’ll go ahead and add a new destination using the NavGraphBuilder.composable function. We start by providing the route for the composable using the string defined in our NavigationDirections definition, this means that whenever this route is navigated to, the body of this composable destination is the one that will be composed in our UI. Here we provide our previously defined Authentication composable for that body.
composable(NavigationDirections.Authentication.destination) {
    Authentication()
}
We’ll then do the same again for our Dashboard destination — defining the route which triggers this composable being navigated to, using the Dashboard composable that we previously defined for the body.
composable(NavigationDirections.Dashboard.destination) {
    Dashboard()
}
With the above in place we now have two composable destinations defined within our navigation graph, with the Authentication composable being used as the starting destination in our graph.
Providing View Models to Composables

If we hop back to our composables that we previously defined for Authentication and Dashboard, we’ll see that the above declarations won’t compile — this is because we are missing the required viewmodel arguments for those composable functions. To provide these we are going to utilise our NavController reference along with the hiltNavGraphViewModel extension function. To get access to this you’ll need to add the following dependency to your application.
androidx.hilt:hilt-navigation-compose:1.0.0-alpha01Using this extension function will provide us with a viewmodel reference that is scoped to the provided route of our NavController.
Authentication(
    navController.hiltNavGraphViewModel(route = NavigationDirections.Authentication.destination)
)
While this would be possible do to within the composable itself, passing this in as an argument allows us to keep both the Compose Navigation + hilt navigation compose dependencies outside of our feature module. Being able to provide the ViewModel itself through the composable function can be helpful when it comes to composable tests and providing mock references.
If we can guarantee that a navigation graph is always present (and don’t need to provide our own route when providing the viewmodel) then we can use the hiltNavGraphViewModel() function that is not an extension function on the NavController. This function does not require a route to be provided, as this will be inferred from the current backstack entry.
Authentication(
    hiltNavGraphViewModel()
)
With this in place for our Authentication composable, we’ll then go ahead and do the same for our Dashboard composable to ensure it has a viewmodel provided to it for use.
composable(NavigationDirections.Dashboard.destination) {
    Dashboard(
        hiltNavGraphViewModel()
    )
}
Handling Navigation Events
With our viewmodels in place, we’re close to being able to trigger navigation events for our navigation graph to handle. The key for this part is a centralised location to trigger and observe events, which in this case is going to be a singleton class called NavigationManager. This class is going to need to define two things:
- A component that is used to output the previously defined NavigationCommand events, allowing an outside class to observe these events
- A function that can be used to trigger these NavigationCommand events, allowing the observer of the above component to handle them
With this in mind, we have a NavigationManager class which comes to look like so:
class NavigationManager {

    var commands = MutableStateFlow(Default)

    fun navigate(
        directions: NavigationCommand
    ) {
        commands.value = directions
    }

}
Here, the commands reference can be used by an outside class to observe the triggered NavigationCommands, while the navigate function can be used to trigger the navigation based on the provided NavigationCommand.
It’s important to note that this class must be a singleton instance. That way we can ensure that every class communicating with the NavigationManager is referencing the same instance. In the case of my application, I have the class defined within the Hilt SingletonComponent.
@Module
@InstallIn(SingletonComponent::class)
class AppModule {

    @Singleton
    @Provides
    fun providesNavigationManager() = NavigationManager()
}
With this in place, we can then observe these navigation events to be handle by our navigation graph. We previously defined our NavHost reference which is being used to define our navigation graph, for which we also provided a NavHostController reference. This NavHostController can also be used to trigger the navigation between different destinations — something that we can do whenever our observed NavigationCommand events occur. What we want to do here is inject a reference to our NavigationManager and then use the contained commands to observe for navigation events. Because these commands are using StateFlow, we can utilise the Compose Runtime collectAsState() extension function to collect the state flow events that occur in the form of Compose state. We can then use the value of this state for the direction that is to be navigated to, triggering this using our NavHostController.
@Inject
lateinit var navigationManager: NavigationManager

navigationManager.commands.collectAsState().value.also { command ->
    if (command.destination.isNotEmpty()) navController.navigate(command.destination)
}
Note: StateFlow currently requires (as far as I’m aware) a value to be provided for initialisation. This is why we have this empty check here — hopefully this can be tidied up in future!
Triggering Navigation Events
Now that we have the observation of navigation commands in place, we’re going to trigger them. This is going to be done from our viewmodel, removing this responsibility of navigation from our Composable.

What we’re going to do here is add our NavigationManager to our viewmodel, providing it through the constructor. Remember that this reference is a singleton, so this will be the same instance that is being utilised by where our navigation graph is hosted.
@HiltViewModel
class AuthenticationViewModel @Inject constructor(
    private val savedStateHandle: SavedStateHandle,
    private val authenticate: Authenticate,
    private val sharedPrefs: Preferences,
    private val navigationManager: NavigationManager
)
With this in place, we can now trigger navigation events directly from our viewmodel. Maybe our Composable wants to manually call our viewmodel to trigger some navigation, or we want to trigger navigation based on some result of an operation. Regardless, we can do so by triggering the navigation function and passing in the NavigationDirections that we want to use for the navigation command.
navigationManager.navigate(NavigationDirections.Dashboard)With this navigation logic now in our viewmodel, we can easily test any mocked instances of our navigation manager by verifying that the required functions were called.
verify(mockNavigationManager).navigate(NavigationDirections.Dashboard)Wrapping Up
With the above in place, we’ve been able to implement navigation for Jetpack Compose for a modular app. These changes have allowed us to centralise our navigation logic and while doing so, we can see a collection of advantages that are now in place:
- We’ve removed the need to pass around a NavHostController to our composables, the reference is used to perform the navigation. Keeping this outside of our composables removes the need for our feature modules to depend on the Compose Navigation dependency while also simplifying our constructor for when it comes to testing.
- We’ve added ViewModel support to our composables, provided through our nav controller, and again without the need to add Hilt Compose Navigation related dependencies to each of our feature modules — instead, providing the viewmodel through the Composable function. This not only gives us the advantage mentioned here, but it again simplifies the testing of our composable — allowing us to easily provide mocked instances of the ViewModel and its nested classes when it comes to testing.
- We’ve centralised our navigation logic and created a contract for the things which can be triggered. Outside of the benefits mentioned in the points above, this helps to keep the navigation of our app simpler to understand as well as debug. Anyone jumping into our app can experience reduced friction when it comes to understanding what navigation or app supports, along with where these things are triggered.
- Alongside the above points, we’ve been able to work with navigation in a way that helps to reduce friction alongside adoption of Compose. When adopted Compose in an existing app, it’s likely that developers will be adding composable sections to the app — maybe a single composable to replace a view, or a whole screen that represents a composed UI. Regardless of the approach, it can help to keep things simple and responsibilities minimal — something that this modular navigation approach helps to achieve.
These are just some of the advantages that came to mind when thinking about this approach to navigation in Jetpack Compose. Can you think of any others? Or even so, any disadvantages? Let us know!
Navigation in Compose is still in it’s early(ish) stages, so things could change still. I’m currently using this approach in my Minimise project, but that could definitely change as I continue to learn more about Compose and the best way to structure things for my project. Depending on the needs of your project, it could also work for you. In the meantime, I’m happy with this approach and there’s definitely room for it to evolve should additional functionality be needed from navigation.