With the Android 12 beta now available, we’re starting to learn more about the new features that the latest version of Android gives to us. One of the things that caught my eye here is the introduction of a Splash Screen API – not only providing a standardised way for apps to present splash screens within their apps, but also improve the user experience when it comes to launching apps. I’m in the process of getting the Compose Academy app ready for launch, whilst also ensuring things are working properly against the Android 12 APIs – so this was a great chance to learn about the the Splash Screen APIs.

You may be thinking, I see many splash screens for apps that look great! While that is true, a lot of the time this requires developers to create their own Splash Screen classes. These sometimes only serve the purpose of displaying some form of branding on screen, or even handle more complex scenarios such as performing app initialisation and fetching data before the user is taken into the app. There are also the cases to take into account where apps do not even setup some form of splash screen – because the user may be coming from a cold or warm start when launching an app, this doesn’t always result in a smooth experience. For examples sake, let’s look at what an app will currently look like if you do not setup some kind of splash screen.
Personally, this feels a little janky! I get shown a blank screen which doesn’t display any kind of branding while I wait for my app to launch – this isn’t the best experience when it comes to taking the user into our app.
What a lot of apps started doing here was utilising the android:windowBackground attribute inside of a theme, allowing you to essentially set the content that was going to be shown in this blank space while the app loaded. Now, this isn’t exactly official support for “splash screen” content, but is more of a way to avoid that blank space from being shown on screen.

Now while this doesn’t provide a smooth transition into our app, this definitely looks better than before! The only thing to note here is that because this is just applying some theming to the background of the window, the launch time is going to remain the same – so if we were doing some kind of application setup, we would still need to add some additional changes to have support for these requirements.
In API level 26, we saw the introduction of the android:windowSplashScreenContent attribute. This can be used to show some content as a splash screen while your app is being launched. While this again doesn’t handle the scenario where we might need to handle initilization of our app during this time, it provided a smoother splash screen display and entrance into our app.
Now come Android 12, we have the new Splash Screen APIs. Without using any of the further customisation that these APIs provide, we can see that we still have a very similar smooth experience that we saw from the attribute added in API 26 except this time out-of-the-box:
While this doesn’t look too different from the attribute we saw introduced in API 26, in the Android 12 we get access to more attributes that allow for further customisation of our Splash screen. These attributes allow us to customise our splash screen in ways that was not previously achievable without providing a custom splash screen activity.
Over the following sections, let’s take a look at how we can utilise these to provide a customised experience for the launch of our app.
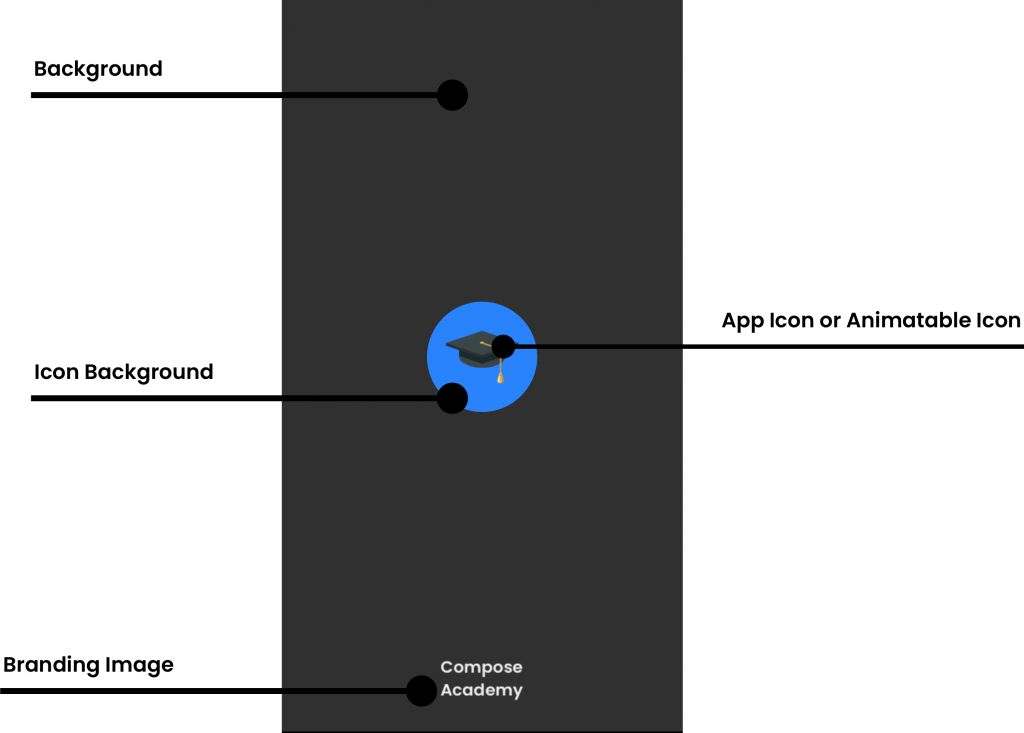
Displaying a Splash Screen
While in previous API versions we needed to provide some form of resource as a theme attribute to be used for the content of our window or splash screen content, this is no longer a requirement when it comes to Android 12. So it’s important to know that your launcher activity will display this new Splash Screen by default – so if you are currently presenting a custom splash screen in your application, you will need to adapt to these changes coming in Android 12.
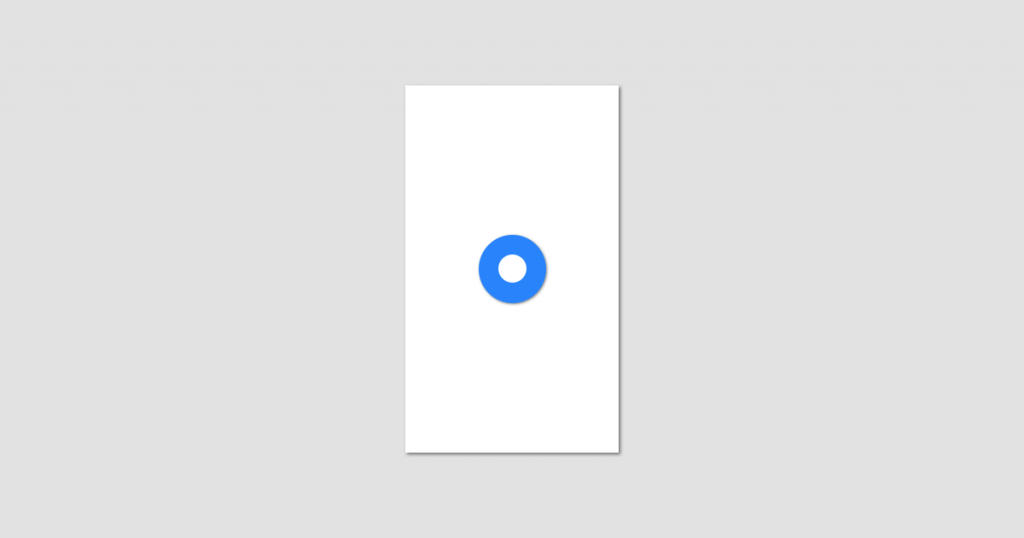
While the Splash Screen APIs offer a collection of attributes which can be used to fine tune your Splash Screen appearance, if you do not provide values for these then default values and resources from your application will be used. For examples sake, here is the default splash screen displayed when launching my app on a device running Android 12:
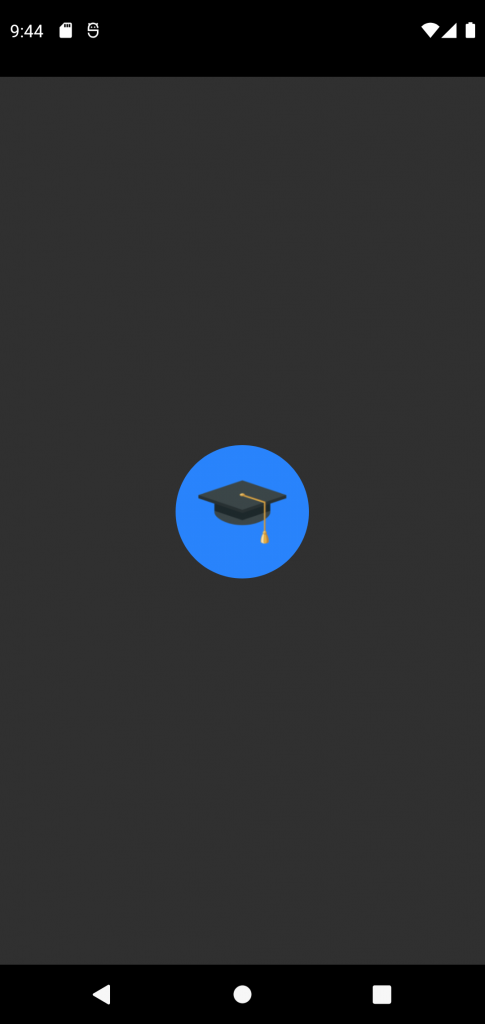
We can see a couple of things here when it comes to the display of the splash screen – the icon for my application is displayed on top of a background color. In my application I am using an adaptive icon and it appears as though the Splash Screen is directly using that adaptive-icon xml reference to display the icon within the screen. I know this because when I changed the color of the background layer for my launch icon, this was reflected in my splash screen.
Setting the Background Color
As we can see above, the Splash Screen will use a default background color*. In some cases we may want to override this – maybe it needs to match branding colors, or maybe the app icon doesn’t look quite right when displayed on top of the default background color. In either scenario you can utilise the windowSplashScreenBackground attribute to override this default color.
<item name="android:windowSplashScreenBackground">#000000</item>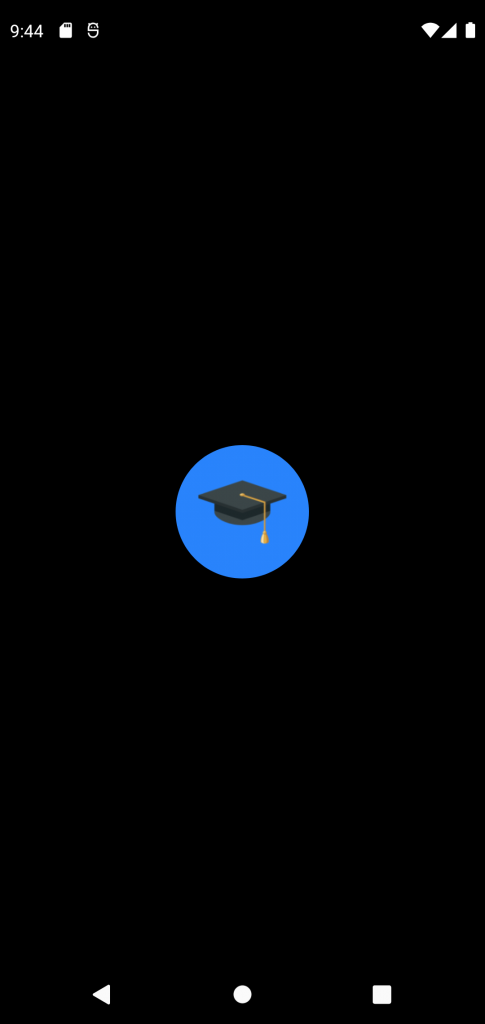
*I’m not entirely sure what color is being used for this background color yet, I will update this post once I have clarity here!
Setting the Splash Icon
In some cases, you might not want to use your application icon for the icon displayed in the splash screen. If you want to display something else in place of this then you can use the android:windowSplashScreenAnimedIcon attribute to do so. I find this name a bit misleading as this icon can actually be a reference to one of two things:
- A static vector drawable reference – used to display a static asset in place of the default application icon
- An animated vector drawable – used to display an animated graphic in place of the default application icon
This enables you to replace the default icon (your application icon) that is being displayed in the splash screen with an asset of your choice. If using an animated asset then it’s important to be sure that this does not extend the lifetime of the splash screen (1,000 milliseconds). While the approach here will depend on the kind of animation you are using, there are some general guidelines that come to mind here:
- If using an animation that animates a single time from a start to end state, ensure that the animations ends shortly before the 1,000 millisecond time limit.
- If using an infinitely looping animation, be sure that the animation does not appear to be cut-off once the 1,000 millisecond time limit is hit. For example, an infinitely spinning item being cut-off at the time limit will not appear “janky”, but cutting off the morphing between two shapes could make the transition between the splash screen and your app feel not so smooth.
Once we have an asset that we wish to use for the icon of our splash screen, we can apply it:
<item name="android:windowSplashScreenAnimatedIcon">@drawable/ic_launcher_foreground</item>As displayed above, our icon asset will displayed in the center of the splash screen. Using this will completely remove any of the default properties and styling from what was previously being shown in our splash screen.
Setting the Icon Background Color
As we saw above, providing a custom icon allows us to change the default icon that is displayed within our splash screen. However, we can also see above that this might not always render in the best results. The icon I used there does not have a background layer, so it’s a bit tricky to see the icon against the background color being used for the splash screen. While we can customise the background color of the splash screen, we might not want to or be in a position to change this here. In these cases we can utilise the android:windowSplashScreenIconBackgroundColor attribute to provide a color to be used for the background of our icon.
<item name="android:windowSplashScreenIconBackgroundColor">@color/black</item>When this is applied, we’ll see a shaped background applied to our icon, using the color that we defined in the attribute above. It’s been difficult to test this, but in the case of my device this matches the app icon shape that I have set in my system settings. Currently this is not something that you can override for the splash screen. If you need customisation here, the best approach would be to create a drawable that already has a background layer as a part of the asset.
Setting a Branding Image
The branding image is an optional static asset which can be used to display an image at the base of the Splash Screen. This branding image will be displayed for the entire time that the splash screen is presented on screen.
<item name="android:windowSplashScreenBrandingImage">@drawable/logo_text</item>While the design guidelines state that it is not recommended not to use a branding image within the Splash Screen, this functionality has been provided should you need to present this visual component. Personally I think this adds a nice touch to the splash screen, but realistically in most cases the splash screen will not be displayed long enough for the user to take in all of the content within the screen. If you are not doing any customisation to override the exit time of the splash screen, the splash screen is going to be displayed for about 1 second. When the splash screen is launched, the user is naturally going to be drawn to the icon that is displayed in the center of the screen – any additional content on the screen is likely going to overwhelm the user and in most cases, probably not going to be seen. With that said, it’s important to think about whether your app really needs to utilise this branding asset within its splash screen.
Customising the Splash Screen time
By default, the Splash Screen will display for ~1,000 milliseconds – until the first frame of our application is drawn. However, a lot of applications use their splash screen to initialise default application data or perform asynchronous tasks to configure the app. In these cases, we can prevent the first frame of our app being drawn so that our splash screen remains in view. We can achieve this by using the ViewTreeObserver OnPreDrawListener – returning false until we are ready to proceed past the splash screen. Returning false here will prevent our
val content: View = findViewById(android.R.id.content)
content.viewTreeObserver.addOnPreDrawListener(
    object : ViewTreeObserver.OnPreDrawListener {
        override fun onPreDraw(): Boolean {
            return if (isAppReady) {
                content.viewTreeObserver.removeOnPreDrawListener(this)
                true
            } else {
                false
            }
        }
    }
)
Accessing the Splash Screen
The Activity class has a new getSplashScreen function that can be used to access the splash screen for your activity. As mentioned previously, the splash screen will only be shown for the launcher activity of your application – so accessing this elsewhere does not have any effect.
You can view a full example of this in the official documentation, but currently the splashScreen only provides programatic access for applying a listener to the exist animation of the splash screen. This means you can listen for when the splash screen is animating to the content of your app, allowing you to customise this transition.
splashScreen.setOnExitAnimationListener { splashScreenView ->
    ...
}
Wrapping Up
After learning about the Splash Screen APIs, I can now ensure that the Compose Academy app will be handling things properly. In most cases you may not even need to change anything, with your users enjoying a smooth launch flow of your app out-of-the-box.
In future there may be further additions to what applications can customise for the splash screen – having these APIs now means that there is a platform for opening up these things to developers. However, it’s impossible to create a one-size-fits-all implementation and I feel like Google will still want to enforce some kind of standard for splash screens (and not give developers free rein). Regardless, I’m looking forward to seeing how developers utilise these new APIs 😃