In a recent blog post I took a look at the new Compose Preview Screenshot Testing Tool, provided by Google as a way to enable developers to easily write screenshot tests for their composable UI. When it comes to screenshot testing, writing these tests only represents one part of the process – we also need to think about how we will slot this into our CI process, along with the management of our composable snapshots. In this post, we will be exploring Screenshotbot, which can help to alleviate some of the friction experienced when trying to integrate screenshot tests into your workflow.
This is a commissioned blog post based on my experience using Screenshotbot
Why Screenshotbot?
So you may be thinking, why do I need another tool for my screenshot testing process? Well, as mentioned above, there are a couple of pain points which come with integrating screenshot testing into your development workflow.
For the code on your main branch, you’re going to want to have snapshots that represent the expected state of your UI – this is so that we can compare the changes of our proposed work with that on main. The friction here is that we would need to manage this ourselves – we’d have to manually update the screenshots and commit them to our repository, while also only ensuring that this happens when there are expected changes to those parts of the UI.
Alongside this management, we need to run the verification process and then communicate this on the PR for reviewers. To make it easy for reviewers to assess changes, we’d want to show a diff of the before/after state and ensure that we are doing this for each UI change within the PR. Depending on the screenshot testing framework being used, this would be both tricky and tedious to configure via manual scripting within your CI flow.
Screenshotbot solves both of these issues by offering a plug-and-play tool that will capture, store and diff UI changes in your project. You do not need to write custom scripts to capture and update snapshots, or write scripts to surface diffs within pull requests, Screenshotbot will handle all of this for us. We simply need to add a plugin and optional GitHub app, and we’ll be able to access screenshot checks directly within our pull requests.
Screenshotbot is also platform & framework agnostic, meaning that it only needs screenshots to operate. This means you can use one of the supported frameworks of the plugin (Compose Preview Screenshot Tests, Paparazzi, Roborazzi, Shot, screenshot-tests-for-android, Dropshots) or simply provide screenshots via your own screenshot testing tool, as long as Screenshotbot has access to screenshots then it will be able to perform diffs on your UI changes.
With a generous free plan, it’s easy to get started and see if the tool is something that will work for you or your team. With that said, let’s take it for a spin and integrate it into a sample workflow.
Setting up Screenshot Tests
For this blog post, we’re going to be using Composable Preview Tests via the Compose Preview Testing Tool. We’re going to focus on the management of screenshot tests through Screenshotbot as opposed to creating tests. If you haven’t yet set up screenshot tests or are looking to learn more about the Compose Preview Testing Tool, please checkout a recent blog post of mine.
In our sample project we have 2 simple composables – a Contact composable that displays the name of the contact, followed by a composable that displays a list of these contacts.
@Composable
fun MainScreen() {
    Scaffold(
        topBar = {
            TopAppBar(title = {
                Text(text = "Contacts")
            })
        }
    ) { padding ->
        LazyColumn(
            contentPadding = padding
        ) {
            items(ContactFactory.makeContacts()) {
                Contact(modifier = Modifier.fillMaxWidth(), contact = it)
            }
        }
    }
}

@Composable
fun Contact(modifier: Modifier = Modifier, contact: Contact) {
    Surface {
        Row(modifier = modifier.padding(16.dp), verticalAlignment = Alignment.CenterVertically) {
            Box(
                modifier = Modifier
                    .background(contact.color, CircleShape)
                    .size(48.dp),
                contentAlignment = Alignment.Center
            ) {
                Text(
                    text = contact.name.first().uppercase(),
                    color = Color.White,
                    lineHeight = 0.sp
                )
            }
            Spacer(modifier = Modifier.width(16.dp))
            Text(text = contact.name)
        }
    }
}
We’ll also use composable previews to write two preview tests, allowing snapshots to be generated for our composable.
@Preview(showBackground = true)
@Composable
fun ScreenPreview() {
    MaterialTheme {
        MainScreen()
    }
}

@Preview(showBackground = true)
@Composable
fun ContactPreview() {
    MaterialTheme {
        Contact(contact = Contact("Joe", Color.Red))
    }
}
With this in place, we now have some composables along with corresponding preview tests to take Screenshotbot for a spin.
Setting Up Screenshot Bot
Configuring the Android Project
When it comes to integrating Screenshotbot into our project, there isn’t a lot that we need to do. First up, we need to add a plugin declaration to the root build.gradle file in our project – this will enable the use of Screenshotbot functionality.
plugins {
   …
   id("io.screenshotbot.plugin") version "1.14"
}
Next, we’ll need to add the plugin to the build.gradle file for every sub-module that contains screenshot tests. If every module contains screenshot tests then you can apply this globally from your root build.grade file, but I would recommend doing this at individual level.
plugins {
   …
   id("io.screenshotbot.plugin")
}
Once your project has synced and can built successfully, we will have everything in place to run Screenshotbot.
Installing the GitHub App
Because we’re going to be integrating Screenshotbot with our Pull Request flow, we’re going to want to install the Screenshotbot GitHub App – this will allow the tool to hook into the GitHub Checks API, which means we can show success/failed states for screenshot verification directly within our pull requests.
Setting up the app is very straightforward and during project setup within Screenshotbot, you’ll be prompted to do so via the Install App on GitHub button.
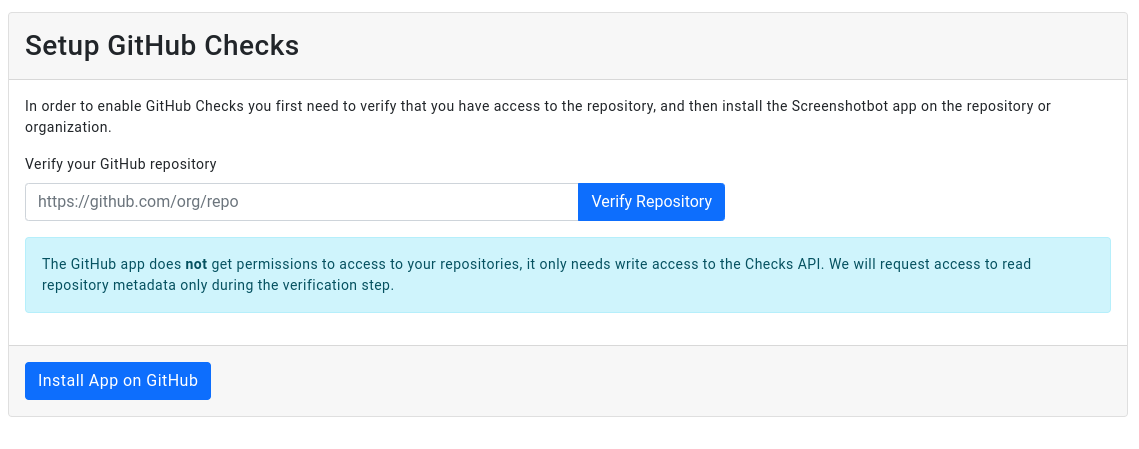
You’ll need to follow the on-screen instructions and then grant Screenshotbot access to your repository. Once complete, you will see verification that the setup was successful.
Running Verification Checks
When it comes to verifying our screenshots, we no longer need to use any existing commands from the testing framework we are using. Instead, we just need to run a single corresponding command from Screenshotbot. Because I am using the Compose Preview Testing Tool, I need to use the following command.
./gradlew recordAndVerifyDebugAndroidScreenshotbotCIWhen running this command, Screenshotbot will record the screenshots for the current branch and upload them to its server, which is where they will be compared with the existing snapshots. Once this flow has completed, we will be returned with a result that states a success or failure state.
While we can run this locally, we’re going to want to slot this into our CI process. I am going to be using GitHub Actions for my project, so I’ll go ahead and create a new Pull Request workflow. This workflow will run on any pull requests that are opened, as well as when any changes are pushed to the corresponding branch (while the PR is open).
name: Pull Request

on:
  pull_request:
  push:
    branches:
      - 'main'

jobs:
 screenshots:
   runs-on: ubuntu-latest
   steps:
     - uses: actions/checkout@v3
       with:
         fetch-depth: 0
     - name: Set up JDK
       uses: actions/setup-java@v3
       with:
         distribution: 'temurin'
         java-version: '17'
         cache: 'gradle'
     - name: Setup Android SDK
       uses: android-actions/setup-android@v2
We won’t go too deep into this workflow, but we’re simply checking out the branch of our repository and configuring the required frameworks (Java and Android), as this is required for any checks depending on these.
Whenever this workflow is run, we’ll want to run the verification for our screenshots.
name: Pull Request

…

jobs:
 screenshots:
   runs-on: ubuntu-latest
   steps:
     …
     - name: Run checks
       run: |
         ./gradlew recordAndVerifyDebugScreenshotTest
However, this command alone is not enough.So that our script can communicate with our Screenshotbot account, we’re going to need to provide both an API key and secret that will allow API calls to be made on behalf of our account. We’ll need to start here by heading back on over to our Screenshotbot account, selecting API Keys from the sidebar, and then using the New API Key button to navigate to the key creation form.
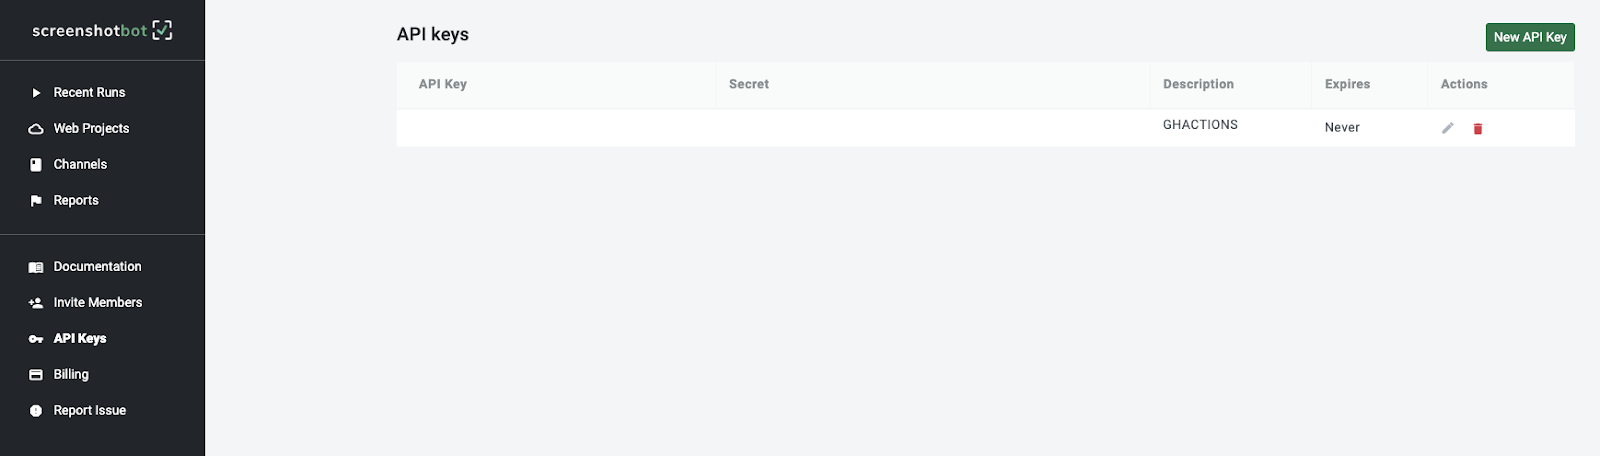
After creating our API key and secret, we’ll want to store these within GitHub Actions as action secrets. We’ll create two new secrets, SCREENSHOTBOT_API_KEY and SCREENSHOTBOT_API_SECRET, copying over the values generated in the previous step.
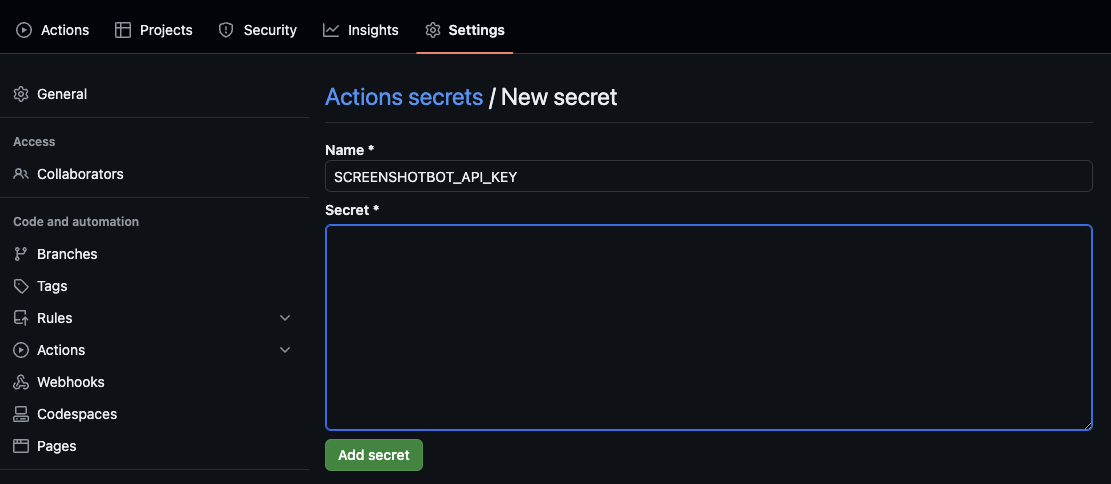
We’ve these in place, we can now provide them as environment variables for our command. We’ll do this using the env property for our workflow step, passing the corresponding values for the key and secret value.
name: Pull Request

...

jobs:
 screenshots:
   runs-on: ubuntu-latest
   steps:
     ...
     - name: Run checks
       run: |
         ./gradlew recordAndVerifyDebugScreenshotTest
       env:
         SCREENSHOTBOT_API_KEY: ${{ secrets.SCREENSHOTBOT_API_KEY }}
         SCREENSHOTBOT_API_SECRET: ${{ secrets.SCREENSHOTBOT_API_SECRET }}
Opening a Pull Request
Now that Screenshotbot has been configured, we’re going to go and test the functionality in our repository. We’re going to purposefully create a failed state here, so we’ll start by changing the background colour of our Box composable to use Color.Red instead of the color property from the provided Contact reference. This will cause our screenshot tests to break, due to there now being a change in the styling of the Contact component.
@Composable
fun Contact(modifier: Modifier = Modifier, contact: Contact) {
    Surface {
        Row(
            …
        ) {
            Box(
                modifier = Modifier
                    .background(Color.Red, CircleShape)
                    .size(48.dp),
                contentAlignment = Alignment.Center
            ) {
                …
            }
            …
        }
    }
}
After this change has been committed and a pull request open, we’ll be able to see two checks running – the screenshots job that we created in our GitHub Action, along with the Screenshotbot app that is verifying our changes. The changes that we’ve made have purposefully broken the styling of our Contact component, and we can see that the Screenshotbot check has failed because of this.
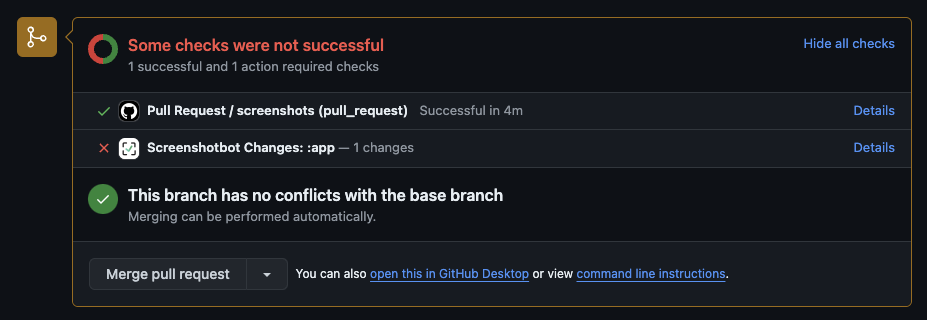
We’re going to want to inspect why these checks have failed, so we’ll click the Details link for Screenshotbot in our pull request checks.
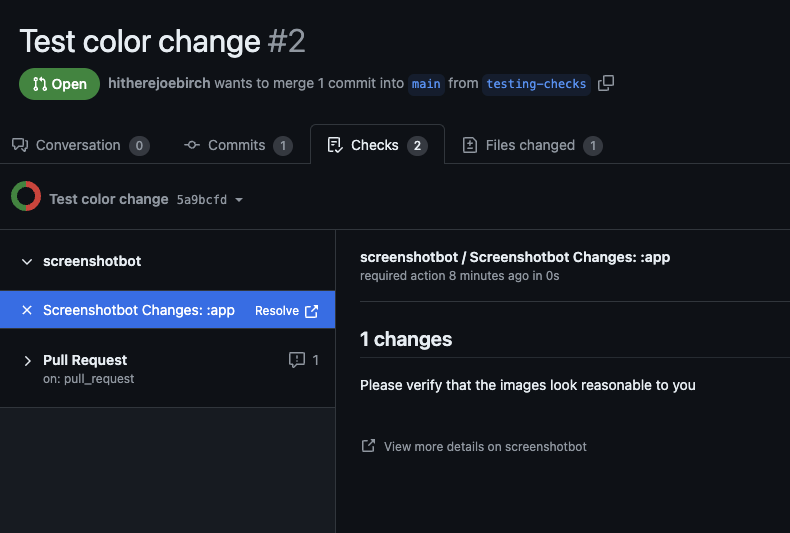
At this point, we’ll want to click Resolve – this will take us directly to the diff report for this commit within Screenshotbot.
Analysing changes
Once we’ve clicked through to Screenshotbot from GitHub, we will be able to see the stored snapshots of our composable, along with the generated screenshot from our pull request.
Comparing Screenshots
On the main screen of the commit, we’ll be able to see the before/after for our changes – hovering over the before state will also allow you to quickly flick between these states for comparison.
If we want to inspect our changes in more detail, we can click the Compare link to open up a window that allows us to view scaled in diff, before and after versions of our changes. This is incredibly useful for being able to focus in on changes, especially where the overall diff image is a larger screenshot where it may be harder to work out change details.
Once we’ve analysed the changes on this screen we’ll want to review them, meaning that we will either want to Accept or Reject them.
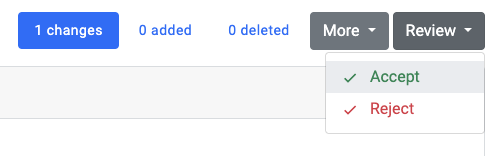
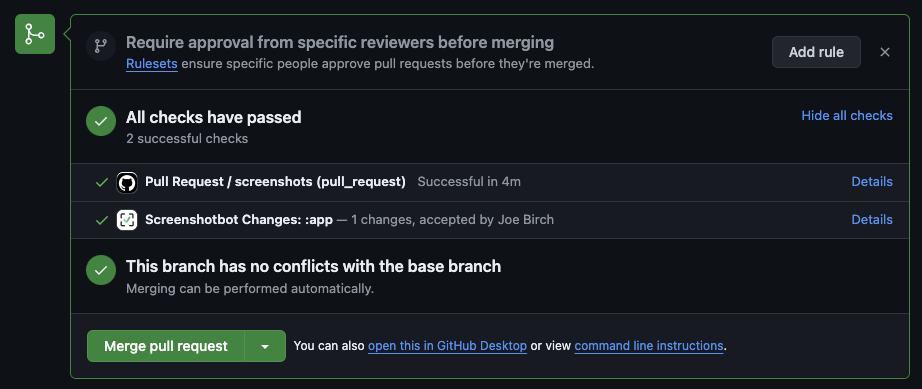
If we reject these changes, the check will remain as failed until we push some more changes and the checks are run again. Otherwise, accepting the changes will mark the check as passed in our Pull Request, allowing the changes to be merged.
Adding Notes
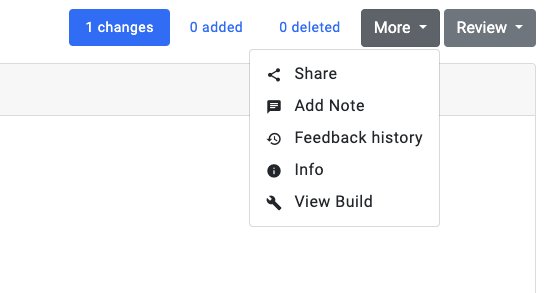
In scenarios where the changes need some feedback, we can utilise the notes functionality in Screenshotbot which can be accessed through the More menu on the changes dashboard.
After leaving a note, it will appear at the top of the changes dashboard which is incredibly visible to any viewers. If multiple comments are added, then these will appear stacked in the latest order.
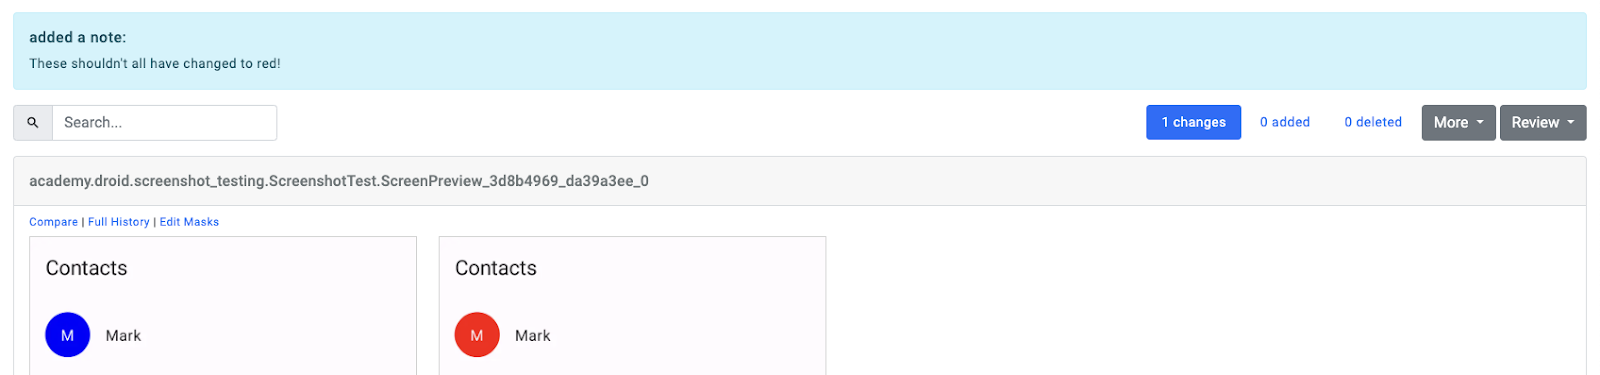
Notes are global for the changes in question. So if there are multiple comments, this will rely on the author making it clear what the comment applies to. Ideally, developers will create small PRs with focused changes, but this is going to be dependent on the workflows of the corresponding team. One nice addition here could be the ability to leave comments on specific parts of a change, as opposed to the comment being general to the overall change.
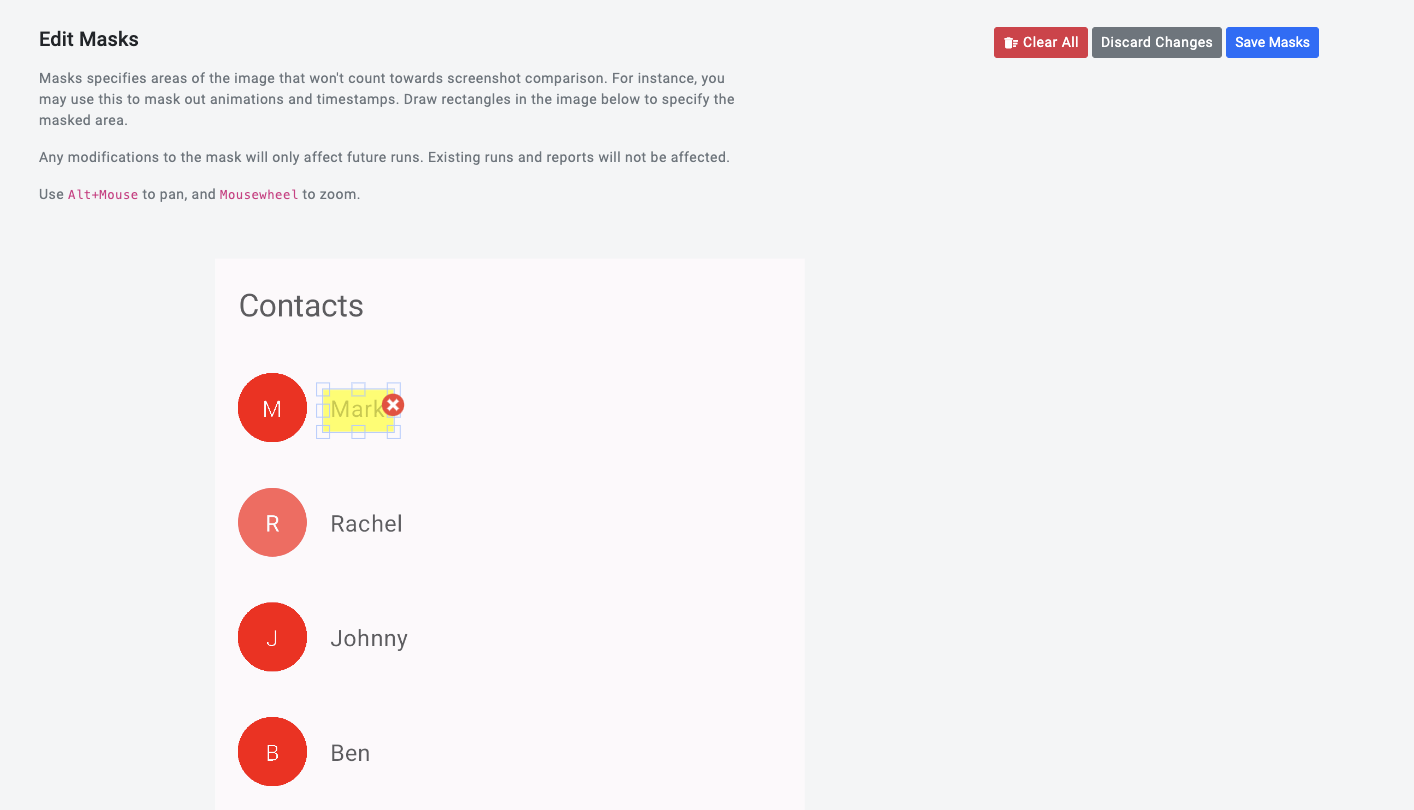
Masking Screenshots
In some cases, there may be parts of a screenshot that we want to ignore when verification is taking place. This is supported within Screenshotbot as Masks and allows us to highlight specific parts of screenshots that should not be counted towards comparisons. This could be useful in cases such as:
- Dynamic Content – such as timestamps, usernames or any kind of user-generated content. We can’t rely on this data always being the same between runs, so created masks help us to avoid flakey comparisons
- Animations – it’s likely that the state of any animations will differ between runs, meaning that comparisons will not be equal. In these cases, we can mask parts of our UI that are animated to avoid flakey results from animated content
To add masks we can use the Edit Masks link on the comparisons dashboard for your commit, which will take us to the masks management screen. Here we can draw rectangle areas on our screenshot to represent the areas that should be ignored during comparison. Once we are satisfied with our masks, we can hit Save Masks and these will be applied for any future comparisons.
Creating Jira Issues
When there are issues during verification, this work is going to need to be accounted for in planning and completed by developers. To make it easier for reviewers to create these tasks, Jira tickets can be created from Screenshotbot. We can select the Create Issue link on the comparisons dashboard for your commit, which will take us to the issue creation screen.
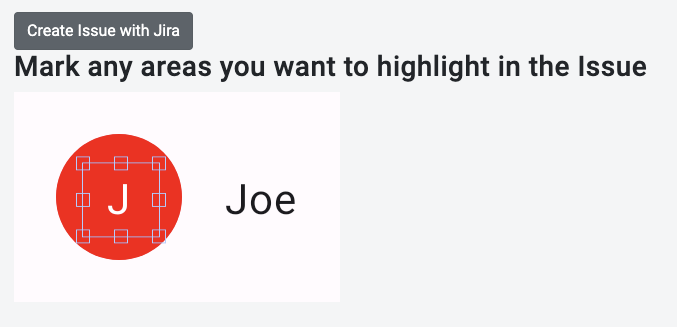
Here we can again use rectangles to select areas of the image, but this time the selection will be used to highlight within the created issue. This content will then be referenced when creating the ticket, allowing developers to have clarity on the issue and reduce friction when performing the fix.
Summary
Prior to my use of screenshot testing, I wasn’t aware of the friction that I would experience with the storing of screenshots and surfacing issues to reviewers within pull requests. However, tools such as Screenshotbot remove this friction and make me confident that more teams will be able to easily adopt screenshot testing into their workflows. The management aspect alone of Screenshotbot is enough to pull me into using the tool, with the extended functionality such as masking, issue creation and diffing functionality taking its offerings to the next level.
I would highly recommend Screenshotbot when evaluating the tooling for your testing infrastructure, and if you haven’t started screenshot testing yet for your product, at this point you’ll find it even easier to get started.